Whether you have used a template or cloned event or built your event from scratch, you can add questions at any time while the event is in draft status. You can add questions from the Perceptyx Question Library, add your own custom questions, and even add miscellaneous text. Once a question is added, you can move it to another page or another position on the current page. You can also delete any questions you don’t want to use.
This article walks through:
- Access the Questions Page
- Add Questions from the Perceptyx Question Library
- Add Custom Questions
- Add Miscellaneous Text
- Set Options for Unanswered Questions
- Delete Questions
- Expand and Collapse Question Details
- Apply Question Actions

Access the Questions Page
The Questions page is included with the other event pages in the Content phase of the Event Builder. If you used a template to create your event or cloned an existing event, the Questions page will already contain questions. If you built your event from scratch, the page will be empty.

Navigate to the Content phase for the event you want to work with.
From within the Event Builder:
Click Content in the left panel.
From Listen:
In the Live Events section or the All Events section, click Manage Event for the event you want to work with.
The Event Builder opens, displaying the Overview page.
In the left panel, click Content.
2. In the workspace, click the Questions tab.

Add Questions from the Perceptyx Question Library
Our Question Library enables you to select questions based on our best practices. All questions from the Question Library include Perceptyx benchmarks and are available in the Benchmark Report.
You can edit question text after you add the questions to the workspace. If you edit a question from the library, you will receive a warning message because changes to the question wording could negatively impact how results compare to the Perceptyx benchmark and may also affect translations.
For questions that use an agreement scale, you can add an N/A option and customize the label text to a more intuitive option, such as “Don’t Know” or “Not Sure.”
The Question Library contains questions in 36 categories.
Add a Question from the Question Library
In the workspace, click the Questions tab.
At the bottom of the page you want to add the question to, click Question Library.
The Question Library dialog box appears.

Question categories display on the left side and the questions for the selected category display on the right. You can use the Filter Categories box to filter the categories by specific key words or phrases. You can use the Search Questions box to search for a specific question by a key word or phrase. You can also click Export to Excel to export the entire Question Library to an Excel document.
Click a category.
Select the checkbox next to each question you want to add.
Select additional categories and questions, if appropriate.
Click Add Selected.
The questions are added to the survey.
Note: If you want to select all the questions in a category, click the Questions checkbox at the top of the question list to select all the questions at once.
Edit a Question from the Question Library
In the workspace, click the Questions tab.
Display the Actions dropdown next to the question you want to edit, then select Edit.
The Edit Question dialog box appears.
Edit the text in the Question Text box.
If you want to add a Not Applicable option, click Add Not Applicable (N/A).
If you want to customize the N/A option label, click the N/A option to display the Not Applicable Text box, enter your custom text, then click Save to the right of the text box.
Click Save at the bottom right of the dialog box.
A confirmation message displays with a warning that your changes may impact benchmarks and a reminder to update translations, if applicable.
Click Proceed.
The question updates in your event. The changes do not affect the question within the library.

Add Custom Questions
You can add your own custom questions to an event – even if you used a template to create the event. Keep in mind that custom questions are not tied to Perceptyx benchmarks.
You can add five types of questions:
Favorability
A closed-ended question type that lets respondents select a single answer option. The results for a Favorability question type are included in both the Favorability report and the Survey Results report. In the Favorability report, the user can run driver analysis per each scaled question.Single Selection
A closed-ended question type that lets respondents select a single answer from multiple options. The results for a Single Selection question type are included in the Survey Results report.Multiple Choice
A closed-ended question type that lets respondents select two or more answers from multiple options. You can set a response limit to restrict the number of options a respondent can select. The results for a Multiple Choice question type are included in the Survey Results report.Ranking
Asks respondents to compare items to each other by placing them in order of preference. An average ranking is calculated for each answer choice. The results for a Ranking question type are included in the Survey Results report.Comment
An open-ended question type that lets respondents provide written feedback. The results for a Comment question type are included in the Comments report.
Specify Question Setup Options
When you add a custom question, you specify the question text and an associated category. You can format the question text and even add a hyperlink, if applicable (for example, a link to an FAQ, an employee handbook, etc.). When respondents click the link in the listening event, it opens in a separate browser window.
In the workspace, click the Questions tab.
At the bottom of the page you want to add the question to, click New Question.
The New Question dialog box appears.
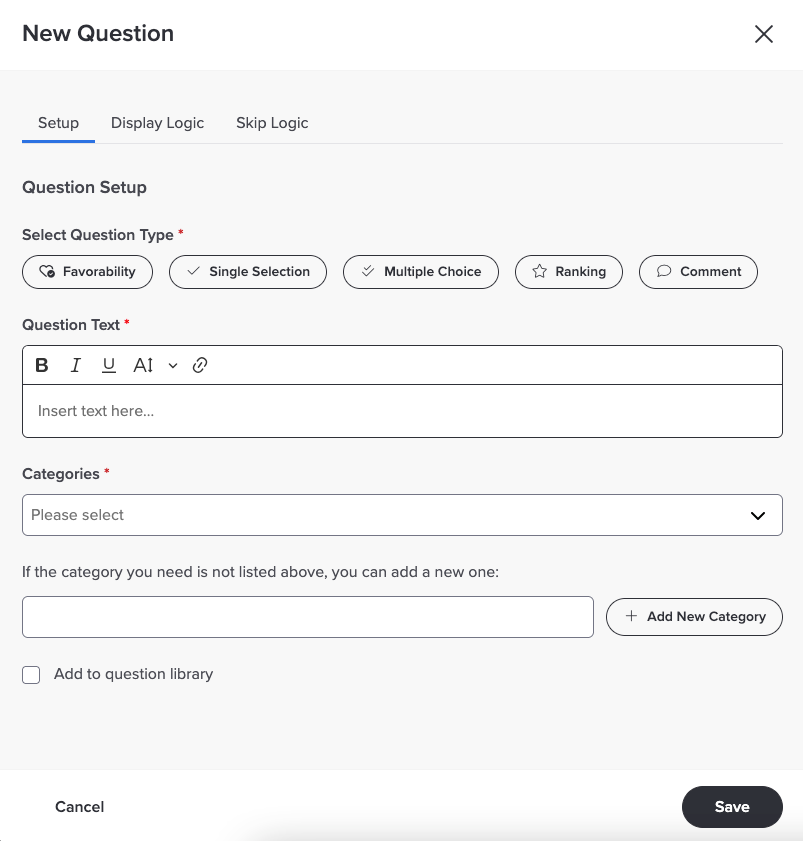
In the Question Setup section, select a Question Type (Favorability, Single Selection, Multiple Choice, Ranking, or Comment).
Click the Question Text box, then type your question text.
This text appears as the question in your event.
If you want to format the question text, use the options in the Question Text formatting toolbar to apply formatting.
If you want to add a hyperlink in the question text, select the text, click the link icon in the Question Text formatting toolbar, type the link URL in the pop-up that appears, then press Enter or click the checkmark icon.
Click the Categories dropdown, then select a category.
Note: If the category you need does not appear in the dropdown list, click the If the Category You Need… box, type a category name, then click + Add New Category.
If you want to add the question to the Question Library, select the Add to Question Library checkbox.
Specify Answer Setup Options
After you specify the question setup options, you specify the answer setup options. These options vary based on the question type. You can also specify the display type for the response options (radio button, checkbox, or pulldown) for all question types except the Comment type.
Note: If a question has more than eight response options, Pulldown is the only available display type. If the question type is Multiple Choice, the display type options are Checkbox or Pulldown.
The display type cannot be changed for questions used from the Perceptyx Question Library.
Favorability Question
For a Favorability question, you can use a predefined scale or create a custom scale.
To use a predefined scale:
Display the Scale Type dropdown, then select a scale type.
Leave the options ordered from most unfavorable (at the top) to most favorable (at the bottom).
If you want to include a Not Applicable response option, click Add Not Applicable (N/A).
To optionally customize the N/A label (e.g., Don’t Know, Not Sure, etc.):
Click the N/A option to display the Not Applicable Text box.
Select the current text, type your custom text, then click Save.
Display the Display Type dropdown, then select a display option for the question (radio or pulldown).
Click Save.
To use a custom scale:
Display the Scale Type dropdown, then select Custom Scale.
Click the Custom Scale Title box, then type a name for your custom scale.
Click the Enter New Value box, type the first response option, then press Enter.
Repeat the process for the remaining response options.
If you want to include a Not Applicable response option, click Add Not Applicable (N/A).
To optionally customize the N/A label (e.g., Don’t Know, Not Sure, etc.):
Click the N/A option to display the Not Applicable Text box.
Select the current text, type your custom text, then click Save.
Display the Display Type dropdown, then select a display option for the question (radio or pulldown).
Click Save.
Single Selection Question
For a Single Selection question, you can include an “Other” option that respondents can choose if none of the listed options apply. Selecting Other opens a small text field where they can type their own response. This text is stored along with their answer and follows the same required/optional rules as the question itself.
Click the Enter New Value box, type the first response option, then press Enter.
Repeat the process for the remaining response options.
If you want to include a Not Applicable response option, click Add Not Applicable (N/A).
To optionally customize the N/A label (e.g., Don’t Know, Not Sure, etc.):
Click the N/A option to display the Not Applicable Text box.
Select the current text, type your custom text, then click Save next to the box.
If you want to include an “Other” response, click Add “Other” Option.
To optionally customize the Other label:
Click the Other option to display the Other Text box.
Select the current text, type your custom text, then click Save next to the box.
Display the Display Type dropdown, then select a display option for the question (radio or pulldown).
Click Save.
Multiple Choice Question
For a Multiple Choice question, you can set a response limit (for example, choose the two most important items from a group of options).
Click the Enter New Value box, type the first response option, then press Enter.
Repeat the process for the remaining response options.
Click the Response Limit box, then type the maximum number of responses to be selected.
If you want to include a Not Applicable response option, click Add Not Applicable (N/A).
To optionally customize the N/A label (e.g., Don’t Know, Not Sure, etc.):
Click the N/A option to display the Not Applicable Text box.
Select the current text, type your custom text, then click Save.
If you want to include an “Other” response, click Add “Other” Option.
To optionally customize the Other label:
Click the Other option to display the Other Text box.
Select the current text, type your custom text, then click Save next to the box.
Display the Display Type dropdown, then select a display option for the question (checkbox or pulldown).
Click Save.
Ranking Question
For a Ranking question, you can set a response limit (for example, rank the top three most important items from a group of options).
Click the Enter New Value box, type the first response option, then press Enter.
Repeat the process for the remaining response options.
Click the Response Limit box, then type the maximum number of responses to be selected.
If you want to include a Not Applicable response option, click Add Not Applicable (N/A).
To optionally customize the N/A label (e.g., Don’t Know, Not Sure, etc.):
Click the N/A option to display the Not Applicable Text box.
Select the current text, type your custom text, then click Save.
Click Save.
Comment Question
For a Comment question, you can choose an open text format that best matches the type of input you need:
Short Answer: A short, one-line text field for brief answers or single words (default limit: 150 characters).
Paragraph Answer: A larger text box for longer explanations or general feedback (no default limit).
Word Cloud: A set of short text fields where respondents can enter multiple words or phrases (default 25 characters per entry, with 1–10 fields configurable).
Display the Display Type dropdown, then select the open text format you want to use (Paragraph Answer, Short Answer, or Word Cloud).
Specify the character/word limit based on your selection:
Paragraph Answer or Short Answer:
Select the default value in the Character Limit box, then type a new value.
Word Cloud:
Click the Min. # of Words box, then click the up or down arrow as needed to increase or decrease the minimum number of words for each word cloud entry.
Click the Max. # of Words box, then click the up or down arrow as needed to increase or decrease the maximum number of words for each word cloud entry (up to a maximum of 10).
Optionally, click the Character Limit per Field box, then click the up or down arrow as needed to increase or decrease the character limit for each word cloud entry. (For example, if you set a maximum of 5 words and a character limit of 30, all 5 words cannot exceed a total of 30 characters.)

Click Save.

Add Miscellaneous Text
You can add miscellaneous text to any page. You can use miscellaneous text to include details explaining specific questions or to link to resources like an FAQ or employee handbook. When respondents click a link in the listening event, it opens in a separate browser window.
Add Miscellaneous Text
In the workspace, click the Questions tab.
At the bottom of the page you want to add the text to, click Misc Text.
The New Misc Text dialog box appears.

Click the Misc Text box, then type your text.
If you want to format the text, use the options in the Misc Text formatting toolbar to apply formatting.
If you want to add a hyperlink in the text, select the text, click the link icon in the Misc Text formatting toolbar, type the link URL in the pop-up that appears, then press Enter or click the checkmark icon.
Click Save.
The text is saved as a question on the survey page.
Move the miscellaneous text above the question you want it to precede:
Click and hold the 6-dot symbol for the text, then drag it to the appropriate location.

Set Options for Unanswered Questions
To maximize the insights provided by your listening event, it’s important to encourage respondents to answer all questions. You can do this by making all questions required and displaying a prompt informing respondents that they cannot move forward if they leave a question unanswered.
If you don’t want to make questions required, you can still add a prompt to remind respondents if they’ve left any questions unanswered. This way, you can help make sure nothing gets missed accidentally.
The Should Participants be Prompted to Answer Questions section contains three options:
Not Required (No Prompt): None of the questions are required, and no prompt displays if respondents leave questions unanswered.
Not Required (With Prompt): None of the questions are required, but a prompt displays if respondents leave questions unanswered.
Required: All questions are required, and a prompt displays informing respondents that they cannot continue without answering all required questions. If you choose this option, you can set individual questions as not required.

In the workspace, click the Questions tab.
Click an option in the Should Participants be Prompted to Answer Questions section.
A confirmation message appears.
Click Yes, Continue.
If you chose the Required option but want to make a question not required, display the Actions dropdown for the question, then select Make Not Required. Repeat for other questions as applicable.
If you chose the Not Required (No Prompt) or Not Required (With Prompt) option, but want to make a question required, display the Actions dropdown for the question, then select Set as Required. Repeat for other questions as applicable.

Delete Questions
You can remove any questions you don’t want to use, whether they were included as part of a template or cloned event, added from the Perceptyx Question Library, or added as custom questions.
In the workspace, click the Questions tab.
Navigate to the page with the question you want to delete.
Display the Actions dropdown for the question you want to delete, then select Delete.
A confirmation message appears.
Click Delete.
The question is deleted.

Expand and Collapse Question Details
You can expand question details to see information about the question type and category.
In the workspace, click the Questions tab.
Navigate to the page with the question you want to view information for.
Below the page title click Expand Questions.
All the questions on the page expand to show their details.

Click Collapse Questions to collapse the question details.

Apply Question Actions
You can easily select questions and apply actions to them, including duplicating them, making them required, deleting them, or hiding/unhiding them from respondents.
Hiding or unhiding questions can be useful for ongoing or extended listening events for which you may need to include or exclude specific questions at different times. Hiding/unhiding lets you do so without having to recreate the event.
In the workspace, click the Questions tab.
Navigate to the page with the questions you want to work with.
Below the page name, click Select Questions.
The option changes to Question Actions.
Select the checkbox for one or more questions you want to apply an action to.
Click Question Actions and then select an option:
Duplicate: Make a copy of the question that you can modify as appropriate.
Make Required: The respondent must answer the question(s) to move forward in the event.
Delete: Deletes the selected question(s).
Hide: Hides the selected question(s) from respondents.
Unhide: Unhides the selected hidden question(s), making them visible to respondents.
Note: You can view hidden questions by expanding question details. You can also hide/unhide demographic questions and miscellaneous text. For more information see the Manage Your Live Listening Event | Point-In-Time & Lifecycle article.
Was this article helpful?
That’s Great!
Thank you for your feedback
Sorry! We couldn't be helpful
Thank you for your feedback
Feedback sent
We appreciate your effort and will try to fix the article