After building and testing your survey, you are ready to invite your participants to the survey. This process includes choosing the survey delivery method, adding participants, and creating and scheduling email notifications, if applicable.
This article walks through:
- Choose Your Delivery Method
- Add Your Participants: Email Unique Links
- Add Your Participants: Email Universal Link
- Add Your Participants: Create Universal Link

Choose Your Delivery Method
The delivery method determines how participants access the survey. The options available depend on whether your survey uses a PIN page (specified in the Build phase).
Navigate to the Invite phase for your survey.
From within the Program Builder:
Click Build in the progress bar.
From My Surveys:
Click the pencil icon for the survey.
Note: You can also click the gear icon and then select Edit Survey.
The survey opens in draft mode, displaying the Overview page.
Click Build in the progress bar.
2. Click Proceed to Invite.
The survey moves into the Invite phase and delivery methods appear.
Choose your delivery method.
If your survey uses a PIN Page (enabled during the Build phase), select from the following:
PIN Page Only
If you have participants without email addresses and will not be sending emails from Perceptyx.PIN and Email Unique Links
If you have some participants without email addresses and also want to send unique links via emails from Perceptyx. Participants can access the survey via link or PIN.

If your survey does not use a PIN Page, select from the following:
Email Unique Links
The survey is attributed, each participant receives their own unique URL, and demographics are pre-loaded.Email Universal Link
The survey is generic, each participant receives the same URL, and only self-select demographics (added in the Build phase) are included.Create Universal Link
The survey is generic, no emails are sent from Perceptyx, and only self-select demographics (added in the Build phase) are included.


Add Your Participants: Email Unique Links
This option sends an attributed survey/unique URL to all participants. Each participant’s demographics are tied to their responses, and they can submit the survey only once.
Note: If a participant forwards their invite to someone else, the recipient can potentially take the survey on their behalf.
Select how you wish to add participants and complete the instructions for each:
Bring Your Own List
Import your own data using a Perceptyx templateHRIS Data Available
Import HRIS data from an automated data feedCreate a Snapshot
Use the Manager Hierarchy feature to select participants
(* People Insights Platform users only)
Bring Your Own List (Data Import)
Click Email Unique Links.
Click Bring Your Own List.
The Data Import wizard appears. The wizard walks through the steps for downloading a Perceptyx template to populate with your data, uploading the completed template, mapping your data, and reviewing/resolving any potential errors.
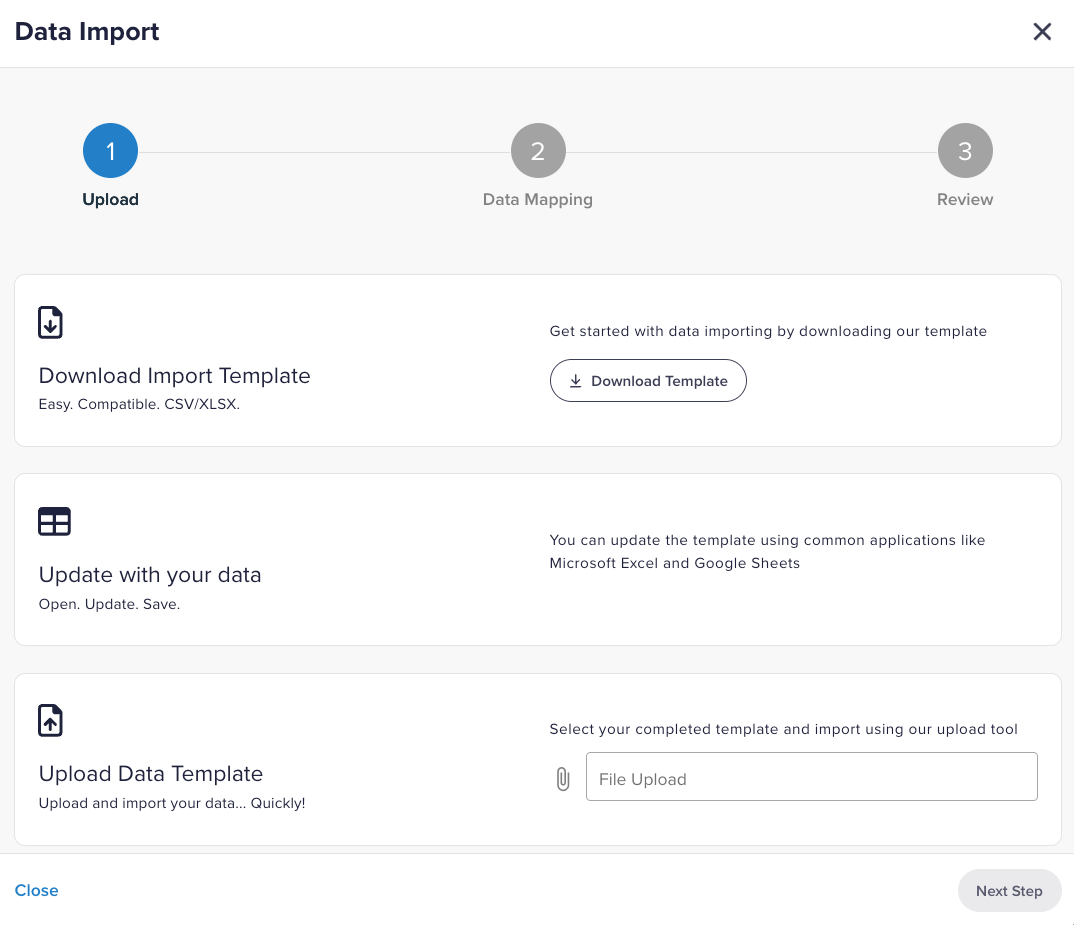
Click Download Template.
Navigate to the downloaded template, then open it with an application that supports csv or xlsx format.
Complete the template with your data and save your changes.
The first four fields in the provided template are required (Emp ID, Email, First Name, Last Name). Add in all demographic information in the remaining columns. Column names cannot include spaces (ex: country_name) and field entries cannot contain special characters (ex: ñ). The maximum number of columns is set to 20. If you need additional columns, contact your Product Manager or Customer Care.
Return to the wizard and click the File Upload box or the paper clip icon.
Navigate to the completed template, then double-click the filename.
When the Upload Complete message appears in the wizard, click Next Step.
The file is uploaded and the wizard displays data mapping options.

The first four fields are locked and the demographics from your completed template display below them, with the Demographic toggle turned on for all that do not personally identify the participant. If the toggle is turned on, the demographic is available in reports.
Note: If you turn the toggle off for a demographic it will not appear in reporting and cannot be turned on after the survey launches.
Confirm all the demographics you loaded with the template are listed.
If you want to change the name that appears for a demographic in reports, update the text in the Label field.
Note: If you change the label for a demographic, it cannot be modified after the survey is launched.
Click Next Step.
The system processes the data. If there are any errors, they display in the wizard highlighted in red.
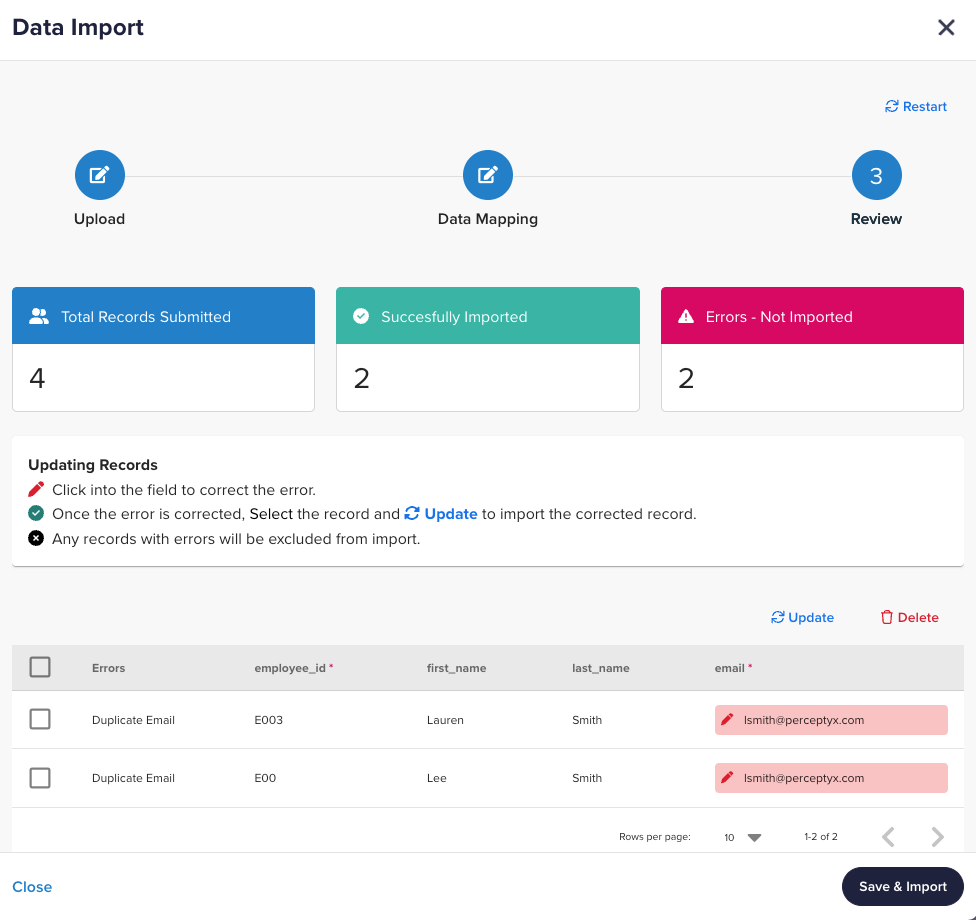
If any errors display, click the red error box, make your corrections, click Save, then click Update.
Note: Any records with errors will not be imported.
When all errors are corrected, the wizard displays a success message.
Click Save & Import.
A confirmation message appears.
Click Confirm.
The full list of invitees displays on screen, with all records selected.
If you want to narrow down the list of invitees:
Click the checkbox for any invitees you don’t want to include. You can use the Search box to search by name, email, or employee ID.
Apply a filter:
Click Filter (upper right).
The Add Filter dialog box appears.
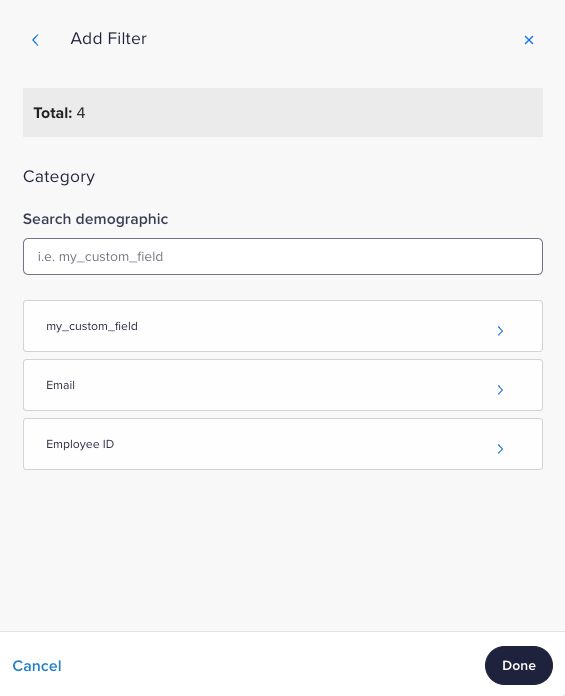
Type a specific demographic in the Search Demographic box, if necessary, to display it in the dialog box.
Click the blue arrow for the demographic you want to filter by.
The Include From (Demographic Name) dialog box appears.

Type or paste one or more values in the text box (one per line), then click Submit.
The filter is applied and only the records that match the values you specified appear in the invitee list.
Click Proceed to Launch.
HRIS Data Available
HRIS Data is available only if you have an automated data file set up with Perceptyx. If you are interested in setting up an automated data file please contact your Program Manager or Customer Success Manager.
Click Email Unique Links, then click HRIS Data Available.
The HRIS Data Import wizard appears. The wizard walks through the steps for importing your HRIS file, mapping your data, and reviewing/resolving any potential errors.
Review the Feed Load date to confirm the last file Perceptyx received and loaded, then click Start Import.
A Preparation Complete message displays in the wizard.
Click Next Step.
The demographic fields from your data file are listed in the wizard with the Demographic toggle turned on for all that do not personally identify the participant. If the toggle is turned on, the demographic is available in reports.
Note: If you turn the toggle off for a demographic it will not appear in reporting and cannot be turned on after the survey launches.
If you want to change the name that appears for a demographic in reports, update the text in the Label field.
Note: If you change the label for a demographic, it cannot be modified after the survey is launched.
Click Next Step.
The system processes the data. If there are any errors, they display in the wizard highlighted in red.
If any errors display, click the red error box, make your corrections, click Save, then click Update.
Note: Any records with errors will not be imported.
When all errors are corrected, the wizard displays a success message.
Click Save & Import.
A confirmation message appears.
Click Confirm.
The full list of invitees displays on screen, with all records selected.
If you want to invite the entire population of your file, click +Select All, then click Proceed to Launch.
If you want to narrow down the list of invitees:
Click +Select All, then deselect the checkbox for any invitees you don’t want to include. You can use the Search box to search by name, email, or employee ID.
Apply a filter:
Click Filter (upper right).
The Add Filter dialog box appears.
Type a specific demographic in the Search Demographic box, if necessary, to display it in the dialog box.
Click the blue arrow for the demographic you want to filter by.
The Include From (Demographic Name) dialog box appears.
Select the applicable options for the demographic, then click Apply.
Note: If you choose Email or Employee ID from the demographic list, you can paste in a list of values to search for participants.
The filter is applied and only the records that match the values you specified appear in the invitee list.
Click +Select Filtered, then click Proceed to Launch.
Create a Snapshot (Manager Hierarchy)
Manager Hierarchy is a feature that, among other things, enables Admin and Creator users to include the organizational hierarchy during the survey setup process and use it to invite participants to a survey.
Note: This option is only available to customers on the People Insights Platform, with an automated data file aligned to Perceptyx data specifications, and the feature is enabled.
You use the Snapshot screen to invite participants using Manager Hierarchy. The Snapshot screen is available in two views: List View and Hierarchy View. Both views provide access to the same information, just in different ways. You can toggle back and forth between the views and use whichever one you prefer.
Invite Participants
Using List View:
On the Add Your Invitees page, click Create a Snapshot.
The Snapshot screen displays in List View.
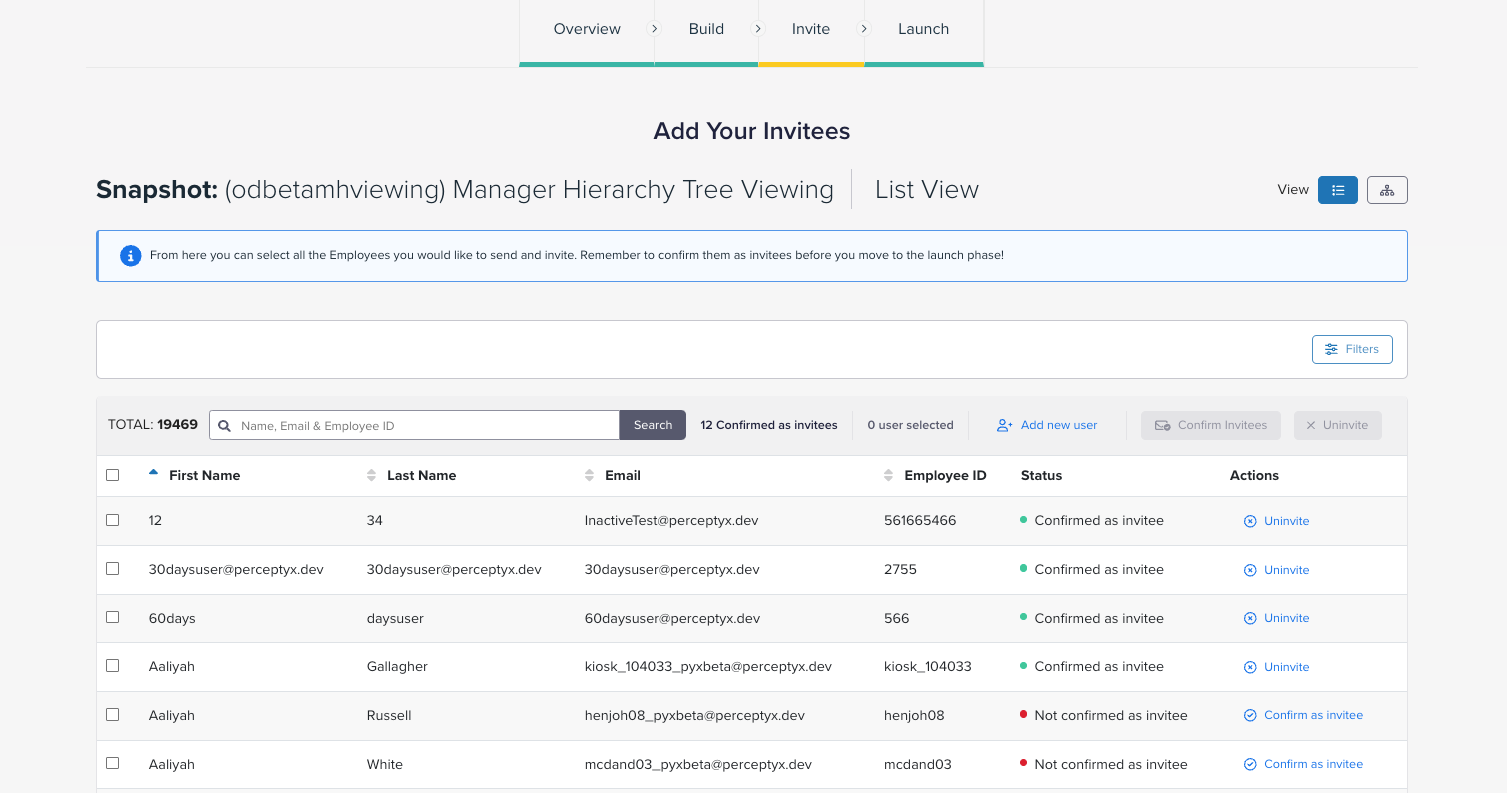
In List View, information for each employee in the hierarchy displays as a record in a table.
Use the search or filtering option to display the employee(s) you want to work with:
Search
Type a name, email address, or employee ID in the Search box, then click Search.Filters
Click Filters (upper right), select from the list of pre-populated demographic options, type a value, then click Apply.
Note: To specify multiple filters, click Apply & Add Another instead of Apply, choose another filter and specify your options, and repeat as needed. When you specify your options for the final filter, click Apply.
Note: Each filter you apply displays in the Filters bar. You can remove a filter by clicking X next to its name.
Confirm the employee(s) as an invitee:
For an individual employee:
Click Confirm as Invitee to the right of the employee’s information (in the Actions column).For multiple employees:
Select the checkbox for each employee, then click Confirm Invitees (top right).For all employees displayed on the screen:
Select the checkbox in the header row of the table, then click Confirm Invitees (top right). Note that if your invitee list spans more than one screen, only the employees you see on the first screen are selected.For all employees in the invitee list:
Select the checkbox in the header row of the table, click Select all xxxx employees for this table, then click Confirm Invitees (top right).
The Snapshot screen refreshes, and the record(s) for the selected employee(s) display a confirmed as invitee status.
Using Hierarchy View:
On the Add Your Invitees page, click Create a Snapshot.
The Snapshot screen displays in List View.
Click Hierarchy View (top right).
The screen displays in Tree View.

In Hierarchy View, you can click through the branches of the organizational hierarchy to select groups or individuals and invite them to the survey. As you click, each branch of the hierarchy displays as a card that shows the employees in the branch and their invitation status. Icons for each employee allow you to move them to another part of the hierarchy, confirm them as an invitee, or confirm a manager and their entire team as invitees.
Click through the hierarchy tree to display the employee(s) you want to invite:
Click the CEO branch to start expanding the tree view.
Click additional branches to navigate to the hierarchy segment or individual employee you want to invite.
Note: If an employee is a manager with direct reports, an Is a Manager icon displays to the right of their name.
Confirm the employee(s) as an invitee:
For an individual employee:
Navigate to the individual employee in the hierarchy, then click the Confirm as Invitee icon.For a manager and their team:
Navigate to the manager in the hierarchy, then click the Confirm (Manager) and Their Team as Invitees icon (bottom right).
The Snapshot screen refreshes, and the Invitation Status icon changes from Uninvited (with a red dot) to Invited (with a green dot).
Uninvite Employees
On the Add Your Invitees page, click Create a Snapshot.
Display the Snapshot screen in List View or Hierarchy View.
Display the employee(s) you want to work with.
Click Uninvite.

Add Your Participants: Email Universal Link
The Email Universal Link option enables you to send a universal link to the participants via the survey system. You can populate a provided template and send email invitations to the participants in your data file. You cannot load demographics when using this option. Demographic reporting is available only if you add self-select demographics to your survey during the Build phase.
Click Email Universal Link.
Options for downloading and uploading the Perceptyx template.
Click Download Template.
Navigate to the downloaded template, then open it with an application that supports csv or xlsx format.
Complete the template with your data for the Email, First Name, and Last Name fields and save your changes.
Return to the Invite screen, click the File Upload box or the paper clip icon, navigate to the completed template, then double-click the filename.
The file uploads.
Click the checkbox at the top of the page to select all invitees, then click Proceed to Launch.
The Survey Details page appears, containing an option to generate and download a QR code.
Click Generate to generate the QR code, then click Download to download the QR code.
You can print the QR code to make it available for participants to scan with their mobile devices or you can send the code via SMS (text).
Note: After you change the survey status to Live, the system will generate the universal URL for accessing the survey. You can then set up your email template(s) and send invitation emails with the link to participants.

Add Your Participants: Create Universal Link
This option creates a universal link for you to share internally. No Perceptyx email communications are sent. You cannot load demographics when using this option. Demographic reporting is available only if you add self-select demographics to your survey during the Build phase.
Click Create Universal Link.
The Survey Details page appears, containing a universal URL you can copy and the means to generate and download a QR code.
To copy the URL, click Copy.
Note: The URL is not live until you launch the survey.
Click Generate to generate the QR code, then click Download to download the QR code.
Click Launch Survey.
Was this article helpful?
That’s Great!
Thank you for your feedback
Sorry! We couldn't be helpful
Thank you for your feedback
Feedback sent
We appreciate your effort and will try to fix the article