Listen
Your event is built and tested. Now you decide how people get to it, who gets invited, and how those invitations go out.
The Invite phase is where you pick a delivery method, load or select your participants, and hand off to the Communications phase to write the emails. What you see in this phase depends on two things: whether your event is Point-In-Time or Lifecycle, and whether your event uses a PIN page. This article covers both event types.
This article walks through
- Choose your delivery method
- Add participants: unique links for each respondent
- Add participants: email an anonymous link
- Add participants: distribute an anonymous link yourself
- Add participants to a Lifecycle event
- Test your sensors before you launch
- Let people take a Lifecycle event more than once
- Enable Real-Time Survey Eligibility
Choose your delivery method
Note: This section is for Point-In-Time events. Lifecycle events work differently, and they are covered in Add participants to a Lifecycle event.
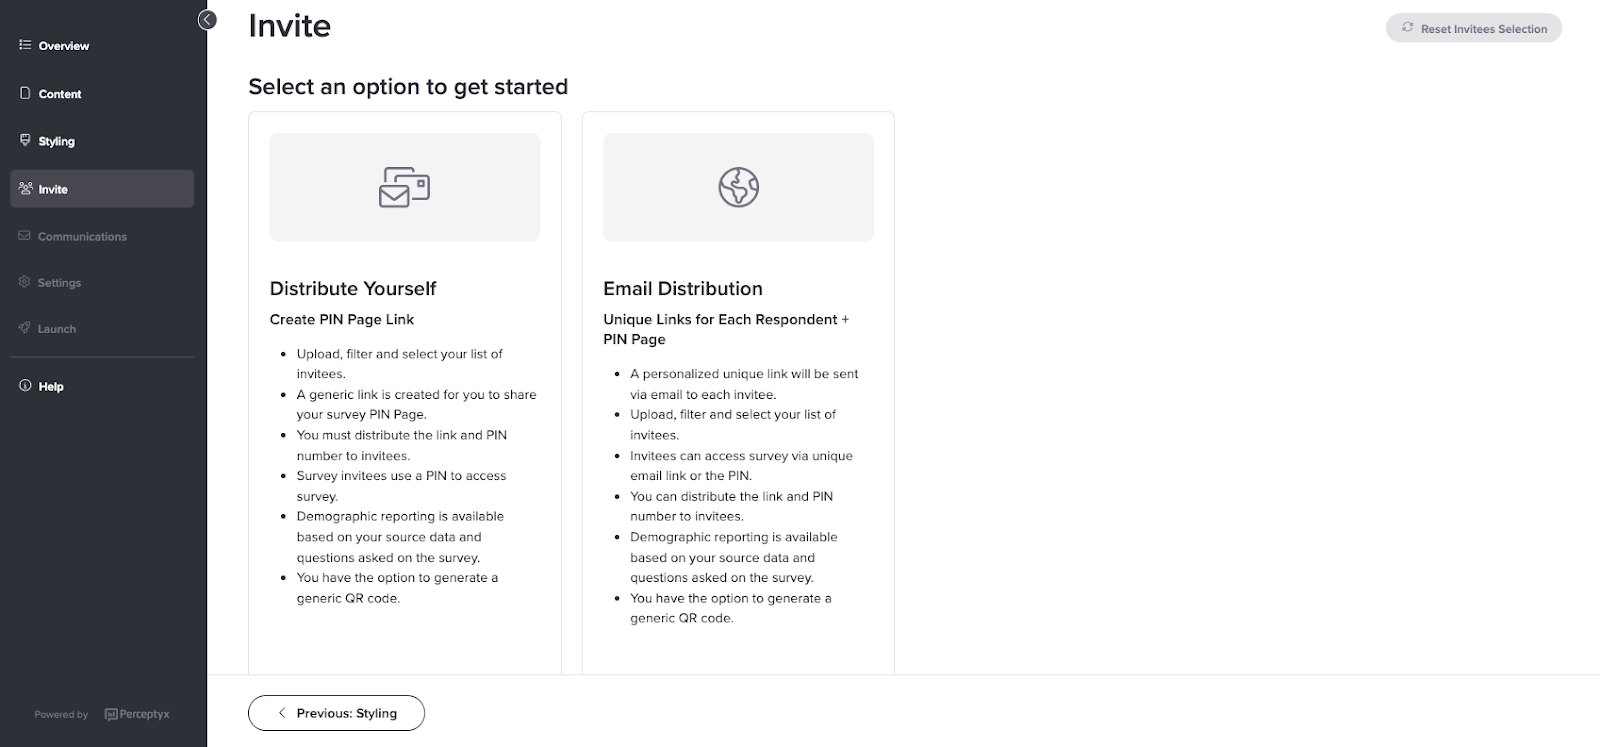
Navigate to the Invite phase for your listening event. The delivery options you see depend on whether you turned on the PIN page back in the Content phase. A PIN page is a page where participants type in a personal identification number to get into the event, which is handy for people who do not have a work email address or a company sign-in.

If your event uses a PIN page
Distribute Yourself - Create PIN Page Link You get a link to the PIN page, and you send the link and the personal identification number out yourself. You can upload, filter, and select your list of invitees, and you can generate a scannable QR code for the PIN page. |
Email Distribution - Unique Link for Each Respondent + PIN Page Everyone gets their own link by email, and the PIN page stays available as a second way in. You can upload, filter, and select your list of invitees, or pick them from your manager hierarchy if that feature is turned on. |
Note: Decide about the PIN page early, in the Content phase. If you turn the PIN page on after you have already uploaded a participant file, that file is removed and you have to upload it again.
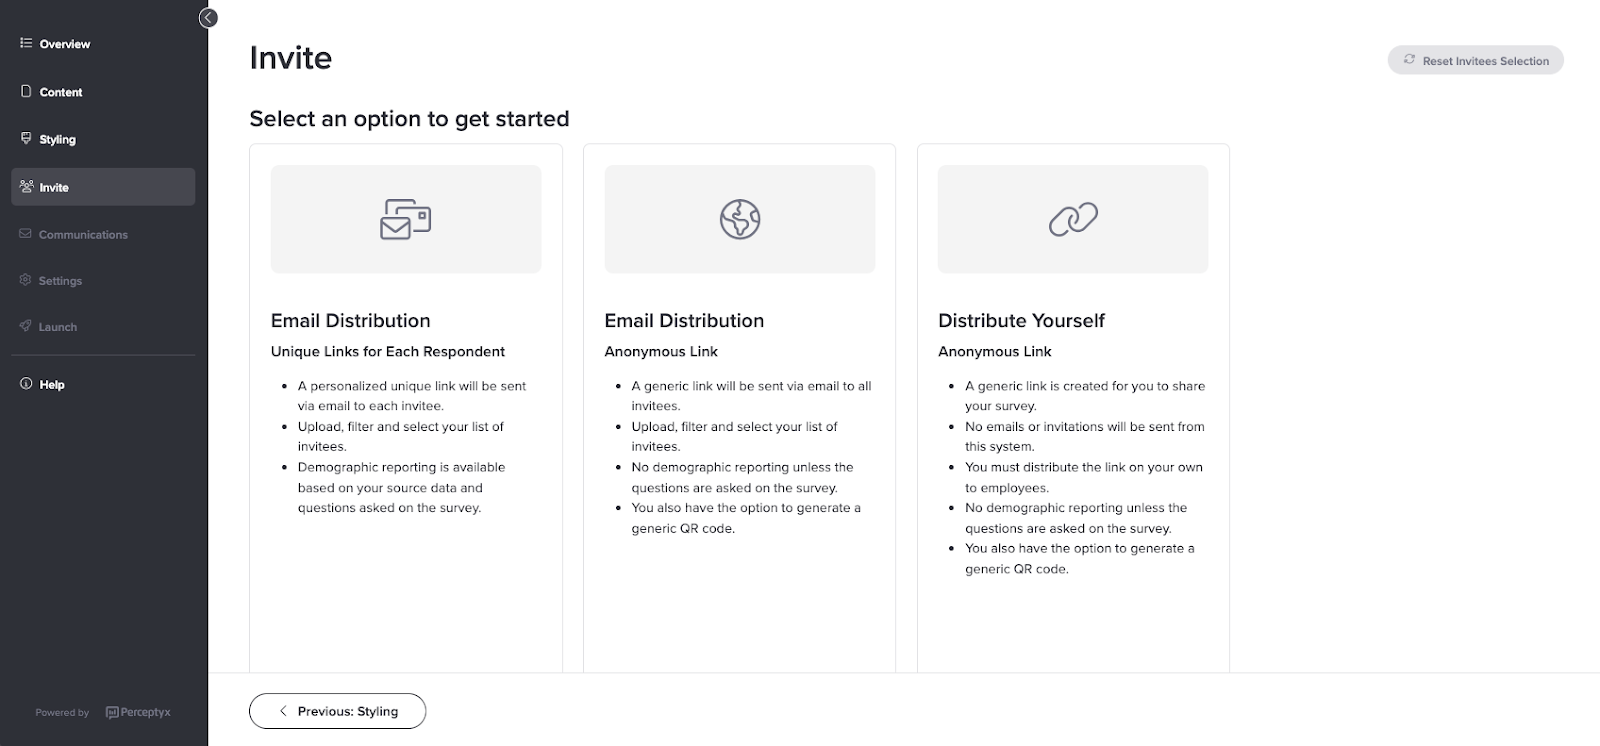
If your event does not use a PIN page
Email Distribution - Unique Links for Each Respondent Everyone gets their own link, either a plain unique link or a single sign-on link, sent by email or handed out by you. The event is attributed, which means each response is tied to the person who gave it, and their demographics come from your source data plus any demographic questions you asked inside the event. |
Email Distribution - Anonymous Link One shared link goes out by email to everyone on your list. The event is generic, so responses are not tied to individuals, and the only demographics you get are the ones people pick for themselves in questions you added during the Content phase. |
Distribute Yourself - Anonymous Link Same shared link, except Perceptyx sends nothing. You put the link wherever you want it. Again, responses are not tied to individuals, and demographics come only from self-select questions you added during the Content phase. |
Attributed or anonymous
Whichever route you take, the underlying choice is whether responses are tied to individuals.
With unique links, each response is attributed. Results can be filtered by any demographic you load, and you can see who has responded and remind the people who have not. Setting up means loading a participant list and mapping demographics.
With anonymous links, responses are not attributed. There is no participant data to load and nothing in the results connects a response back to a person. Demographic reporting comes from self-select questions you add during the Content phase.
Both are fully supported. What usually decides it is the confidentiality expectations you have set with participants, whether you need to track response rates, and how much demographic detail your reporting calls for.
Add participants: unique links for each respondent
This option sends every participant their own link. Their demographics are tied to their responses, and they can complete the event only once.
Note: If you are not using single sign-on and someone forwards their invitation to another person, that person can take the event in their name. Single sign-on closes that gap, because the link only works for the person it belongs to.
There are two ways to get your people into the event, and which ones you see depends on your setup.
Bring Your Own List You fill in a Perceptyx template with your people and their demographics, then upload it. Available to everyone. |
HRIS Data Available Perceptyx already has your people, from an automated feed out of your human resources system. Nothing to upload. This option appears only if that feed is set up. |
Note: These two options work exactly the same way if you chose one of the PIN page methods instead. The only difference is that a PIN page address gets generated when you make the event active.
Bring Your Own List
- Navigate to the Invite phase for your listening event.
- Click Select below Email Distribution - Unique Links for Each Respondent.
- Click Select below Bring Your Own List.
The Data Import wizard opens. It walks you through downloading a template, filling it in, uploading it, mapping your data, and clearing up any errors.

- Click Download Template.
- Open the downloaded template in any application that handles .csv or .xlsx files.
- Fill in your data and save the file.
Filling in the template
- The first four columns are required: employee_id, email, first_name, and last_name. Leave those column names exactly as they come in the template, all lowercase.
- Everything after those four columns is demographic data, and it is up to you. Add whatever you want to be able to filter results by.
- Column names cannot contain spaces. Use country_name rather than country name.
- Values cannot contain special characters such as ñ.
- You get 20 columns in total. If you need more, talk to your project manager or Customer Care.
- Back in the wizard, click the File Upload box or the paper clip icon under Upload Data Template.
- Find your completed template and double-click the file name.
- When the Upload Complete message appears, click Next Step.
The wizard shows your data mapping options.

The four required fields are locked, and your demographic columns are listed underneath. Each one has a Demographic toggle, and it is switched on for every column that does not personally identify a participant. On means the demographic is available in reports.
Note: These two choices are permanent once the event launches. A demographic you toggle off cannot be turned back on, and a label you change cannot be changed again. Worth a careful look now.
- Check that every demographic you loaded is in the list.
- To change the name a demographic goes by in reports, edit the text in its Label field.
- Click Next Step.
The system processes your data. Any errors appear in the wizard highlighted in red.

- If there are errors, click the red error box, make your corrections, click Save, then click Update.
Records with errors are skipped, so anything you do not fix here does not get imported. When everything is clean, the wizard shows a success message. - Click Save & Import, then click Confirm.
Your full list of invitees appears with every record selected.
Narrow down who gets invited
If you want everyone on the list, skip ahead and click Next: Communications. Otherwise you have two ways to trim it.
Clear people individually. Click the checkbox for anyone you do not want to include. The Search box finds people by name, email, or employee identifier.
Or apply a filter:
- Click Filter.
The Add Filter dialog box appears.

- If you have a lot of demographics, type one into the Search Demographic box to find it.
- Click the arrow for the demographic you want to filter by.
The Include From dialog box appears for that demographic.

- Type or paste one or more values into the text box, one per line, then click Submit.
The matching records appear in the dialog box. - Click Continue, then click Done.
Only the records that match your values are left in the invitee list. - Click Next: Communications.
Note: To get your full list back, click Filter and then Clear Filters.
HRIS Data Available
This option shows up only if you have an automated data file set up with Perceptyx, where your human resources system sends us your employee data on a schedule. If you would like to set one up, talk to your project manager while a project is running, or Customer Care once it has wrapped.
- Navigate to the Invite phase for your listening event.
- Click Select below Email Distribution - Unique Links for Each Respondent.
- Click Select below HRIS Data Available.
The HRIS Import wizard opens. - Check the Feed Load date. That is the last file Perceptyx received and loaded, so it tells you how current the data behind your invitee list is. Then click Start Import.
A Preparation Complete message appears. - Click Next Step.
Your demographic fields are listed, with the Demographic toggle on for everything that does not personally identify a participant. On means the demographic is available in reports.
Note: Both of these choices lock when the event launches. A demographic you toggle off cannot be turned back on, and a label you change cannot be changed again.
Controlling which demographics reporting users can filter by
The toggles here decide what comes into the event in the first place. To go a step further and control which of those demographics a reporting user can actually filter by, set it on the reporting group they belong to. Each reporting group has its own Demographics tab, so you can give one group the full set and another group only a few. That's a common way to hold back sensitive demographics like age or tenure while still keeping them in the data.
Demographics are off by default for any new reporting group, so turn on only the ones each group needs. For the steps, see Configure Event Settings | Point-In-Time & Lifecycle.
- To change the name a demographic goes by in reports, edit the text in its Label field.
- Click Next Step.
The system processes your data. Any errors appear highlighted in red. - If there are errors, click the red error box, make your corrections, click Save, then click Update.
Records with errors are not imported. When everything is clean, the wizard shows a success message. - Click Save & Import, then click Confirm.
Your full list of invitees appears.
Choose your invitees
To invite everyone in the file, click +Select All, then Next: Communications.
To invite some of them, either click +Select All and then clear the checkbox for anyone you want to leave out, or filter the list:
- Click Filter.
- If you have a lot of demographics, type one into the Search Demographic box to find it.
- Click the arrow for the demographic you want to filter by.
- Select the values you want, then click Apply.
If you pick Email or Employee ID from the list, you can paste in a whole set of values instead of selecting them one at a time. - Click Continue, then click Done.
- Click +Select Filtered, then click Next: Communications.
Add participants: email an anonymous link
With this option, Perceptyx emails one shared link to everyone on your list. You still build the email in the platform and still control who receives it, but responses are not tied to individuals, so you cannot load demographic data. The only way to filter results is with self-select demographic questions you added during the Content phase.
- Navigate to the Invite phase for your listening event.
- Click Select below Email Distribution - Anonymous Link.
Options for downloading and uploading the Perceptyx template appear. - Click Download Template, then open it in any application that handles .csv or .xlsx files.
- Fill in the Email, First Name, and Last Name columns and save the file.
That is all this template takes. There is nowhere to put demographics, because none are collected. - Back on the Invite screen, click the File Upload box or the paper clip icon, find your file, and double-click the file name.
- Click the checkbox at the top of the page to select everyone, then click Next: Communications.
Generate a QR code
- Navigate to the Launch page.
- Select Generate under Generate QR code.
- Click Download.
Print it and people can scan it with a phone, which is useful for anyone who does not sit at a desk.
Note: The shared link is not generated until you set the event status to Active. Once it exists, you can send your invitation emails with the link in them.

Add participants: distribute an anonymous link yourself
This one gives you a shared link and gets out of the way. Perceptyx sends no emails, so there is no participant list to upload at all. You put the link in a newsletter, on a poster, in a team channel, wherever it needs to go. Responses are not tied to individuals, and demographics come only from self-select questions you added during the Content phase.
- Navigate to the Invite phase for your listening event.
- Click Select below Distribute Yourself.
The Settings page appears. - Turn on any settings you want for the event, then click Next: Launch.
- Click Copy URL to copy the event address, or click Generate and then Download for a QR code.
- Click Make Event Active.
Note: You can copy the address before you launch, but it does not go anywhere until the event is active. Send it out early and people will hit a dead end, so hold off until you have clicked Make Event Active.

Add participants to a Lifecycle event
Lifecycle events are always on, so there is no participant list to upload. Instead you set up sensors: rules that watch your employee data and send an invitation when somebody meets them, such as thirty days after their hire date or two weeks before they leave. That is why Lifecycle events need an automated data feed. Without one, there is nothing for the sensors to watch.
What you do next depends on the PIN page. If your event uses one, you choose a delivery method and then configure sensors. If it does not, you go straight to sensors.
Choose a delivery method (PIN page events only)
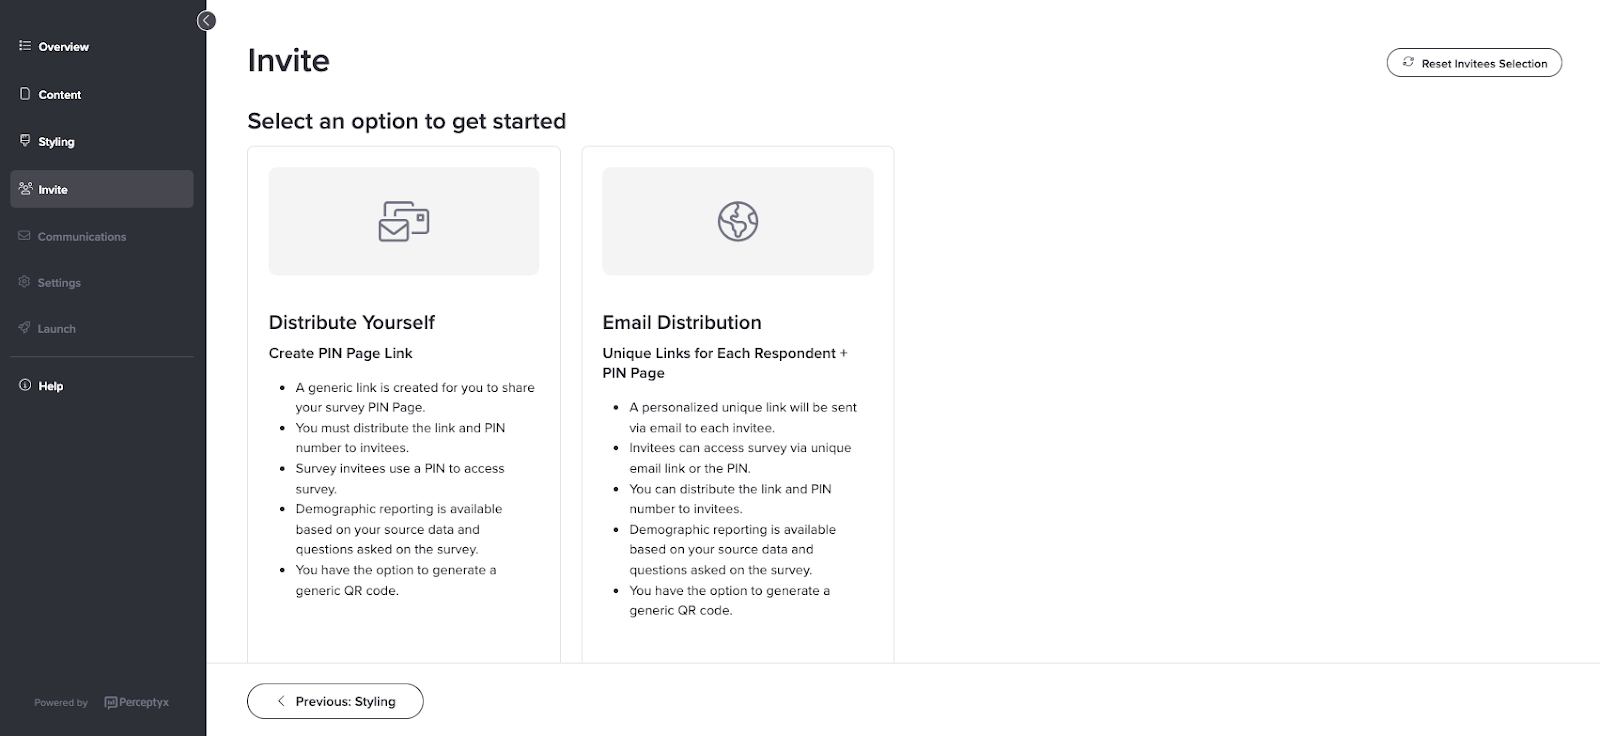
If your Lifecycle event uses a PIN page, the Invite phase shows you delivery options first, much like a Point-In-Time event.
Distribute Yourself - Create PIN Page Link You get a shared link to the PIN page and hand it out along with the personal identification number. A QR code is available too. |
Email Distribution - Unique Link for Each Respondent + PIN Page Each participant gets their own link by email, and the PIN page stays available as a second route in, through a shared link or a QR code. |
Why a PIN page helps on Lifecycle events
It gets you around two common problems.
- Deskless workers can reach an attributed event through a shared link, without needing single sign-on or a company email address.
- People on their way out can still complete an exit event after their work email has been switched off.
- Navigate to the Invite phase for your listening event.
- Click Select below the option you want.
Sensor configuration options appear.
Configure sensors
A sensor is made of two parts.
Condition The date in your employee data to watch, such as Hire Date or Term Date, meaning termination date. Conditions are always date-based demographics. |
Qualifier The timing rule applied to that date. Thirty days after it, fifteen days before it, once a year on it. |
As your data feed updates, the platform checks your conditions and sends invitations to anyone who now meets them.
The three qualifiers
Equal to Usually used for onboarding events. It sends the invitation when a date is exactly so many days in the past. Say you set it to 30. Today happens to be exactly thirty days after your hire date, so today is the day you get the invitation. Options: equal to 30 days ago, 60 days ago, 90 days ago, or a number you type in. |
Approaching within Usually used for exit events. It sends the invitation when a date is coming up within so many days. Say someone gives two weeks notice on March 1 and their last day is March 14. Someone in human resources enters March 14 as their termination date that afternoon. With the qualifier set to approaching within 15 days, they get their invitation straight away, because March 14 falls inside that window. Options: approaching within 15 days, or a number you type in. |
Annually Used for anniversary events. It sends the invitation on the same date every year, normally a hire date or a start date. If your hire date is September 1, you get an invitation every September 1. This one has a catch. Annually needs the Resurvey Employees setting turned on, and once that is on it cannot be turned off. That is what lets somebody take the same event again next year as a new respondent. See Let people take a Lifecycle event more than once. |
Set up a sensor
- Navigate to the Invite phase for your listening event.
- If your event has a PIN page, click Select below the delivery method you want. If it does not, skip this step.
The Invite page updates to show sensor configuration options.
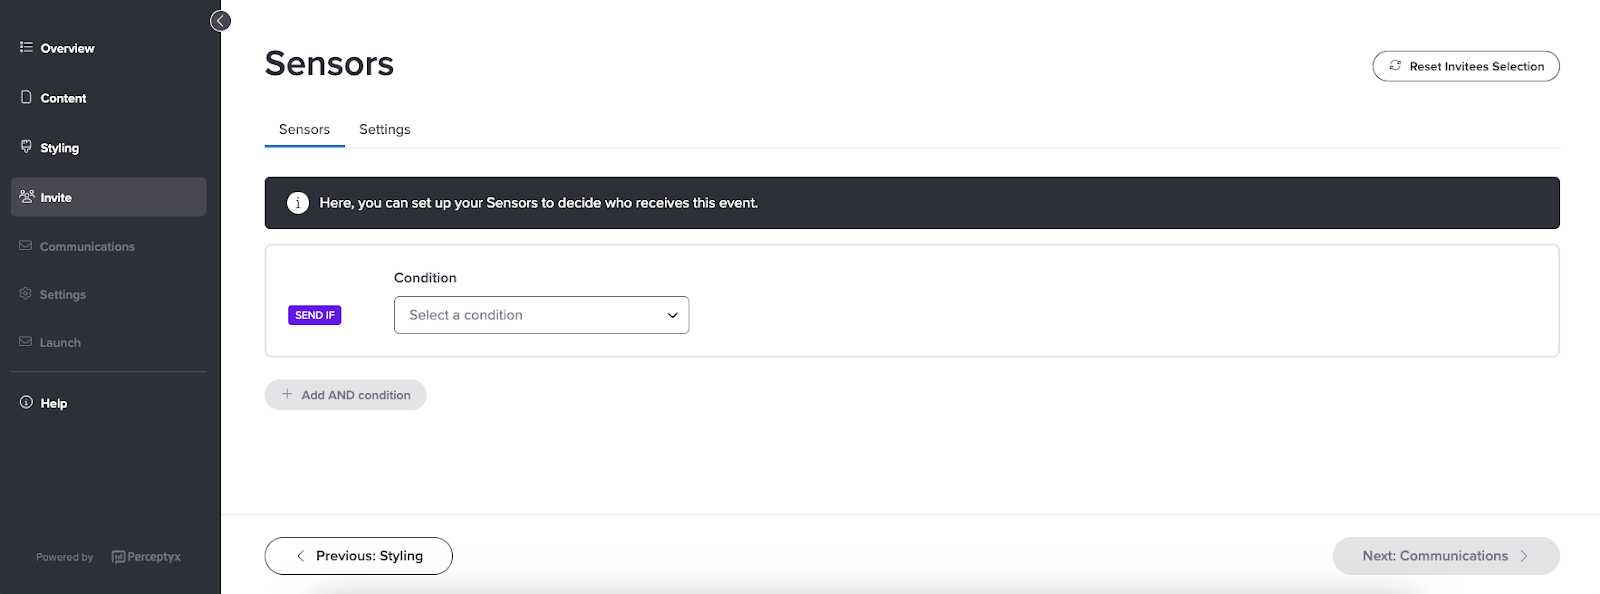
- Open the Condition dropdown and pick a date field.
Qualifier fields appear.
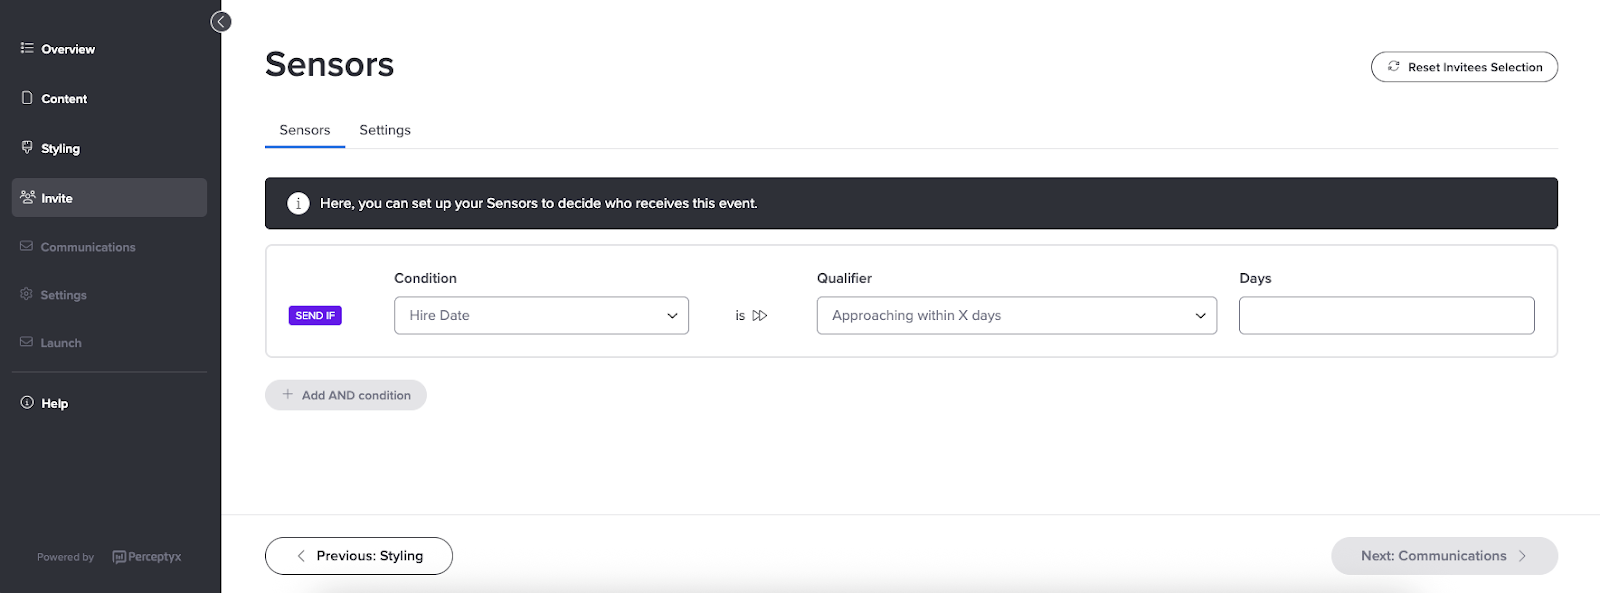
- Open the Qualifier dropdown, pick an option, and type a number in the Days box if one is needed.
Some qualifiers already have a number built in, in which case there is nothing to fill in. - To narrow things further, click +And and set up another condition the same way.
Conditions stack, so adding one makes the sensor stricter rather than broader. Two conditions means somebody has to meet both.
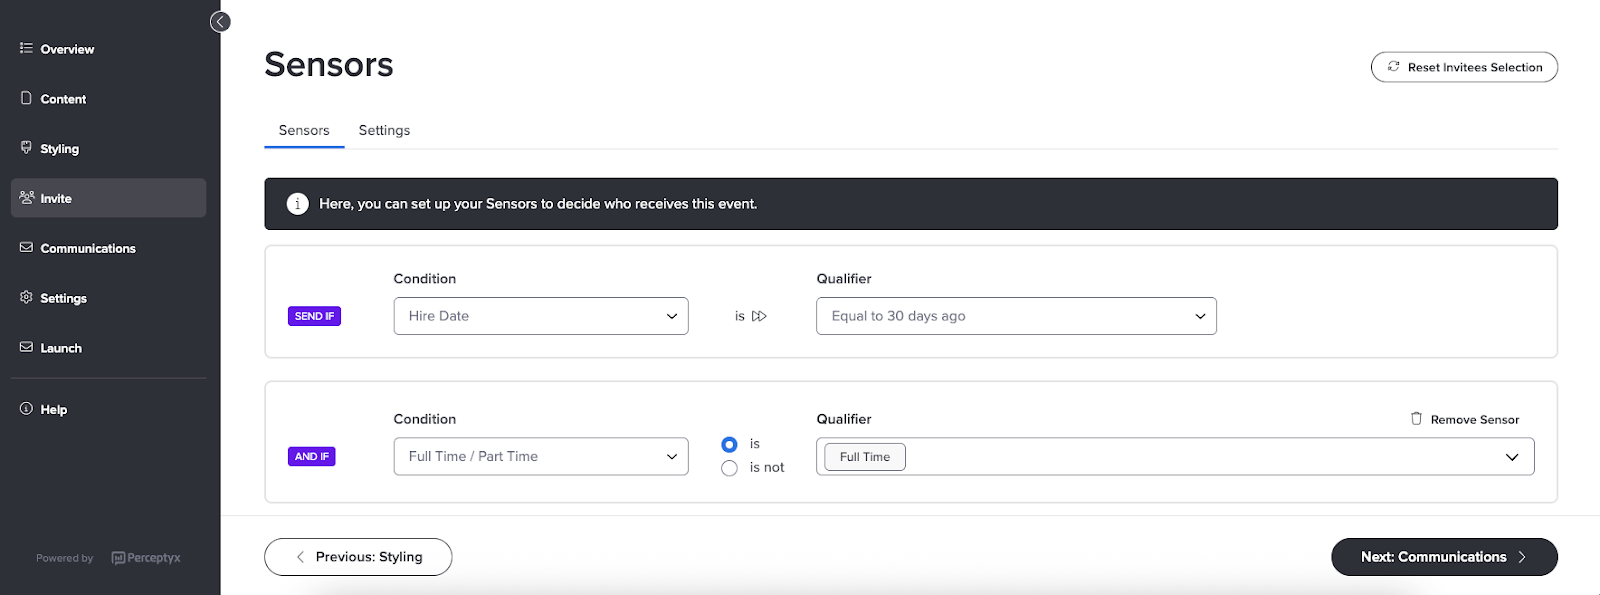
In the example above, invitations go to full-time employees thirty days after their hire date.
- Add any other conditions you need, then click Next: Communications.
Test your sensors before you launch
A sensor that is slightly wrong is hard to spot by reading it, and easy to spot by looking at who it catches. Testing shows you exactly that. Tests use your real data feed, and they never send anything or change anyone's eligibility, so there is no risk in running one.
Live Test Shows who would be invited if the event ran right now, on your current sensor setup and your latest data. Use it to confirm your sensor is catching the people you expect before you launch. |
Set Date Shows who would qualify if it were a different date. Same data, different day. This is the one you want when nobody qualifies today, which is common with a brand new sensor. If your sensor fires thirty days after a hire date and nobody hits that mark today, pick a date a few weeks out and check the right people show up. |
- In the Invite phase, open the Sensors tab.
- Click Test Sensors.
- Open the Live Test or Set Date tab. If you chose Set Date, pick the date you want to simulate.
- Click Run Test.
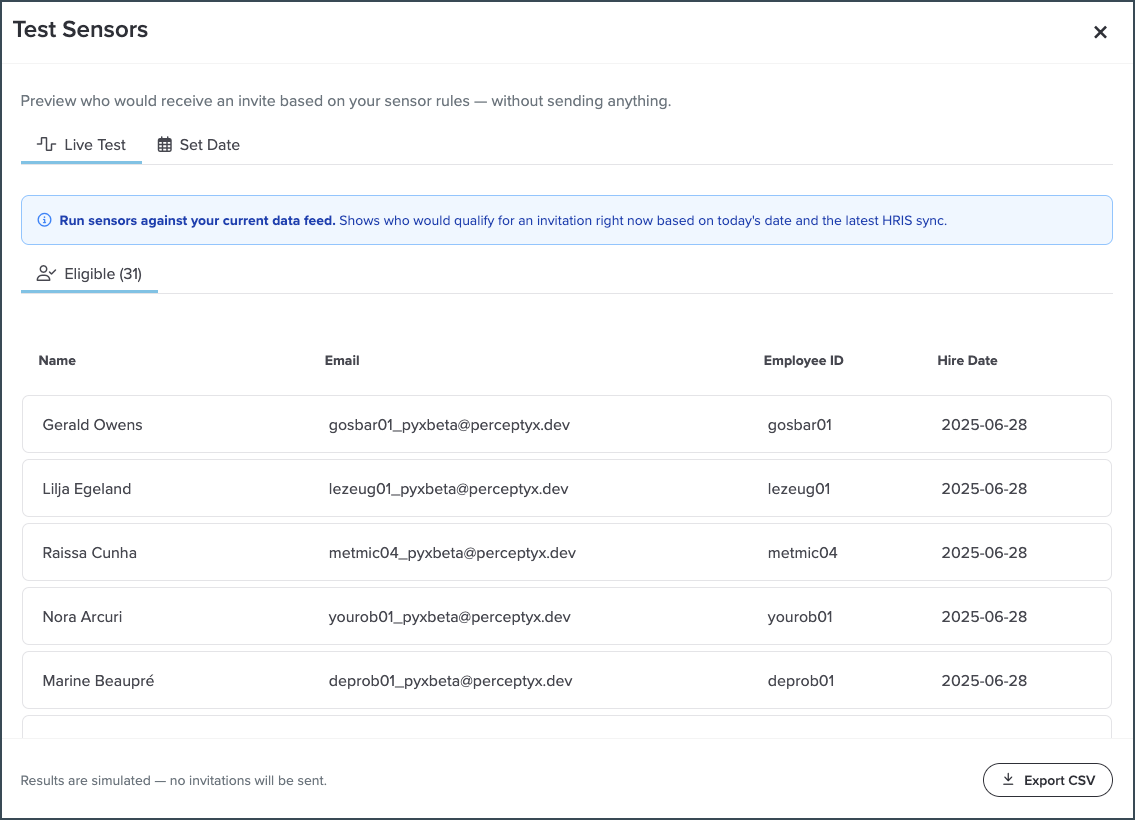
The results tell you how many people currently meet your criteria and list them out with their name, email address, employee identifier, and the date the sensor matched on. You can export the whole thing as a .csv file to review or share.
Note: An empty results table means nobody matched on the date you picked. That is information, not a problem. Try a different date, or take another look at your sensor.

Let people take a Lifecycle event more than once
Some moments come around again. Someone leaves and comes back, then leaves again. Someone hits a fifth work anniversary and then a sixth. The Resurvey Employees option lets a person complete the same Lifecycle event more than once when they qualify again.
With it on, people can be invited again when they re-enter a stage, be surveyed at more than one milestone, and get a fresh invitation whenever they become eligible. Each completion is treated as its own separate instance, with its own reporting.
The exclusion window
When you turn resurvey on you have to set an exclusion window, which is the minimum number of days that must pass before somebody can be invited to the same event again. It is what stops a person being asked the same questions twice in a fortnight.
With a 90 day window, someone surveyed 30 days ago is inside the window and will not be reinvited. Someone surveyed 120 days ago is outside it and will be.
- Navigate to the Invite phase for your listening event.
- Click Settings to open the Settings tab.
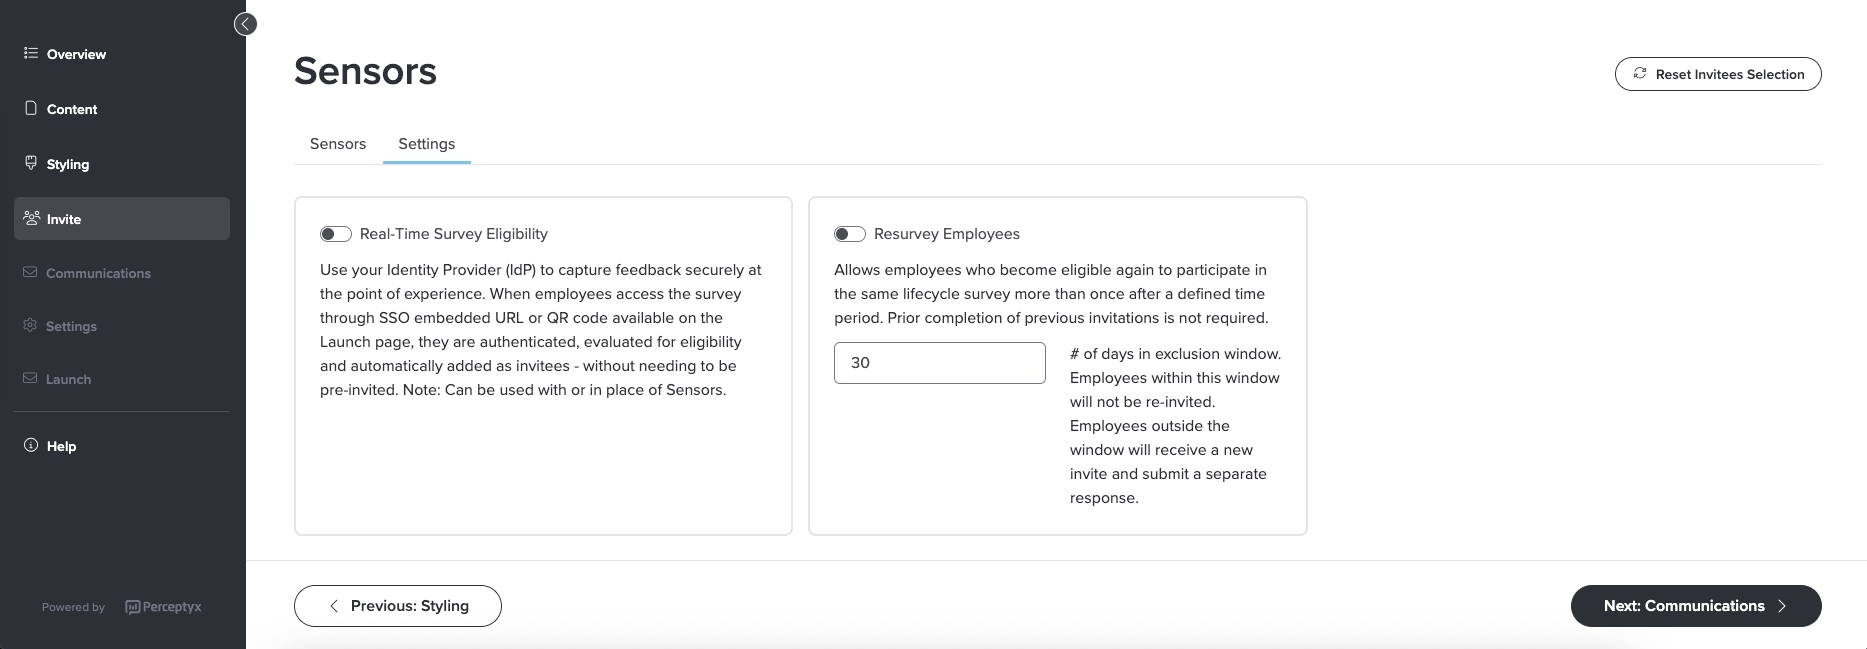
- Turn on the Resurvey Employees toggle.
- Click the # Of Days in Exclusion Window box and type your number.
- Click Next: Communications, or click Save and Exit to save and go back to Listen.

Enable Real-Time Survey Eligibility
Real-Time Survey Eligibility is a different way of getting people into a Lifecycle event. Rather than waiting for a sensor to notice someone and send them an invitation, you share a link or a QR code and they can go straight in. They sign in through single sign-on, a respondent record is created for them on the spot, their demographics come across automatically, and the event opens.
It is built for catching feedback at the moment something happens. Put the link at the end of an onboarding checklist, on a training completion screen, in a resignation form, or anywhere else in the systems people already use.
Note: This feature requires single sign-on, and it is available for Lifecycle events only.
Worth knowing before you share the link
Anyone in your organization who can sign in through single sign-on and open the link can take the event. You cannot narrow eligibility down by demographic, so if you only want a particular group responding, put the link somewhere only that group will come across it.
Demographic values that the platform has not seen before are created as people respond, so a participant from a country that was not in your data yet is handled without anything breaking on your side.
- Navigate to the Invite phase for your listening event.
- Click Settings to open the Settings tab.
- Turn on the Real-Time Survey Eligibility toggle.
- Click Next: Communications, or click Save and Exit.
Once the event is active, the link and the QR code are on the Launch page. For more on that, see Launch Your Listening Event | Point-In-Time & Lifecycle.
Note: Real-Time Survey Eligibility does not replace sensors, and you can run both on the same event. A common setup is a link in a resignation form for people who want to give feedback immediately, plus a sensor that follows up by email with everyone who does not.
Was this article helpful?
That’s Great!
Thank you for your feedback
Sorry! We couldn't be helpful
Thank you for your feedback
Feedback sent
We appreciate your effort and will try to fix the article