After adding participants to your event and configuring event settings, you are ready to move to the Launch phase. This phase includes making the event active and creating and scheduling notifications (invites and/or reminders). If you are using a PIN page to access your event, this is also the time you can generate a QR code and/or distribute the URL.
This article walks through:
- Make Your Event Active
- Create & Schedule Notifications
- Generate a QR Code/Distribute URL (PIN Page Only)

Make Your Event Active
Changing the event status to Active immediately makes the event available to invited participants when they log in to the platform. Once the event is active, you can create and schedule email notifications.
Navigate to the Launch phase for your event.
From within the Event Builder:
Click Launch in the left panel.
From Listen:
In the Live Events section or the All Events section, click Manage Event for the event you want to launch.
The Event Builder opens, displaying the Overview page.
In the left panel, click Launch.
The Review tab displays, showing a high-level summary of your event.
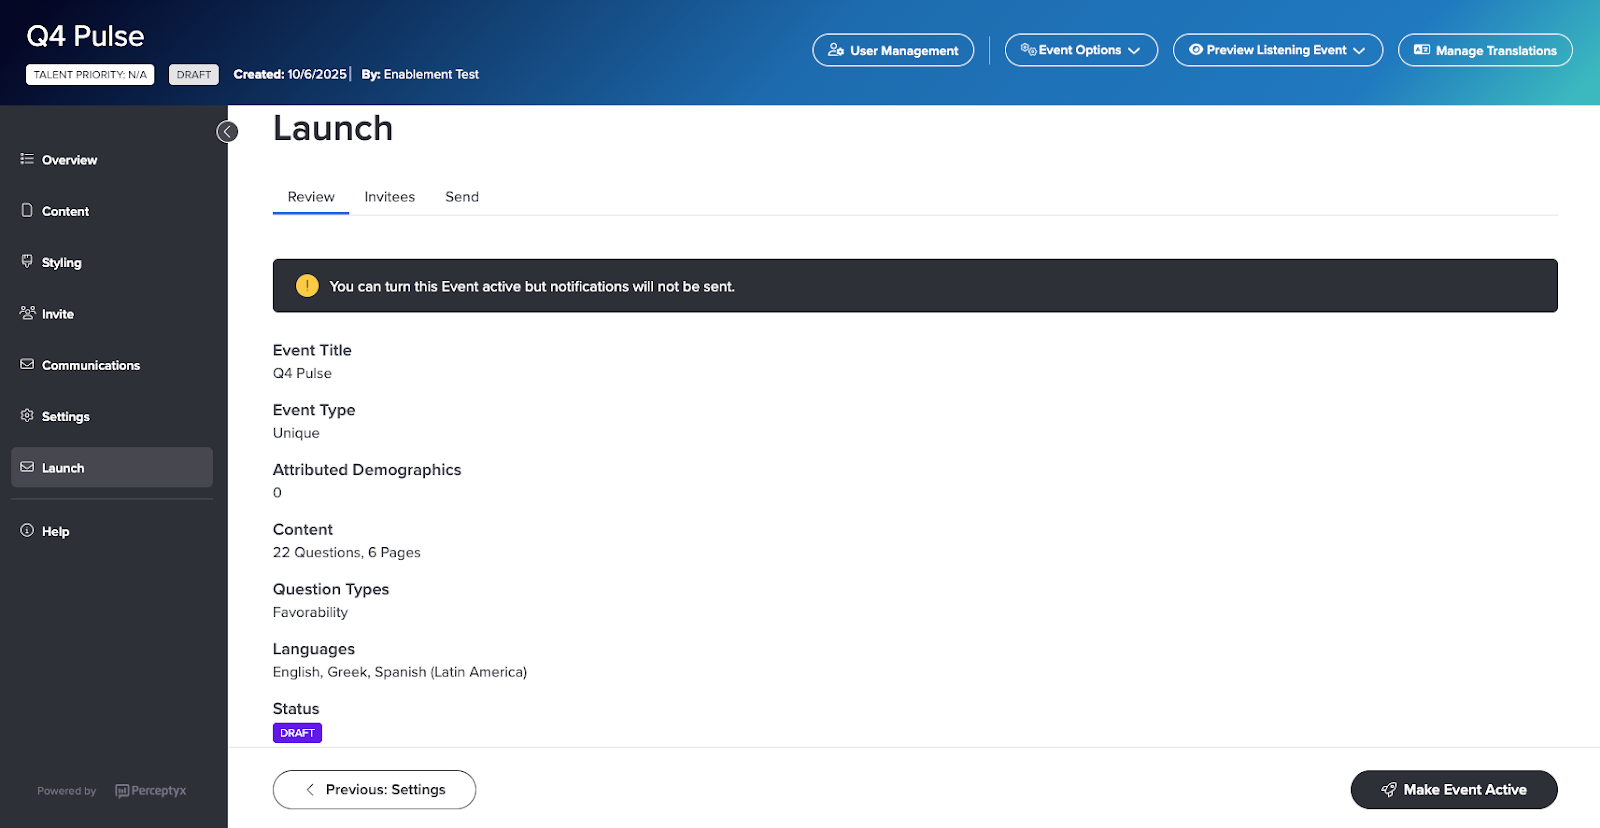
Review the details for your event, then click Make Event Active (bottom right).
A confirmation message appears.
Click Confirm.
A message appears prompting you to keep working on the event or return to the Listen page.
Close the message by clicking the X icon, or click Go to Listen if you want to return to the Listen page.
The event becomes active and a Close Date option appears on the tab.
To specify the event close date, click Schedule Closed Date, select a date and time, then click Save.

Create & Schedule Notifications
After your event is active, you create your notifications (emails), and schedule when they will be sent. You create the notifications using the email templates you created in the Communications phase.
Note: The timezone for notifications is the Admin/Creator device timezone in use when scheduling the event.
Navigate to the Launch phase for your event.
From within the Event Builder:
Click Launch in the left panel.
From Listen:
In the Live Events section or the All Events section, click Manage Event for the event you want to launch.
The Event Builder opens, displaying the Overview page.
In the left panel, click Launch.
2. Click the Send tab.
3. Click + New Email Notification.
The Create Email Notification dialog box appears.

Click the Email Template dropdown, then select an email template.
Click the Notification Status dropdown, then choose when to send emails:
Immediate:
Emails are sent as soon as you click Save. The event link in the email is live.Schedule on Later Date:
Specify the date/time to send the emails. The event link in the email becomes live at the scheduled date and time.Draft:
Keeps the status in draft mode until you are ready to set a notification status.
Click the Status of Recipients dropdown, then select a status for who will receive the email:
Not Finished:
Only participants who have not clicked Submit on their event (for reminder emails). This option doesn’t appear if you are using a universal link for your event.Everyone:
All participants, regardless of completion status.
If you also want the notification to be sent via Slack or MS Teams, scroll down and select the Include Chat Notification check box.
Click Save.
A Confirm Notification message appears.

Review your notification details, then click Send Notification.
The notification is sent or scheduled to send and the status displays as Pending until it is sent to all participants.
Note: You can click Refresh List (top right) to view the latest status. When all the notifications are sent, the status changes to Complete.
If you need to edit your notification, click Action, then select Notification Settings.
If you need to cancel your notification, click Action, then select Delete.

Generate a QR Code/Distribute URL (PIN Page Only)
If you enable the PIN page option for your listening event, the Launch phase in the Event Builder includes options to generate a QR code and to copy a URL for you to distribute.

Note: If you chose the Distribute Yourself Create PIN Page Link delivery method in the Invite phase, the Send tab is not available.
Generate a QR Code
You can provide a QR code for participants to access the event. Simply generate the code, download it, and distribute it.
Navigate to the Launch phase for your event.
From within the Event Builder:
Click Launch in the left panel.
From Listen:
In the Live Events section or the All Events section, click Manage Event for the event you want to launch.
The Event Builder opens, displaying the Overview page.
In the left panel, click Launch.
2. In the Generate QR Code section, click Generate.
The QR code is generated.
Click Download.
The image of the QR code is downloaded to your default download location.
Copy the URL for Distribution
You can copy the event URL to distribute to participants. The URL won’t be live until you launch your event.
Navigate to the Launch phase for your event.
From within the Event Builder:
Click Launch in the left panel.
From Listen:
In the Live Events section or the All Events section, click Manage Event for the event you want to launch.
The Event Builder opens, displaying the Overview page.
In the left panel, click Launch.
2. In the Survey URL section, click Copy URL.
The URL is copied to your clipboard so you can paste it into an email or other location with instructions for accessing the event via PIN page.
If applicable, create and test your email invite, make your event active, and create and schedule notifications.
Was this article helpful?
That’s Great!
Thank you for your feedback
Sorry! We couldn't be helpful
Thank you for your feedback
Feedback sent
We appreciate your effort and will try to fix the article