After building and testing your listening event, you are ready to invite your participants to the event. This process includes choosing the delivery method, adding participants, and creating and scheduling email notifications, if applicable. For lifecycle events, it may also include enabling respondents to complete the event more than once.
This article walks through:
- Choose Your Delivery Method
- Add Your Participants: Email Distribution Unique Links for Each Respondent
- Add Your Participants: Email Distribution - Anonymous Link
- Add Your Participants: Distribute Yourself Create Anonymous Link
- Add Participants to a Lifecycle Event
- Enable Resurvey for a Lifecycle Event
- Enable Real-Time Survey Eligibility

Choose Your Delivery Method
Note: This section applies to Point-In-Time listening events. For information on adding participants to a Lifecycle event, see the Add Participants to a Lifecycle Event section at the end of this article.
Navigate to the Invite phase for your listening event.
Choose your delivery method.
If your survey uses a PIN Page (enabled in the Content phase), select from the following:
Distribute Yourself - Create PIN Page Link
Create a PIN Page link and distribute the link and PIN to the invitees. You can upload, filter, and select your list of invitees. You can also generate and distribute a generic QR code to access the PIN page.Email Distribution - Unique Link for Each Respondent + PIN Page
Send a unique link via email to each invitee. You can also use the PIN page to allow invitees to access the event and generate a generic QR code. You can upload, filter, and select your list of invitees or use the Manager Hierarchy (if enabled) to select invitees.
Note: It is important to decide on the use of a PIN page at the start of the Content phase of the listening event build process. If you choose to enable the PIN page functionality after you have uploaded a participant data file, the file will be removed.

If your survey does not use a PIN Page, select from the following:
Email Distribution - Unique Links for Each Respondent
Send unique links, including SSO links, via email (or distribute them yourself) for each respondent. The listening event is attributed, meaning each participant receives their own unique link, and demographics are based on your source data and questions asked in the event.Email Distribution - Anonymous Link
Send an email with an anonymous link. The listening event is generic, meaning a generic link is sent via email to all invitees, and only self-selected demographics (added in the Content phase) are included.Distribute Yourself - Anonymous Link
Create an anonymous link and distribute it to respondents. The event is generic, no emails are sent from Perceptyx, and only self-selected demographics (added in the Content phase) are included.


Add Your Participants: Email Distribution Unique Links for Each Respondent
This option sends an attributed event/unique URL or SSO link to all participants. Each participant’s demographics are tied to their responses, and they can complete the listening event only once.
Note: If you are not using SSO and a participant forwards their invite to someone else, the recipient can potentially take the event on their behalf.
When using this option, you select how you wish to add participants and complete the instructions for each:
Bring Your Own List
Import your own data using a Perceptyx templateHRIS Data Available OR Create a Snapshot (if Manager Hierarchy feature is enabled) Import HRIS data from an automated data feed
Note: These options work the same way when you choose either of the PIN Page methods. The only difference is the generation of a PIN page URL, which occurs when you make the event active.
Bring Your Own List (Data Import)
Navigate to the Invite phase for your listening event.
Click Select below the Email Distribution Unique Links for Each Respondent option.
Click Select below the Bring Your Own List option.
The Data Import wizard appears. The wizard walks through the steps for downloading a Perceptyx template to populate with your data, uploading the completed template, mapping your data, and reviewing/resolving any potential errors.

Click Download Template.
Navigate to the downloaded template, then open it with an application that supports csv or xlsx format.
Complete the template with your data and save your changes.
The first four fields in the provided template are required (employee_id, email, first_name, last_name). Add in all demographic information in the remaining columns. Column names cannot include spaces (ex: country_name) and field entries cannot contain special characters (ex: ñ). The maximum number of columns is set to 20. If you need additional columns, contact your Project Manager or Customer Care.
Return to the wizard and click the File Upload box or the paper clip icon under Upload Data Template.
Navigate to the completed template, then double-click the filename.
When the Upload Complete message appears in the wizard, click Next Step.
The file is uploaded and the wizard displays data mapping options.

The first four fields are locked and the demographics from your completed template display below them, with the Demographic toggle turned on for all that do not personally identify the participant. If the toggle is turned on, the demographic is available in reports.
Note: If you turn the toggle off for a demographic it will not appear in reporting and cannot be turned on after the event launches.
Confirm all the demographics you loaded with the template are listed.
If you want to change the name that appears for a demographic in reports, update the text in the Label field.
Note: If you change the label for a demographic, it cannot be modified after the event launches.
Click Next Step.
The system processes the data. If there are any errors, they display in the wizard highlighted in red.

If any errors display, click the red error box, make your corrections, click Save, then click Update.
Note: Any records with errors will not be imported unless corrected before clicking “Save & Import.”
When all errors are corrected, the wizard displays a success message.
Click Save & Import.
A confirmation message appears.
Click Confirm.
The full list of invitees displays on screen, with all records selected.
If you want to narrow down the list of invitees:
Click the checkbox for any invitees you don’t want to include. You can use the Search box to search by name, email, or employee ID.
Apply a filter:
Click Filter.
The Add Filter dialog box appears.

Type a specific demographic in the Search Demographic box, if necessary, to display it in the dialog box.
Click the arrow for the demographic you want to filter by.
The Include From (Demographic Name) dialog box appears.

Type or paste one or more values in the text box (one per line), then click Submit.
The records found that match your filter criteria display in the dialog box.
Click Continue, then click Done.
The filter is applied and only the records that match the values you specified appear in the invitee list.
Note: If necessary, you can return to the original list of invitees by clicking Filter and then clicking Clear Filters in the Add Filter dialog box.
Click Next: Communications.
HRIS Data Available
HRIS Data is available only if you have an automated data file set up with Perceptyx. If you are interested in setting up an automated data file please contact your Program Manager (during a project) or Customer Care (after a project).
Navigate to the Invite phase for your listening event.
Click Select below the Email Distribution Unique Links for Each Respondent option.
Click Select below the HRIS Data Available option.
The HRIS Import wizard appears. The wizard walks you through the steps for importing your HRIS file, mapping your data, and reviewing/resolving any potential errors.
Review the Feed Load date to confirm the last file Perceptyx received and loaded, then click Start Import.
A Preparation Complete message displays in the wizard.
Click Next Step.
The demographic fields from your data file are listed in the wizard with the Demographic toggle turned on for all that do not personally identify the participant. If the toggle is turned on, the demographic is available in reports.
Note: If you turn the toggle off for a demographic it will not appear in reporting and cannot be turned on after the event launches.
If you want to change the name that appears for a demographic in reports, update the text in the Label field.
Note: If you change the label for a demographic, it cannot be modified after the event launches.
Click Next Step.
The system processes the data. If there are any errors, they display in the wizard highlighted in red.
If any errors display, click the red error box, make your corrections, click Save, then click Update.
Note: Any records with errors will not be imported.
When all errors are corrected, the wizard displays a success message.
Click Save & Import.
A confirmation message appears.
Click Confirm.
The full list of invitees displays on screen.
If you want to invite the entire population of your file, click +Select All, then click Next: Communications.
If you want to narrow down the list of invitees:
Click +Select All, then clear the checkbox for any invitees you don’t want to include. You can use the Search box to search by name, email, or employee ID.
Apply a filter:
Click Filter.
The Add Filter dialog box appears.
Type a specific demographic in the Search Demographic box, if necessary, to display it in the dialog box.
Click the arrow for the demographic you want to filter by.
The Include From (Demographic Name) dialog box appears.
Select the applicable options for the demographic, then click Apply.
Note: If you choose Email or Employee ID from the demographic list, you can paste in a list of values to search for participants.
Click Continue, then click Done.
The filter is applied and only the records that match the values you specified appear in the invitee list.
Click +Select Filtered, then click Next: Communications.
Create a Snapshot (Manager Hierarchy)
Manager Hierarchy is a feature that, among other things, enables Admin and Creator users to include the organizational hierarchy during the event setup process and use it to invite participants to an event.
Note: This option is available only to customers on the Perceptyx Platform that have an automated data feed aligned to Perceptyx data specifications. The Manager Hierarchy feature needs to be enabled by the Perceptyx team. The process may take up to 3 business days, and must be completed before event creation.
You use the Snapshot screen to invite participants using Manager Hierarchy. The Snapshot screen is available in two views:
List View: Displays a table listing all employees from your automated data feed. You can apply filters to focus on specific employees or groups and add them as invitees to the event.
Hierarchy View: Displays the organizational hierarchy in a tree view, where you can manage the hierarchy and invite individuals and groups to the event. You can also assign any unassigned employees to their appropriate place in the hierarchy. We strongly encourage assignment of unassigned employees for optimal reporting accuracy.
You can toggle back and forth between the views as needed.
Invite Participants
Using List View:
Navigate to the Invite phase for your listening event.
Click Select below the Email Distribution Unique Links for Each Respondent option (or below the Email Distribution Unique Links for Each Respondent + PIN Page option if using a PIN page).
Click Select below the Create a Snapshot option.
The Snapshot screen displays in List View.

In List View, information for each employee in the hierarchy displays as a record in a table.
Use the search or filtering option to display the employee(s) you want to work with:
Search
Type a name, email address, or employee ID in the Search box, then click Search.Filters
Click Filters (upper right), select from the list of pre-populated demographic options, type a value, then click Apply.
Note: To specify multiple filters, click Apply & Add Another instead of Apply, choose another filter and specify your options, and repeat as needed. When you specify your options for the final filter, click Apply.
Note: Each filter you apply displays in the Filters bar. You can remove a filter by clicking X next to its name.
Confirm the employee(s) as an invitee:
For an individual employee:
Click Confirm as Invitee to the right of the employee’s information (in the Actions column).For multiple employees:
Select the checkbox for each employee, then click Confirm Invitees (top right).For all employees displayed on the screen:
Select the checkbox in the header row of the table, then click Confirm Invitees (top right). Note that if your invitee list spans more than one screen, only the employees you see on the first screen are selected.For all employees in the invitee list:
Select the checkbox in the header row of the table, click Select all xxxx employees for this table, then click Confirm Invitees (top right).
The Snapshot screen refreshes, and the record(s) for the selected employee(s) display a confirmed as invitee status.
Click Next: Communications.
Using Hierarchy View:
In Hierarchy View, you select a CEO to begin building your hierarchy, assign any unassigned employees to their part of the hierarchy, and select invitees for the event.
Navigate to the Invite phase for your listening event.
Click Select below the Email Distribution Unique Links for Each Respondent option (or below the Email Distribution Unique Links for Each Respondent + PIN Page option if using a PIN page).
Click Select below the Create a Snapshot option.
The Snapshot screen displays in List View.
Click Hierarchy View (top right).
The screen displays in Tree View.

In this view, you select a manager as “CEO” to start building the hierarchy. You can click through the branches of the organizational hierarchy to select groups or individuals as invitees for the event. As you click, each branch of the hierarchy displays as a card that shows the employees in the branch and their invitee status. Icons for each employee allow you to move them to another part of the hierarchy, confirm them as an invitee, or confirm a manager and their entire team as invitees.
For managers, you can invite just their direct reports or their full teams (all employees below them in the hierarchy).
Select your CEO to begin building the hierarchy.
Note: When it is not clear from your HRIS data who the CEO is, multiple managers may appear as options to select as CEO.
The hierarchy tree displays with the selected CEO and the first branch showing their direct reports.

Click through the hierarchy tree to display the hierarchy segment you want to work with.
Note: If an employee is a manager with direct reports, an Is a Manager icon displays to the right of their name.
Our best practice recommendation is to assign any unassigned employees before confirming employees as invitees.
Unassigned employees aren’t linked to a direct manager, or their manager isn’t fully connected in your HRIS data. While these employees can still be invited to a listening event and access reports, the reporting scope may be inaccurate if employees are not reporting to their correct manager in the hierarchy. For example, if a manager has nine direct reports, but four are unassigned, the unassigned employees won’t be included in the manager’s results, even if they complete the listening event. This can cause the manager to fall short of the minimum response threshold needed to receive a report.
Ideally, you should correct the issue at it’s source, in your HRIS data. However, you can use the Unassigned Employees feature in Manager Hierarchy to resolve the issue for the current snapshot. This feature assigns the employees only for the specific event you're working on. If you refresh the snapshot or add participants to another event, the employees will be unassigned again.
Click Unassigned Employees to display the Unassigned Employees tab.

You assign employees by moving them to a specific segment of the hierarchy. You can move one employee at a time.
Click the Move icon (lower right of the name) for the first employee you want to assign.
The icon turns green and moves to the top right.

Click the Hierarchy tab, then click the Add to Team (down arrow) icon for the manager to whom you want to assign the employee.

The employee is assigned to the manager.
Although you can move only one employee at a time, you can select multiple employees and add them to a Draft List, which reduces the need to repeatedly switch between the Unassigned Employees tab and the Hierarchy tab.
Use the draft list:
Display the Unassigned Employees tab.
Click the Move icon for each employee you want to move.
Click the Hierarchy tab, then click Open Draft List.
The Draft List appears.

Select the radio button for the first employee you want to move, then click Accept.
The selected employee is designated as the one to move.
Click the Add to Team (down arrow) icon for the manager to whom you want to assign the employee.
The employee is assigned to the manager.
Repeat the process for each employee in the Draft List.
Click X to close the Draft List.
After assigning unassigned employees, you are ready to confirm employees as invitees.
Confirm employees as invitees:
For an individual employee:
Navigate to the individual employee in the hierarchy, then click the Confirm as Invitee icon.
For a manager and their team:
Navigate to the manager in the hierarchy, then click the Confirm (Manager) and Their Direct Reports or the Entire Team as Invitees icon (bottom right).
The Select Invitation Type dialog box appears.

Select Invite Manager and Direct Reports Only or Invite Manager and Full Team, then click Confirm.
The Snapshot screen refreshes, and the Invitation Status icon changes from Uninvited (with a red dot) to Invited (with a green dot).
Uninvite Employees
Navigate to the Invite phase for your listening event.
Display the Snapshot screen in List View or Hierarchy View.
Display the employee(s) you want to work with.
Click Uninvite.
Note: To uninvite a manager and their direct reports or full team, display the Snapshot screen in Hierarchy View, then click Uninvite Manager and Their Direct Reports or the Entire Team. When the Select Invitation Type dialog box appears, select Uninvite Manager and Direct Reports Only or Uninvite Manager and Full Team, then click Confirm.
Snapshot Refresh
If a significant amount of time passes from when you create your listening event to when it goes live, you can refresh your snapshot to reflect the most up to date version of your organizational hierarchy.
You can refresh your snapshot at any time prior to launching the event.
Important: When you refresh your snapshot, your previously selected invitees and snapshot are discarded, along with any changes you made in the Manager Hierarchy. Any page or display logic based on demographics from your HRIS file are also discarded.
In the Event Builder, click into the Invite phase.
Your current snapshot appears.

Click Refresh Snapshot (top right).
A confirmation message appears.

Click Refresh.
The snapshot refreshes to reflect the current version of the organizational hierarchy.
Select your invitees as described in the Invite Participants section of the Create a Snapshot (Manager Hierarchy) topic above.

Add Your Participants: Email Distribution - Anonymous Link
The Email Distribution Anonymous Link option enables you to email a generic link to the participants via the platform. You can create an email template and send email invitations to your selected participants. You cannot load demographic data when using this option as survey responses are anonymous and not attributed to individual respondents or any pre-loaded demographic data. Demographic reporting is available only if you add self-select demographic questions to your event during the Content phase.
Navigate to the Invite phase for your listening event.
Click Select below the Email Distribution Anonymous Link option.
Options for downloading and uploading the Perceptyx template appear.
Click Download Template.
Navigate to the downloaded template, then open it with an application that supports csv or xlsx format.
Complete the template with your data for the Email, First Name, and Last Name fields and save your changes.
Return to the Invite screen, click the File Upload box or the paper clip icon, navigate to the completed template, then double-click the filename.
The file uploads.
Click the checkbox at the top of the page to select all invitees, then click Next: Communications.
To generate the QR code, navigate to the Launch page.
Select Generate under Generate QR code.
Click Download to download the QR code.
You can print the QR code to make it available for participants to scan with their mobile devices.
Note: After you change the event status to Active, the system will generate the generic URL for accessing the event. You can then send invitation emails with the link to participants.

Add Your Participants: Distribute Yourself Create Anonymous Link
This option creates a generic link for you to share internally. No Perceptyx email communications are sent from the platform. You cannot load demographics when using this option as survey responses are anonymous and not attributed to individual respondents or any pre-loaded demographic data. Demographic reporting is available only if you add self-select demographic questions to your event during the Content phase.
Navigate to the Invite phase for your listening event.
Click Select below the Distribute Yourself option.
The Settings page appears.
Enable any settings you’d like for the event. Once complete select Next: Launch to generate a QR Code or copy the event URL.
To copy the URL, click Copy URL.
Note: The URL is not live until you launch the event.
Click Generate to generate the QR code, then click Download to download the QR code.
Click Make Event Active.

Add Participants to a Lifecycle Event
Lifecycle events are “always on” events. Invites are sent out based on sensors that define the condition(s) for sending an invite to an employee (for example, a hire or termination date). For this reason, an automated data feed is required for lifecycle events.
The steps for adding participants to a lifecycle event depend on whether the event uses a PIN page.
If your event uses a PIN page, you will need to choose a delivery method and then configure sensors.
If your event does not use a PIN page, you only need to configure sensors.
Choose a Delivery Method (PIN Page Only)
If you use a PIN page for your lifecycle event, the Invite phase displays PIN page link delivery options, similar to Point-In-Time events, before displaying options for configuring sensors.

Distribute Yourself Create PIN Page Link
Create a generic link to the PIN page and distribute the link and PIN number to invitees. You can also generate a QR code.
Email Distribution Unique Link for Each Respondent + PIN Page
Send a unique link to each participant by email. Participants can also access the event through the PIN page using a generic link or QR code.
PIN page delivery options provide additional flexibility. For example, they can:
Enable deskless workers to access attributed events through generic links without SSO or company email
Enable exiting employees to access exit surveys after their work email has been inactivated.
To choose a delivery method:
Navigate to the Invite phase for your listening event.
Delivery options appear.
Choose your delivery method by clicking Select below the option you want to use.
Sensor configuration options appear.

Configure Sensors
Sensors define when invitations are sent.
Each sensor has two components:
Condition: A date-based demographic to evaluate (for example, Hire Date or Term Date)
Qualifier: Time-based logic applied to the condition
As your automated data feed updates employee data, the platform evaluates the specified condition(s) and sends invitations when employees meet the defined criteria.
Available Qualifiers
Three qualifiers are available:
EQUAL TO: This qualifier is usually used for Onboarding listening events. It signals the platform to send an invite when Hire Date = 30/60/90/X days in the past.
For example: Today is the 30 day mark from my hire date. I will receive an invite if the qualifier is set to Equal to 30 days ago.
Available options:
Equal to 30 days ago
Equal to 60 days ago
Equal to 90 days ago
Equal to X days ago
APPROACHING WITHIN: This qualifier is usually used for exit listening events. It signals the platform to send an invite when Term Date is within the next 15/X days.
For example: I gave my 2 weeks notice yesterday, March 1, and my last day is next Friday, March 14. The HRBP entered my Term Date into the system yesterday afternoon (March 1) as Term Date = March 14. Assuming the qualifier is set to Approaching within 15 days, I will receive an invite today because that term date falls within the 15 day window.
Available options:
Approaching within 15 days
Approaching within X Days
ANNUALLY: This qualifier is usually used for anniversary listening events. It signals the platform to send an invite on the same date (typically Hire Date or Start Date) each year.
For example: My hire date is September 1. If the qualifier is set to Annually, I will receive an invite each year on September 1.
Note: The Annually qualifier requires the Resurvey Employees setting to be enabled. After this setting is enabled, it cannot be turned off. This allows employees who become eligible each year to participate in the listening event again as new respondents, regardless of whether they previously participated in the event.
Navigate to the Invite phase for your listening event.
If your event has the PIN page enabled, choose your delivery method by clicking Select below the option you want to use.
Note: If your event does not have the PIN page enabled, skip to step 3.
The Invite page updates to display sensor configuration options.
Display the Condition dropdown and select an option.
Note: The condition is always a date-related demographic.
Qualifier fields appear.

Display the Qualifier dropdown and select an option, then type a value in the Days box, if applicable.
Note: Some qualifiers already contain a specified number of days, in which case you do not need to provide additional information.
If you want to add another condition, click +And to display another Condition dropdown and follow the same steps to specify another condition.
In the following example, invites will be sent to full-time employees 30 days after their hire date.

Add more conditions, if necessary, then click Next: Communications to move to the Communications phase.
Test Sensor Results
Before launching your listening event, you can test your sensors to preview who would receive an invitation based on your sensor rules, without sending anything. Sensor tests use your organization's current data feed and never send invitations or change participant eligibility.
Choose the testing method that best fits your scenario:
Live Test
Use Live Test to see who would receive an invitation if your event were evaluated today using your current sensor configuration and the latest data feed.
This option is useful for confirming that your sensor conditions identify the expected participants before launching your event.
Example: After configuring a Hire Date sensor, run a Live Test to verify that the expected employees appear in the results.
Set Date
Use Set Date to see who would qualify if today's date were different. This option evaluates your current data using the date you specify, making it useful for testing date-based sensor conditions.
This option is useful when:
No participants currently meet your sensor criteria.
You want to verify how date-based conditions will behave on a future or past date.
You want to test rolling time-based conditions.
Example: If your sensor sends invitations 30 days after an employee's hire date and no one reaches that milestone today, you can test using a future date to confirm the correct employees will qualify.
To run a sensor test:
In the Invite phase, display the Sensors tab.
Click Test Sensors to display the Test Sensors dialog box.
Display the Live Test or Set Date tab.
If you displayed the Set Date tab, choose the date you want to use for the simulation.
Click Run Test.
Review the results in the dialog box or export them as a CSV file.
Note: If no participants meet the sensor criteria for the selected date, the results table will be empty. Try a different simulation date or review your sensor configuration.
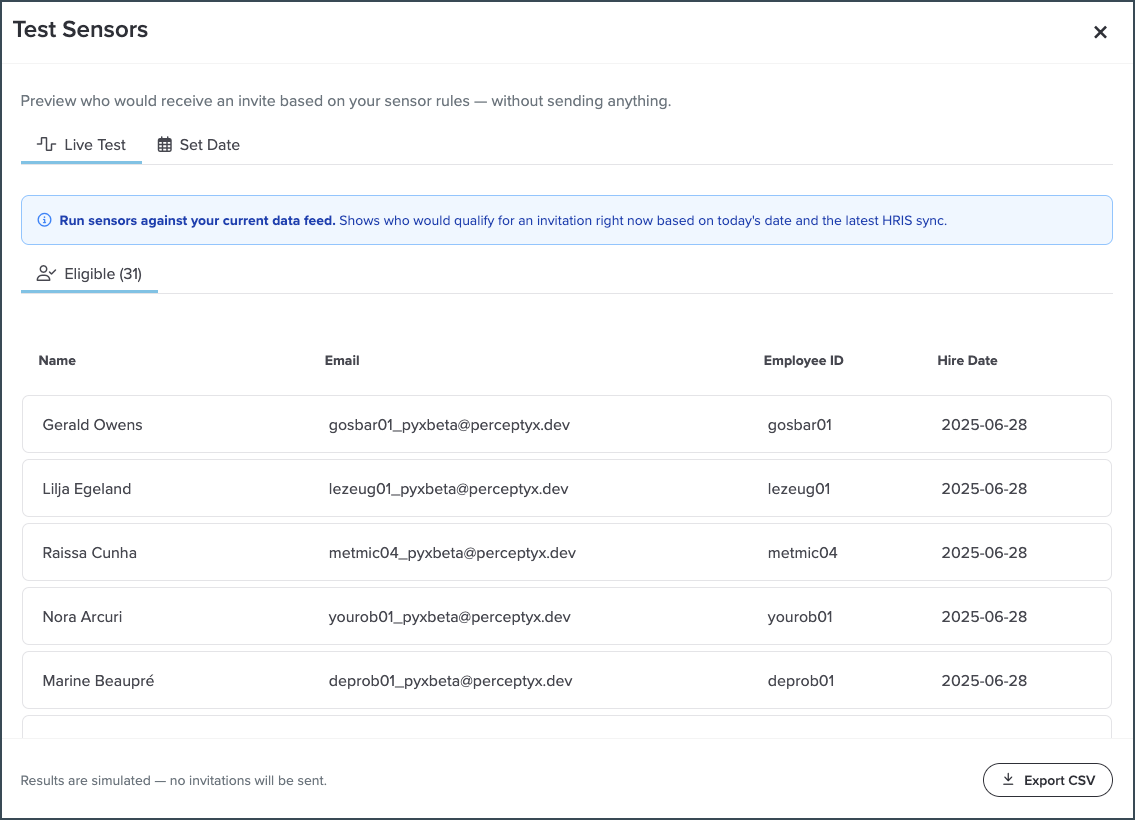
The test results show:
The number of employees who currently meet your sensor criteria.
A list of eligible employees, including their name, email address, employee ID, and the date associated with the sensor.
An option to export the results to a CSV file for review or sharing.

Enable Resurvey for a Lifecycle Event
Some milestones in the employee journey (such as rehire, re-exit, or work anniversary) require an employee to complete the same lifecycle listening event more than once. You can use the Resurvey Employees option in the Invite phase of your event to enable qualified employees to complete the event multiple times, as needed.
When the Resurvey Employees option is enabled, employees can:
Be invited again if they re-enter a lifecycle stage (rehire → re-exit)
Be surveyed at multiple milestones (e.g., multiple anniversaries)
Receive a new invite when they become eligible again
Each lifecycle event completion is treated as a separate instance, with independent reporting.
Exclusion Window
When enabling resurvey, you must define an exclusion window.
The exclusion window determines the minimum number of days that must pass before an employee can receive another invite for the same lifecycle event.
Employees within the window will not be reinvited.
Employees outside the window will be invited.
Example: If the exclusion window is set to 90 days:
An employee surveyed 30 days ago is not eligible.
An employee surveyed 120 days ago is eligible again.
The Resurvey feature is configured on the Settings tab of the Invite phase.
Navigate to the Invite phase for your listening event.
Click Settings to display the Settings tab.

Enable the Resurvey Employees toggle.
Click the # Of Days in Exclusion Window box, then type the value you want to set for the exclusion window.
Click Next: Communications to move to the Communications phase or click Save and Exit to save your changes and return to the Listen page.

Enable Real-Time Survey Eligibility
Real-Time Survey Eligibility allows employees to access a Lifecycle event immediately using a shared link or QR code, without requiring pre-invitation or sensor configuration.
Note: This feature requires Single Sign-On (SSO).
After signing in through SSO, employees are automatically evaluated for eligibility, added as respondents, and taken directly into the event.
This option is useful for embedding listening events into existing workflows, such as onboarding tasks, training completions, or exit processes.
When enabled, you can:
Share a unique event link or QR code.
Embed the event in internal systems (for example, HRIS platforms, LMS courses, or intranet pages).
Capture feedback in the moment, without waiting for scheduled invitations.
Note: Real-Time Survey Eligibility does not replace sensors; you can use both together. For example, you can embed an event link in a workflow while also configuring sensors to send follow-up invitations.
Navigate to the Invite phase for your listening event.
Click Settings to display the Settings tab.
Enable the Real-Time Survey Eligibility toggle.
Click Next: Communications or click Save and Exit.
Once the event is active, you can access the event link and QR code from the Launch page. For more information, see the Launch Your Listening Event | Point-In-Time & Lifecycle article.
Was this article helpful?
That’s Great!
Thank you for your feedback
Sorry! We couldn't be helpful
Thank you for your feedback
Feedback sent
We appreciate your effort and will try to fix the article