Listen
Questions are the heart of your listening event. Pull in proven questions from the Perceptyx Question Library, write your own, and add a little text wherever participants could use some context.
This article covers Point-In-Time and Lifecycle events. You can add questions any time your event is still a draft, whether you started from a template, cloned an earlier event, or built it from scratch.
Want to split your questions across pages or move them around? That has its own steps in Add and Manage Question Pages | Point-In-Time & Lifecycle.
This article walks through
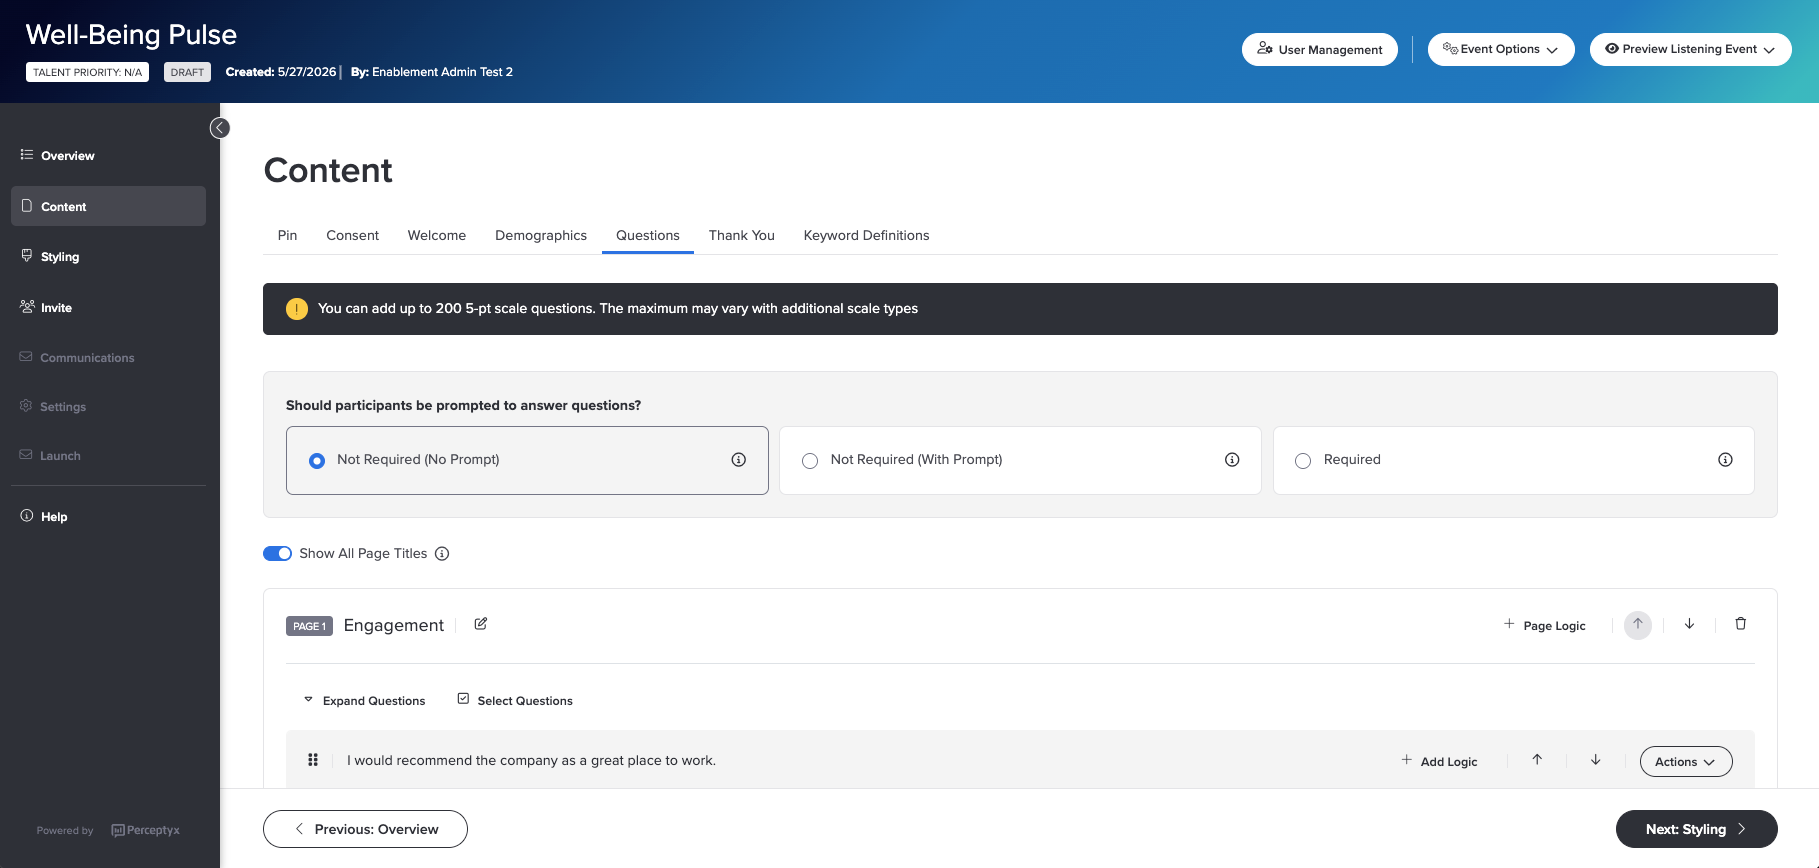
Get to the Questions Tab
Your questions live on the Questions tab, in the Content phase of the Event Builder. If you started from a template or cloned an event, you will find questions there already. If you started from scratch, the tab will be empty and ready for you.
If you are already in the Event Builder
- In the left panel, click Content.
- Click the Questions tab.
If you are starting from Listen
- In the Live Events or All Events section, click Manage Event on the event you want to work on. The Event Builder opens on the Overview page.
- In the left panel, click Content.
- Click the Questions tab.
Good to know
You can add up to 200 five-point scale questions to an event. A banner at the top of the Questions tab reminds you of this, and the limit can change if your event uses other scale types.
Add Questions from the Question Library
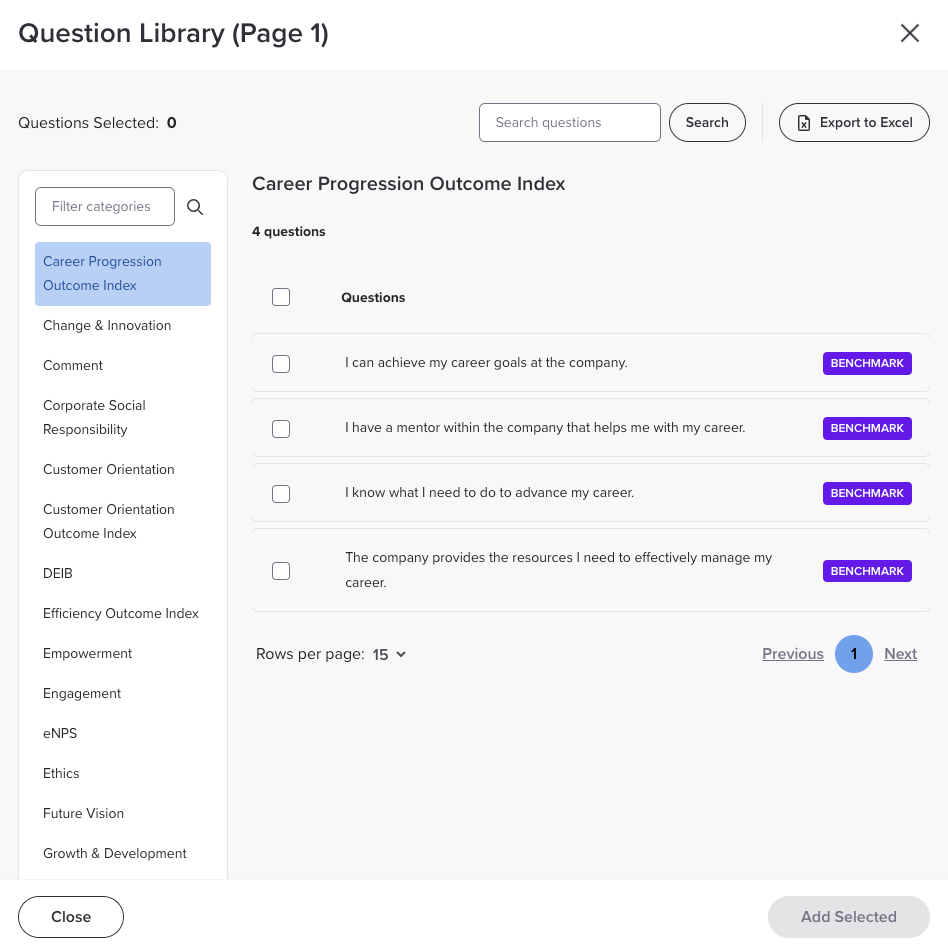
The Perceptyx Question Library is a collection of questions built on our best practices. Every library question comes with Perceptyx benchmarks, so you can see how your results compare in the Benchmark Report.
Add a library question
- On the Questions tab, go to the bottom of the page you want the question on and click Question Library.
- The Question Library window opens. Categories are listed on the left, and the questions in the selected category are on the right. Click a category to see its questions.
- Select the checkbox next to each question you want. You can switch categories and keep selecting.
- Click Add Selected. Your questions are added to the page.
A few shortcuts in the library window:
- Type in the Filter categories box to narrow the category list.
- Use the Search questions box to look for a question by a word or phrase.
- Want every question in a category? Select the checkbox at the top of the question list to grab them all at once.
- Click Export to Excel to download the whole library as a spreadsheet.
Edit a library question
You can change the wording of a library question after you add it. Just keep in mind that changing the wording can make your results harder to compare to the Perceptyx benchmark, and may mean updating your translations.
- On the Questions tab, open the Actions menu next to the question and select Edit.
- In the Edit Question window, change the text in the Question Text box.
- If the question uses an agreement scale and you want to give participants a way to opt out, add a Not Applicable option. Add a Not Applicable or Other option explains how.
- Click Save at the bottom right of the window.
- A message reminds you that your changes may affect benchmarks and translations. Click Proceed.
Your edits only change the question in this event. The original question in the library stays the same.
Write Your Own Questions
You can add your own questions to any event, even one you started from a template. Custom questions are not tied to Perceptyx benchmarks, so they will not appear in the Benchmark Report.
Pick a question type
| Question type | What participants do | Where results show up |
|---|---|---|
| Favorability | Pick one answer on a scale, like Strongly Disagree to Strongly Agree. | Favorability report and Survey Results report. In the Favorability report you can also run driver analysis on each scale question. |
| Single Selection | Pick one answer from a list. | Survey Results report |
| Multiple Choice | Pick two or more answers from a list. You can cap how many they choose. | Survey Results report |
| Ranking | Put options in order of preference. An average rank is worked out for each option. | Survey Results report |
| Comment | Write their own answer in a text box. | Comments report |
Set up the question
- On the Questions tab, go to the bottom of the page you want the question on and click New Question.
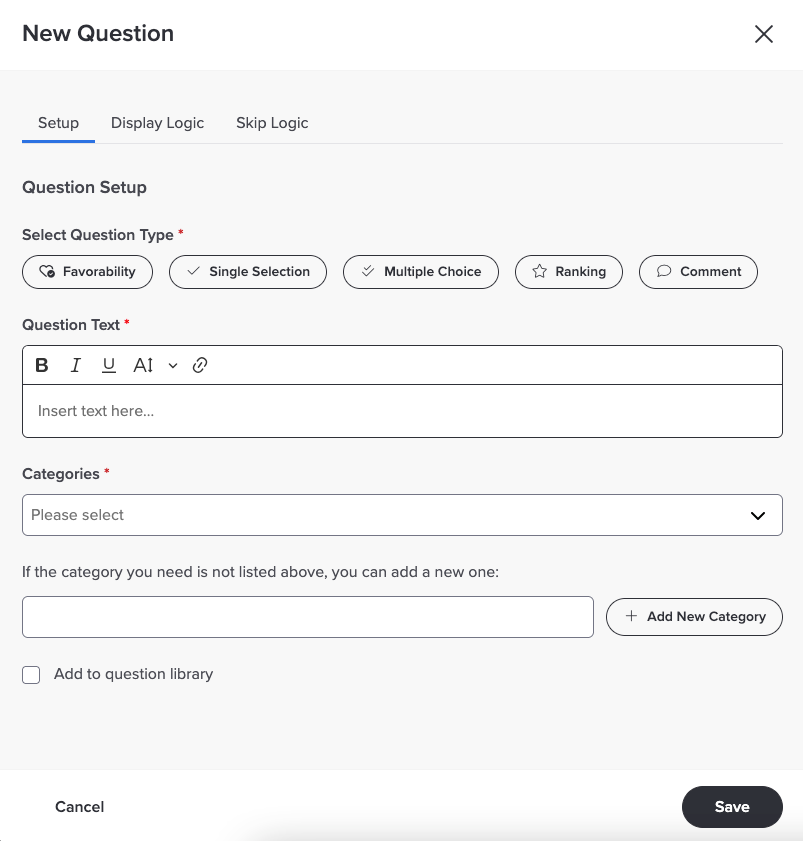
- In the New Question window, under Select Question Type, choose Favorability, Single Selection, Multiple Choice, Ranking, or Comment.
- Type your question in the Question Text box. You can use the toolbar above the box to format the text or add a link, for example to a frequently asked questions page or your employee handbook. Links open in a new browser window for participants.
- Pick a category from the Categories list. If the one you need is not there, type a name in the box below the list and click Add New Category.
- If you plan to use this question again in other events, select Add to question library.
Set up the answers
Next, set up the answer options. What you see depends on the question type, so jump to the one you picked below. For every type except Comment, you also choose how the options are displayed:
- If a question has more than eight answer options, Pulldown is the only display type available.
- Multiple Choice questions display as Checkbox or Pulldown.
- The display type for questions from the Question Library cannot be changed.
Favorability question
A Favorability question uses a scale. You can pick one of the predefined scales or build your own custom scale.
Scale order matters
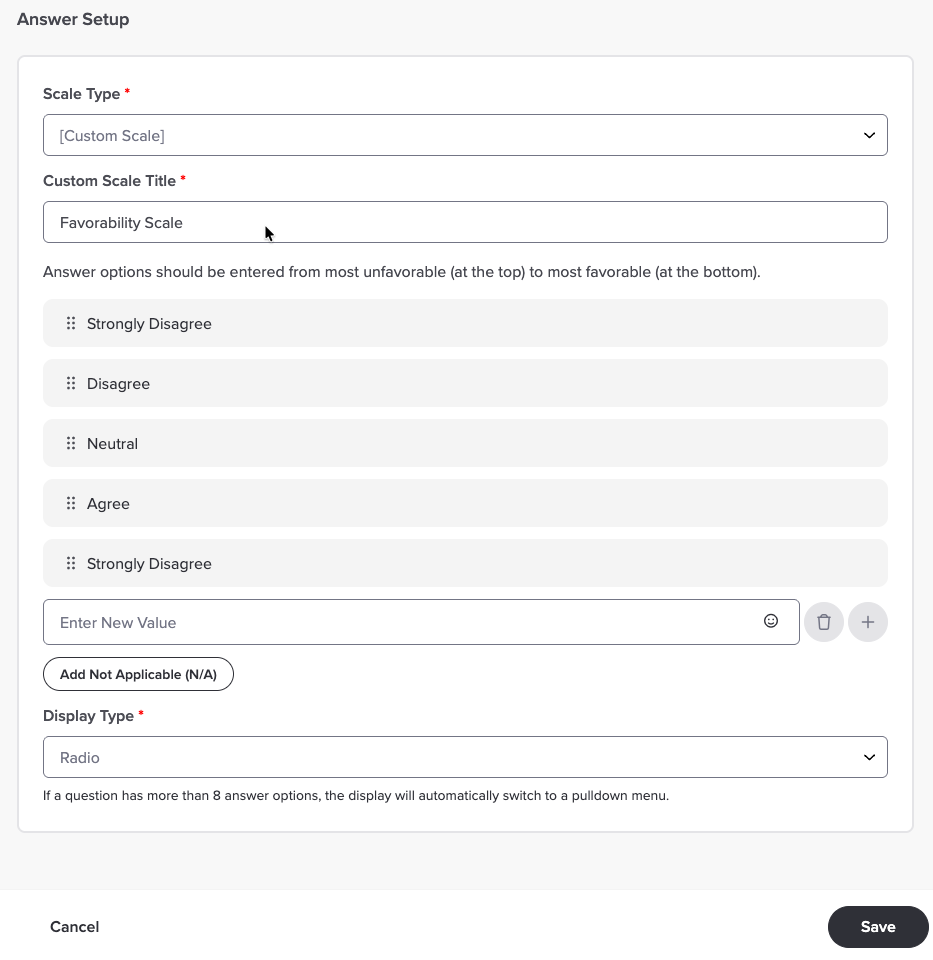
Reporting reads every favorability scale from the top down: the option at the top is treated as the most unfavorable answer, and the option at the bottom as the most favorable. Predefined scales are already set up this way. When you build a custom scale, enter your options in that same order, from most unfavorable first to most favorable last. If a custom scale is entered the other way round, your results show up reversed in reporting, so double check the order before your event goes live.
To use a predefined scale:
- Open the Scale Type list and pick a scale.
- If you want participants to be able to opt out, add a Not Applicable option. Add a Not Applicable or Other option explains how.
- Open the Display Type list and choose Radio or Pulldown.
- Click Save.
To build a custom scale:
- Open the Scale Type list and pick Custom Scale.
- Type a name for your scale in the Custom Scale Title box.
- Click the Enter New Value box, type your most unfavorable option (for example, Strongly Disagree), and press Enter.
- Keep adding options in order, one at a time, finishing with your most favorable option (for example, Strongly Agree).
- Check that the options run from most unfavorable at the top to most favorable at the bottom.
- If you want participants to be able to opt out, add a Not Applicable option.
- Open the Display Type list and choose Radio or Pulldown.
- Click Save.
Single Selection question
Along with your answer options, you can add an Other option. Participants who pick Other get a small text box to type their own answer, and it follows the same required or optional setting as the question.
- Click the Enter New Value box, type your first answer option, and press Enter. Repeat for each option.
- If you want, add a Not Applicable option, an Other option, or both. Add a Not Applicable or Other option explains how.
- Open the Display Type list and choose Radio or Pulldown.
- Click Save.
Multiple Choice question
You can set a limit on how many answers participants pick, for example the two most important items from a list.
- Click the Enter New Value box, type your first answer option, and press Enter. Repeat for each option.
- In the Response Limit box, type the most answers a participant can pick.
- If you want, add a Not Applicable option, an Other option, or both.
- Open the Display Type list and choose Checkbox or Pulldown.
- Click Save.
Ranking question
You can set a limit on how many options participants rank, for example their top three.
- Click the Enter New Value box, type your first option, and press Enter. Repeat for each option.
- In the Response Limit box, type how many options participants should rank.
- If you want, add a Not Applicable option.
- Click Save.
Comment question
Pick the kind of text box that fits the answer you are hoping for:
- Short Answer: a single line for a few words. The limit starts at 150 characters.
- Paragraph Answer: a bigger box for longer thoughts. There is no limit to start with.
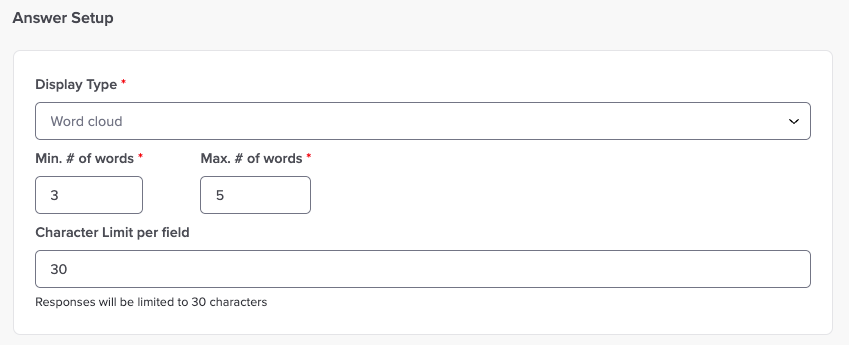
- Word Cloud: a set of short boxes where participants enter separate words or phrases. You can offer 1 to 10 boxes, and each starts with a 25 character limit.
- Open the Display Type list and choose Short Answer, Paragraph Answer, or Word Cloud.
- For Short Answer or Paragraph Answer, type a new number in the Character Limit box if you want a different limit.
- For Word Cloud, set the fewest and most entries a participant should give in the Min. # of words and Max. # of words boxes (up to 10). You can also change the Character Limit per field. For example, a maximum of 5 entries with a limit of 30 means each entry can be up to 30 characters.
- Click Save.
Add a Not Applicable or Other option
These work the same way for every question type that offers them.
- To add a Not Applicable option, click Add Not Applicable (N/A). To add an Other option, click Add “Other” Option.
- To change the label, click the new option to open its text box. Replace the text with your own, such as Don’t Know or Not Sure, then click Save next to the box.
Add Extra Text to a Page
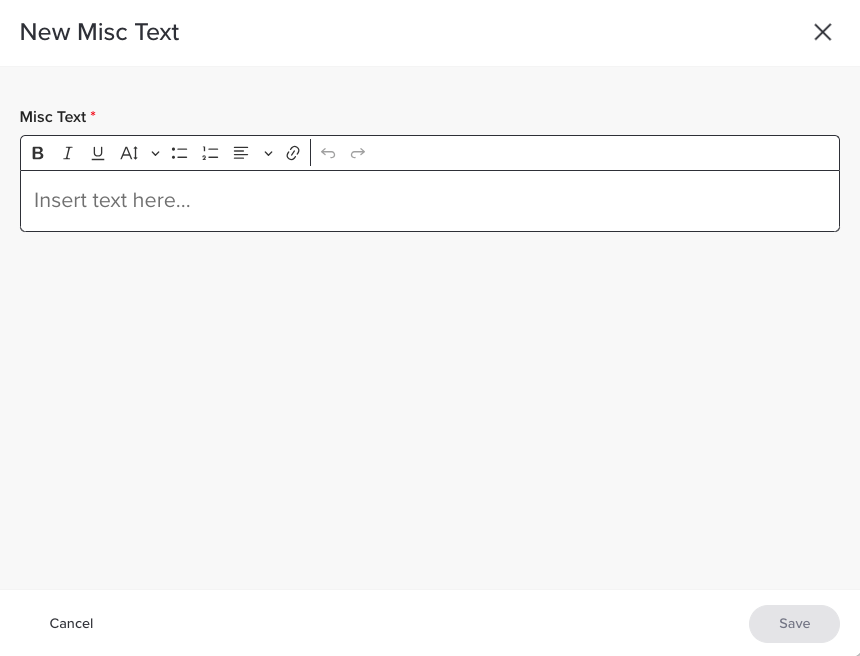
Miscellaneous text lets you add a note anywhere on a page. Use it to explain a set of questions or link to something helpful like a frequently asked questions page. Links open in a new browser window for participants.
- On the Questions tab, go to the bottom of the page you want the text on and click Misc Text.
- In the New Misc Text window, type your text in the Misc Text box. Use the toolbar to format it or add a link.
- Click Save. Your text is added to the bottom of the page, just like a question.
- To put the text above the question it goes with, click and hold the six-dot handle on its left and drag it into place.
Decide What Happens with Unanswered Questions
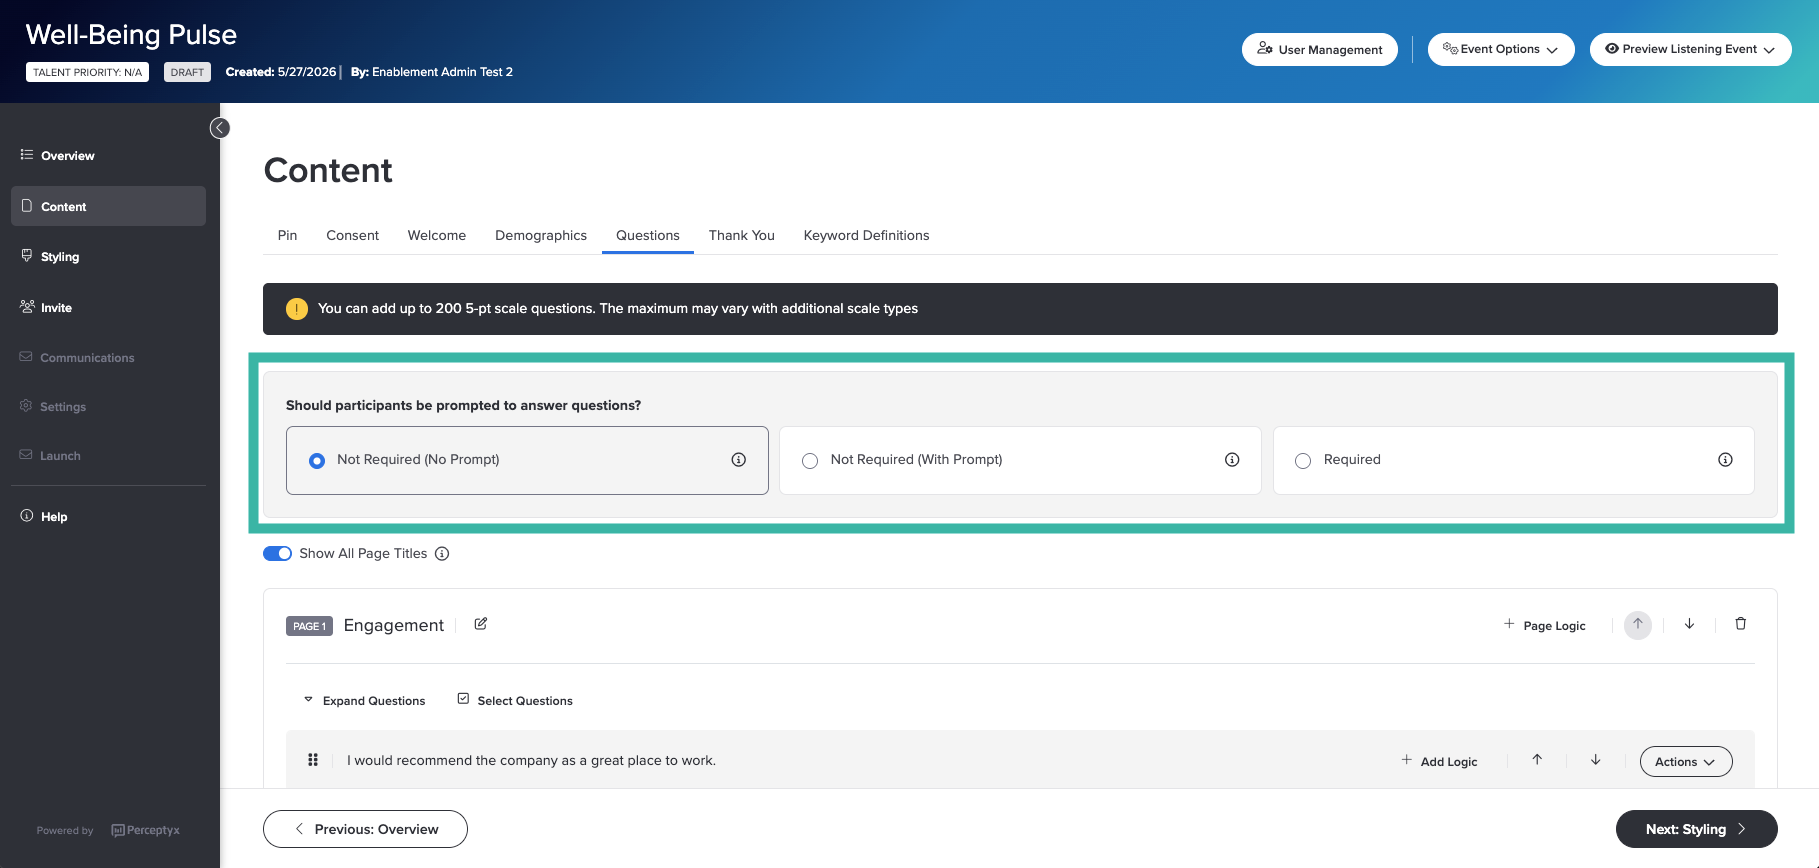
The more questions people answer, the more you learn. At the top of the Questions tab, the Should participants be prompted to answer questions? section lets you decide how firmly to nudge them.
| Option | What participants experience |
|---|---|
| Not Required (No Prompt) | No question is required, and nothing happens if they skip one. |
| Not Required (With Prompt) | No question is required, but they get a reminder if they leave something unanswered. |
| Required | Every question is required, and a message tells them they cannot continue until they answer. You can still make individual questions optional. |
- On the Questions tab, click the option you want.
- A confirmation message appears. Click Yes, Continue.
To make an exception for a single question:
- If you chose Required, open the Actions menu for the question and select Make Not Required.
- If you chose either Not Required option, open the Actions menu for the question and select Set as Required.
Delete a Question
You can remove any question you do not need, whether it came with a template or cloned event, from the Question Library, or you wrote it yourself.
- On the Questions tab, find the question you want to remove.
- Open the Actions menu for the question and select Delete.
- A confirmation message appears. Click Delete.
Show or Hide Question Details
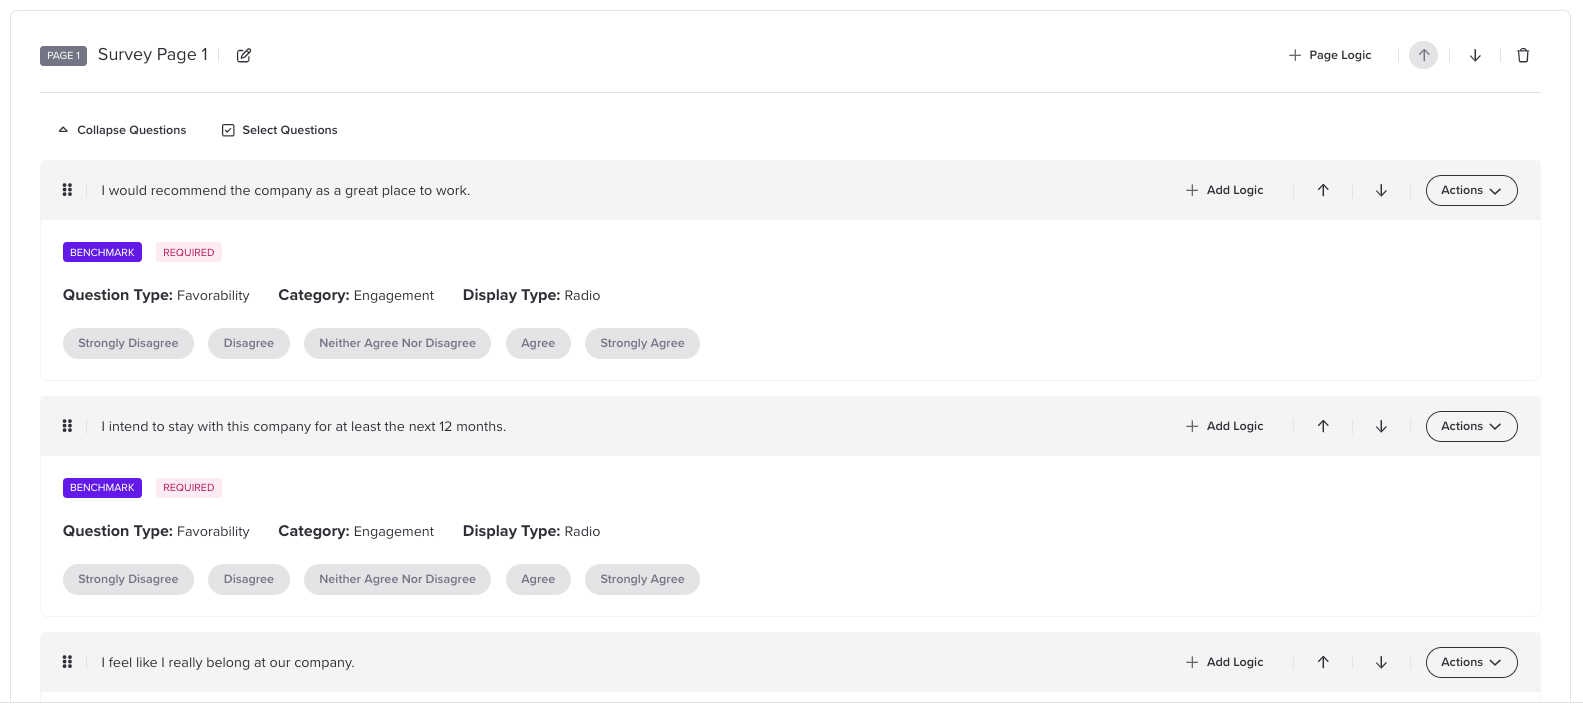
Expanding your questions shows the details behind each one, like its type, category, display type, and answer options. It is a quick way to check your work, including the order of your scale options.
- On the Questions tab, find the page you want to check.
- Below the page title, click Expand Questions. Every question on the page opens up to show its details.
- Click Collapse Questions to close them again.
Work with Several Questions at Once
Select Questions lets you pick several questions and act on them together. Hiding is handy for ongoing events where you want certain questions in some rounds but not others, without rebuilding the event.
- On the Questions tab, find the page with the questions you want.
- Below the page title, click Select Questions. The button changes to Question Actions.
- Select the checkbox for each question you want.
- Click Question Actions and choose what to do.
- Duplicate: make a copy you can change.
- Make Required: participants must answer before moving on.
- Delete: remove the questions.
- Hide: keep the questions in your event but stop showing them to participants.
- Unhide: show hidden questions to participants again.
Hidden questions still show up when you expand question details. You can also hide demographic questions and miscellaneous text. Manage Your Live Listening Event | Point-In-Time & Lifecycle has more on that.
What’s next
Your questions are in. To break them into pages, give those pages titles, and move questions between them, head to Add and Manage Question Pages | Point-In-Time & Lifecycle.
Was this article helpful?
That’s Great!
Thank you for your feedback
Sorry! We couldn't be helpful
Thank you for your feedback
Feedback sent
We appreciate your effort and will try to fix the article