In this update, you’ll find high-level summaries of the latest platform features and enhancements. We’ve also included links to Knowledge Base articles for detailed instructions on how to make the most of these updates.
Unless otherwise noted, the following features support Perceptyx Platform 2.5 and are available based on permissions and subscriptions purchased.
Come explore the new features in our platform workspaces:
We’d love to hear your thoughts on these new features and improvements. Share your feedback with us!
➡️ Point-In-Time & Lifecycle: Translate System Default Text
User Roles: Admin, Creator
Required Subscription(s): Point-In-Time & Lifecycle
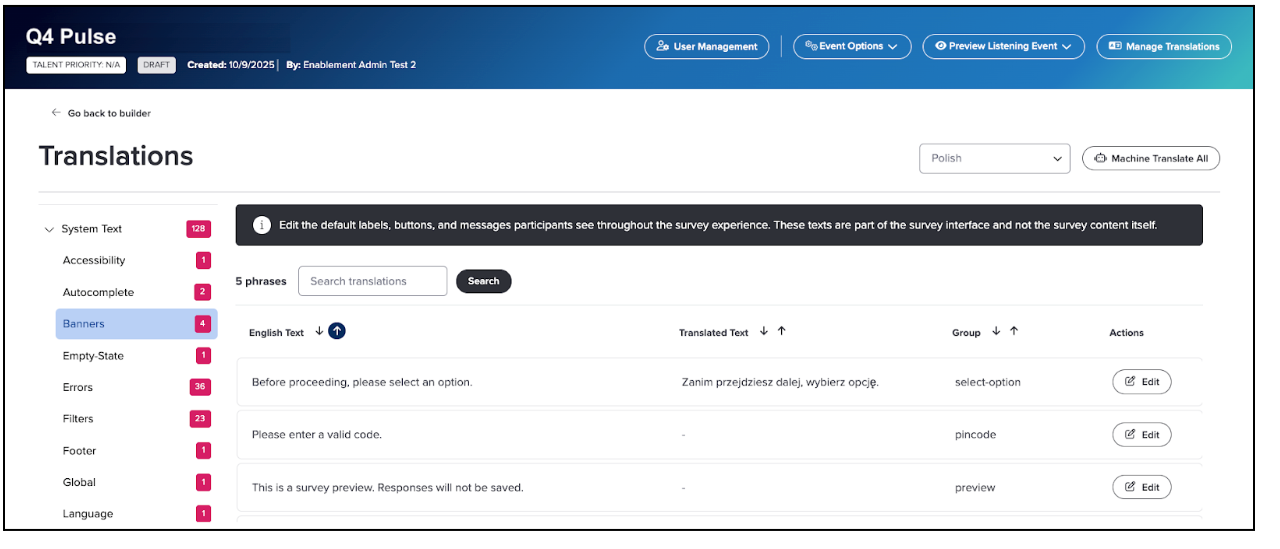
Survey admins and creators now have greater flexibility when creating multi-language listening events. This update makes it possible to view and edit translations for default system text (e.g., button labels, prompts, error messages, etc.) directly in the Translations Manager. The ability to manage these translations improves consistency across languages and reduces the need for support intervention.
What’s New
The Translations Manager now allows you to add translations for default system text where none exist, and refine existing translations as needed. This gives you more control over the participant experience, enabling more accurate and consistent translations across languages.
Previously, system text was not accessible for translation additions or editing. Now, you can view, modify, and complete translations for all system-generated text used in the event flow.
Note: Machine translation is not available for system text. All edits must be entered manually.
How it Works
Within the Translations Manager in the Event Builder, you can:
View default translations for all system-generated text
Edit translations for specific phrases in supported languages
Add missing translations where needed
Instantly preview changes
System text is organized under a new System Text category, with helpful groupings like Navigation, Scales, and Prompts. Any updates appear immediately in event previews. If a translation is missing, the platform defaults to the English phrase.
Note: The English source text cannot be edited.
For more details and step-by-step instructions, see the Translate Your Event | Point-In-Time & Lifecycle Knowledge Base article.
User Roles: Admin, Creator
Required Subscription(s): Point-In-Time & Lifecycle
We’ve made managing and reviewing translations easier than ever. In addition to generating machine translations or entering translations directly in the Event Builder, Admin and Creator users can now export all survey translations into a single Excel file. This update streamlines collaboration with translators or native speakers who can review, edit, and refine translations outside the platform before they’re finalized.
What’s New
A new Export All option is now available on the Translations screen. When selected, it creates an Excel file that includes every translation from your event. Each language is displayed on its own tab, making it easy to navigate and compare translations across multiple languages.
The exported Excel file includes:
Category (e.g., page title, question, system text, etc.)
English text
Translated text
This feature enables you to efficiently share translations for review, quality assurance, or further editing.
How it Works
In the Event Builder, navigate to the Translations screen for the translated event.
Click Export All.
An Excel file containing all translated content from the event is generated and saved to your default download location.
For more details and step-by-step instructions, see the Translate Your Event | Point-In-Time & Lifecycle Knowledge Base article.
➡️ Point-In-Time & Lifecycle: Customizable N/A Response Option
User Roles: Admin, Creator
Required Subscription(s): Point-In-Time & Lifecycle
To help ensure that surveys are clear and contextually appropriate for different audiences, we’ve added flexibility to how N/A response options are presented in scaled questions.
What’s New
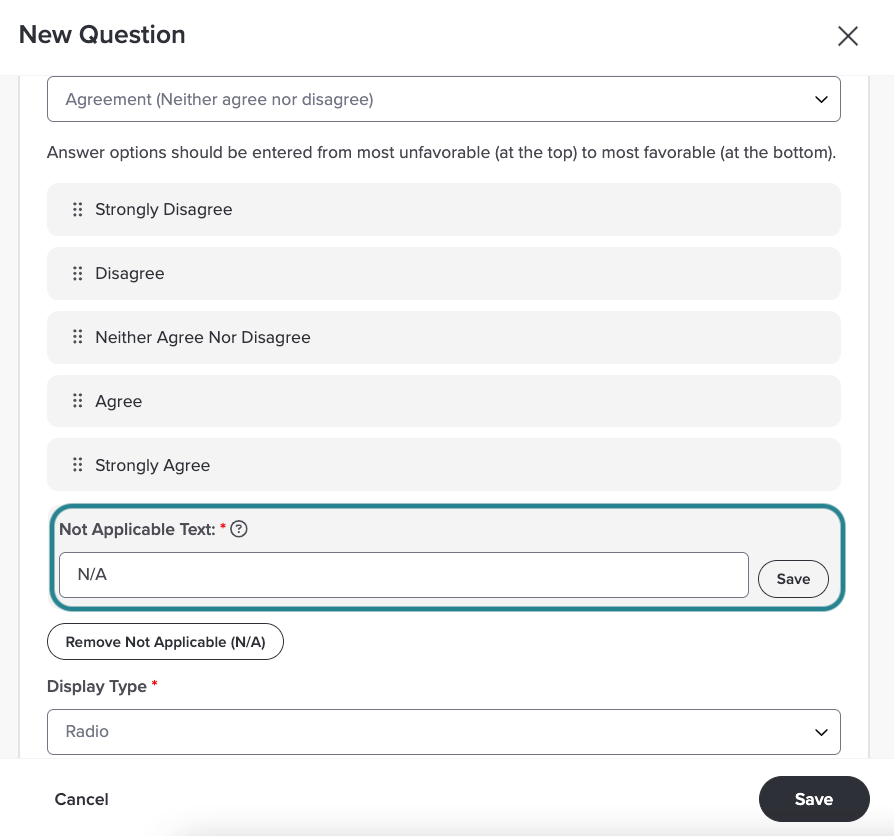
Admin and Creator users can now customize the label text for N/A response options in scaled question types. This allows for greater flexibility in how questions are presented, making it easier to align with specific language, tone, or context, such as using “Not Applicable,” “Don’t Know,” or another relevant phrase.
How it Works
When adding or editing a question with an N/A response option, users can click the option to open a text box for the label text, type the preferred text, and click Save.
For more details and step-by-step instructions, see the Add & Manage Questions | Point-In-Time & Lifecycle Knowledge Base article.
User Roles: Admin, Creator
Required Subscription(s): Point-In-Time & Lifecycle
We’ve enhanced listening event flexibility and engagement by adding the ability to include hyperlinks within questions. With this update, Admin and Creator users can now direct respondents to supporting materials, such as FAQs, policy documents, or organizational resources, directly from a listening event question. Respondents who click a link will see it open in a separate browser window, ensuring a smooth and distraction-free experience.
What’s New
Admin and Creator users can now add hyperlinks to:
Listening event questions (all question types)
Demographic questions (preset and custom)
This enhancement allows you to connect respondents to helpful ancillary materials without cluttering the listening event itself. For example, you might link to an employee handbook, benefits site, or org chart to provide additional context.
How it Works
Users can add a hyperlink while creating or editing a question using the formatting toolbar:
Click into the Question Text or Demographic Text box.
Highlight the text you want to hyperlink.
Click the link icon in the formatting toolbar.
Type or paste the target URL into the pop-up that appears.
Press Enter or click the checkmark icon to apply the link.
When respondents click the link during the event, it will automatically open in a new browser window.

For more details and step-by-step instructions, see the Enable and Customize Event Pages | Point-In-Time & Lifecycle and Add & Manage Questions | Point-In-Time & Lifecycle Knowledge Base articles.
➡️ Customize Presentation Reports with the New Presentation Builder
User Roles: Admin, Creator
Required Subscription(s): Point-In-Time & Lifecycle
To give Admin and Creator users more control over how listening event results are presented, we’ve introduced the Presentation Builder in Advanced Reporting. This new tool is available for Point-In-Time and Lifecycle events and allows you to customize the downloadable Summary Presentation or create additional presentation reports after an event closes.
With the Presentation Builder, you can tailor presentations to better fit your organization’s branding and reporting needs, whether by adjusting slide content, layout, or appearance.
What’s New
The Presentation Builder is now available in Advanced Reporting for Point-In-Time and Lifecycle listening events. Using this tool, Admin and Creator users can:
Modify the default Summary Presentation using the Slide Layout Editor
Create new presentations by duplicating and customizing the default presentation
Reorder, add, or remove slides
Adjust items, comparisons, and formatting per slide
Apply branding or formatting changes across the full presentation
Set access permissions
The default presentation is always active (Live), cannot be deleted, and remains available to all users with access permissions. It can be modified, but not removed.
How it Works
After launching a listening event, you can configure the Summary Presentation from within Advanced Reporting.
To get started:
Open the Presentation Builder from the Advanced Reporting section of your event.
Modify the default presentation or duplicate it to create a new version.
Use the Slide Layout Editor to make changes:
Reorder slides, add new ones, duplicate, or delete
Update presentation-wide settings like name, background, margins, and appearance
Customize slide titles, subtitles, and descriptions
Adjust data sources, comparisons, and display options (varies by slide type)
Preview individual slides or the full presentation before saving
Set reporting permissions to control which users can access it.
The Presentation Builder allows for multiple customized presentations, helping you deliver focused, stakeholder-ready reporting.

For more details and step-by-step instructions, see the Meet the Presentation Builder | Point-In-Time & Lifecycle and Use the Presentation Builder to Edit the Default Presentation or Create a New Presentation | Point-In-Time & Lifecycle Knowledge Base articles.
User Roles: Leader (Manager of Managers)
Required Subscription(s): Point-In-Time, Lifecycle, 360 Feedback
To support broader visibility into action planning activity, leaders (managers of managers) can now access aggregate action planning metrics for the employees and teams in their data view. This enhancement helps organizations give leaders the insight they need while maintaining alignment with existing data access settings.
What’s New
Leaders with access to Act Metrics can now view and download aggregate action planning data for the employees included in their configured data view. This includes:
Visibility into the number of employees included in the user’s Act Metrics view for a selected listening event
The ability to download aggregate action planning metrics, scoped to the same population
Note: This update applies to action planning data only. It does not include access to nudge or AI coaching engagement data.
How it Works
Data shown in Act Metrics is automatically scoped to match the user’s data access settings in Advanced Reporting.
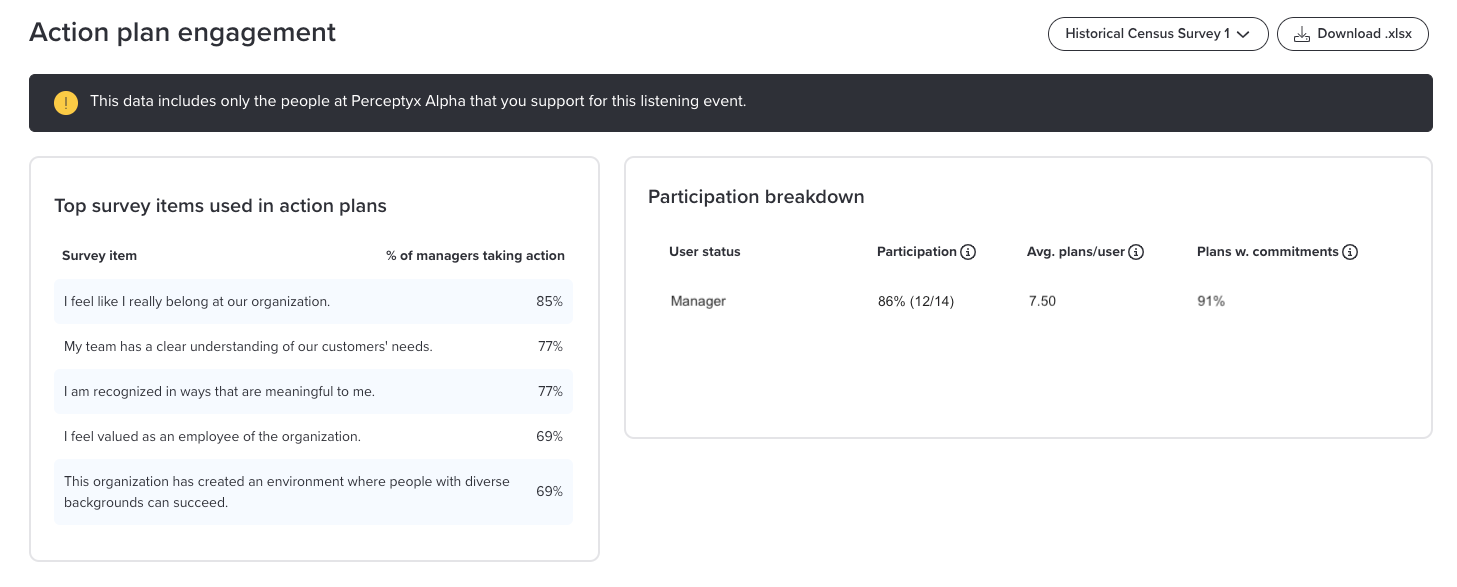
The Participation Breakdown section shows the percentage and number of employees who have participated in action planning, the average number of action plans per employee, and the percentage of action plans with commitments.
Users can download aggregate metrics as a spreadsheet. The data in the download matches the same employee population shown in the interface.
For more details and step-by-step instructions, see the Activate Overview Knowledge Base article.
User Roles: Platform Admin
Required Subscription(s): Point-In-Time, Lifecycle
The new Group-Based Access and Permissions feature gives Platform Administrators a streamlined way to manage who can access the Listening Event Builder and what they can do within it. Instead of configuring roles user-by-user, you can now assign access through reusable permission groups.
Note: This feature applies only to Event Administrator and Event Creator roles for Point-in-Time and Lifecycle events. It does not apply to 360 or Crowdsource events.
What’s New
A new Groups and Permissions section in the Admin Portal
Two types of groups:
Protected groups with fixed permissions (Event Admin, Event Creator)
Custom groups with configurable population access and limited permission options
Options to assign users, clone groups, and archive unused ones
How it Works
From the Admin Portal, Platform Admins can view and manage two types of permission groups:
Protected Groups
These are pre-configured for Event Administrators and Event Creators based on Perceptyx best practices. Their permissions cannot be edited, but Platform Admins can freely assign/edit users for the group.
Custom Groups
Custom groups offer more flexibility. Platform Admins can define:
Permissions - Based on either the Event Admin or Event Creator role. Most permissions are fixed, but if you choose the Event Creator role, you can optionally enable/disable:
Adding questions to the Item Library
Launching events without approval
Population Access - Controls which employees users in the group can invite to events. This can be filtered using current HR data, including demographics and organizational hierarchy.
User Assignments - Admins can assign users to groups individually or by applying the same demographic or hierarchy filters.
Custom groups are created using a five-step workflow that walks admins through naming the group, choosing the permission base (Admin or Creator), setting population access, assigning users, and reviewing before publishing.

Admins can also clone existing groups to reuse structure or archive groups that are no longer needed.
Note: If your organization previously used role-based permissions, users are automatically added to the corresponding protected group.
For more details and step-by-step instructions, see the Manage Group-Based Access and Permissions | Point-In-Time & Lifecycle Knowledge Base article.
Questions?
If you have questions about the Perceptyx Platform functionality or the latest updates, please reach out to the Customer Care Team or your Customer Success Manager.
Was this article helpful?
That’s Great!
Thank you for your feedback
Sorry! We couldn't be helpful
Thank you for your feedback
Feedback sent
We appreciate your effort and will try to fix the article