Listen
Your questions are the heart of an event, but they are not the only thing participants see. These are the pages around them: how people get in, what they read first, and the message they get when they are done.
This article covers Point-In-Time and Lifecycle events. Once you have created your event and filled in the Overview page, you move on to the Content phase. That is where you turn on the pages you want and write what they say. Every page is optional except the Thank You page, which every event has.
Working on your questions instead? Those have their own steps in Add and Manage Questions | Point-In-Time & Lifecycle.
This article walks through
Get to Your Event Pages
Your event pages all live in the Content phase of the Event Builder. Each page has its own tab across the top of the Content page, next to the Questions tab. There are two ways in.
From inside the Event Builder
- In the left panel, click Content.
From the Listen page
- In the navigation bar, click Listen.
- Find your event and click Manage Event. The event opens as a draft on the Overview page.
- In the left panel, click Content.

Good to know
Almost everything on these tabs saves automatically as you type, so there is no save button to hunt for. The one exception is the window you use to add a demographic question, which has its own Save button.
PIN Page
A PIN page lets people join your event without an email invitation. Instead of clicking a personal link, participants go to one shared link and sign in with a personal identification number, or PIN. That can be their email address, their employee ID, or, if your organization has one set up, a custom PIN such as a badge number or worker ID.
This is a great fit for people who do not have a company email address or cannot easily check email at work, like frontline and deskless teams. It also works well when you would rather share the event through your own channels, such as posters, team huddles, or your intranet. Using an identifier people already know makes signing in quicker and easier.
When you use a PIN page, the platform creates one shared link and a QR code, a square barcode people can scan with their phone camera. You get both when you reach the Launch phase.
Decide on the PIN page early
Make your PIN page decision at the start of the Content phase. If you turn it on after you have added participants in the Invite phase, your participant file and invite selections are cleared, along with any conditional logic that relies on demographics from that file, and you will need to set them up again.
About custom PINs
A custom PIN is set up once for your whole organization with help from Perceptyx, usually during onboarding, and each organization can have only one. You cannot pick a different field while building an event. If you do not see a custom option and would like one, reach out to your Workforce Transformation Consultant.
Add the PIN page
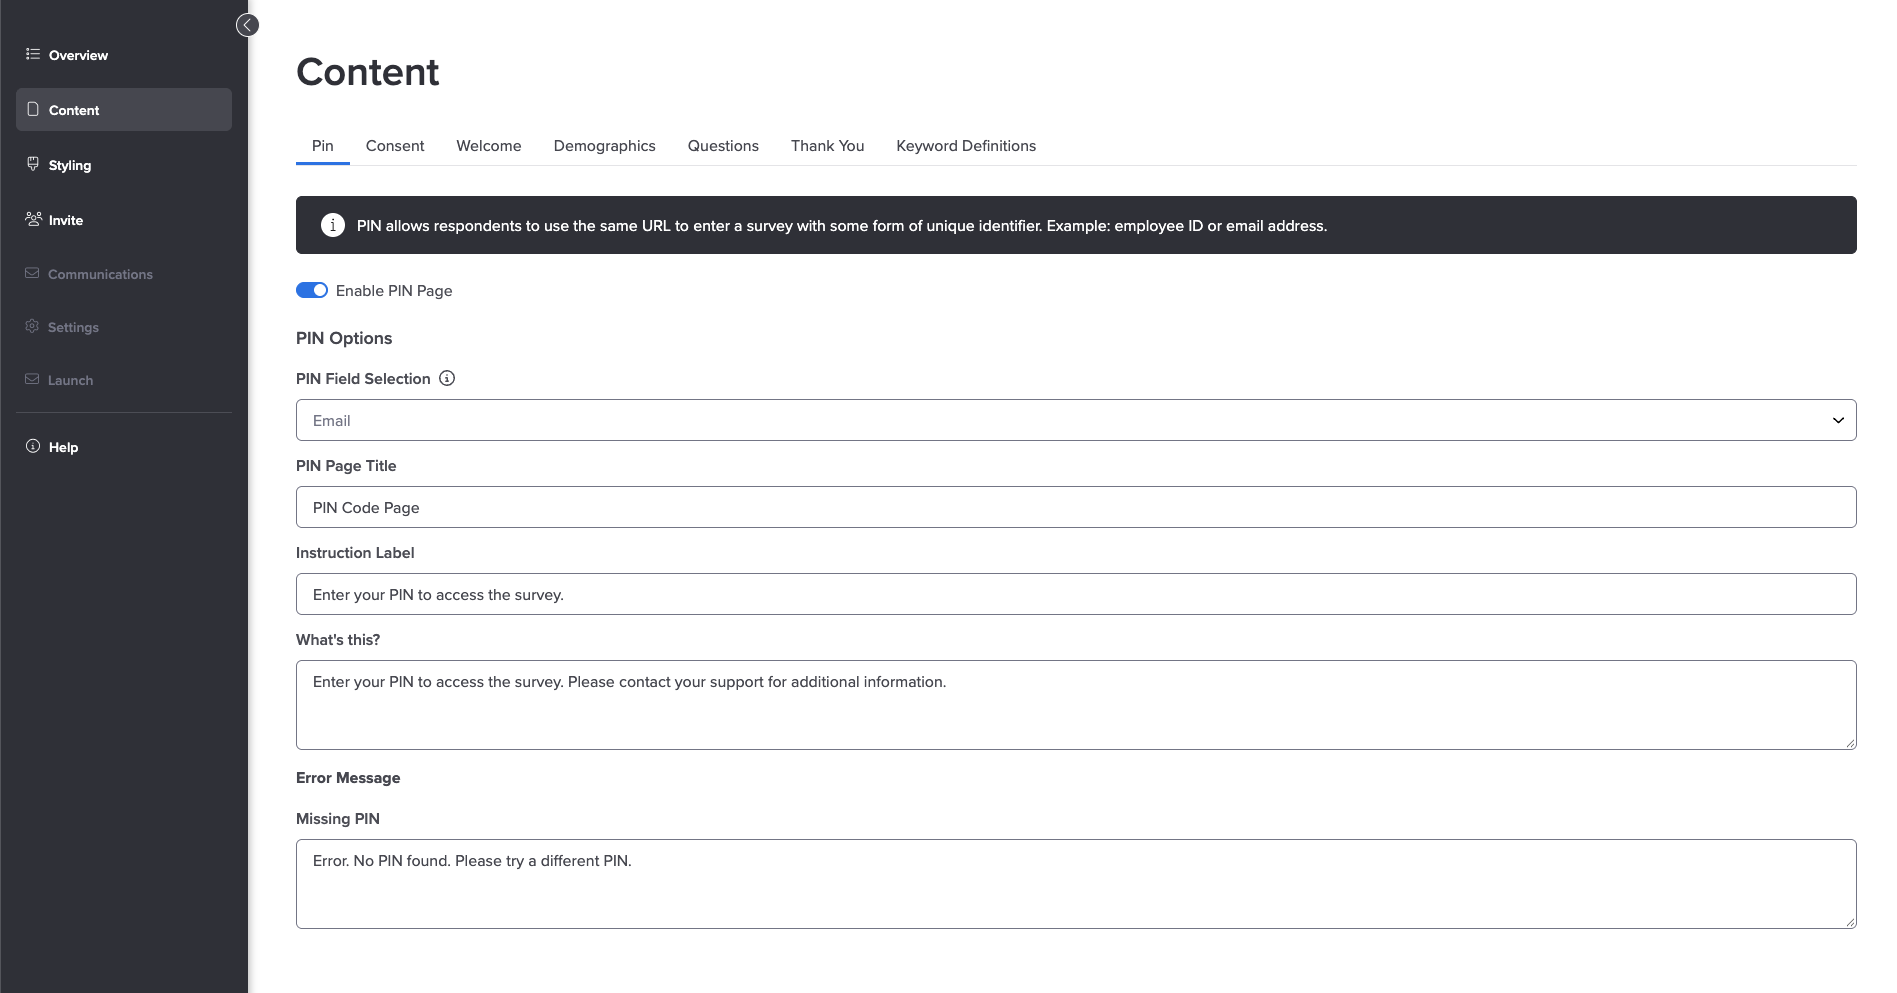
- In the Content page, click the Pin tab.
- Turn on the Enable PIN Page toggle. The PIN page options open up.
- Click the PIN Field Selection dropdown and choose what participants will sign in with: Email, Employee ID, or your organization's custom PIN, if you have one.
- Edit the text on the page, or keep the default wording:
- Page Title. The heading at the top of the PIN page. This one is required and has a 100 character limit. It starts out with default text you can keep or replace.
- Instruction Label. The instructions participants see on the PIN page.
- What's This. The help text participants see when they click the What's This? icon next to the PIN field.
- Missing PIN. The error message participants see if they try to start without entering their PIN.
Consent Page
If you want participants to agree before they take part, add a consent question. Participants see your consent text with a Yes option and a No option. If they choose Yes, they carry on into the event. If they choose No, they do not continue.
Consent always appears on the Welcome page, at the bottom, below your welcome message. That is why turning on consent turns on the Welcome page too, and why the Welcome page stays on for as long as consent is on.
How No answers are counted
Participants who choose No are included in your response count. They are not included in your completed count or in the minimum number of responses a group needs before its results can be reported.
Add the Consent page
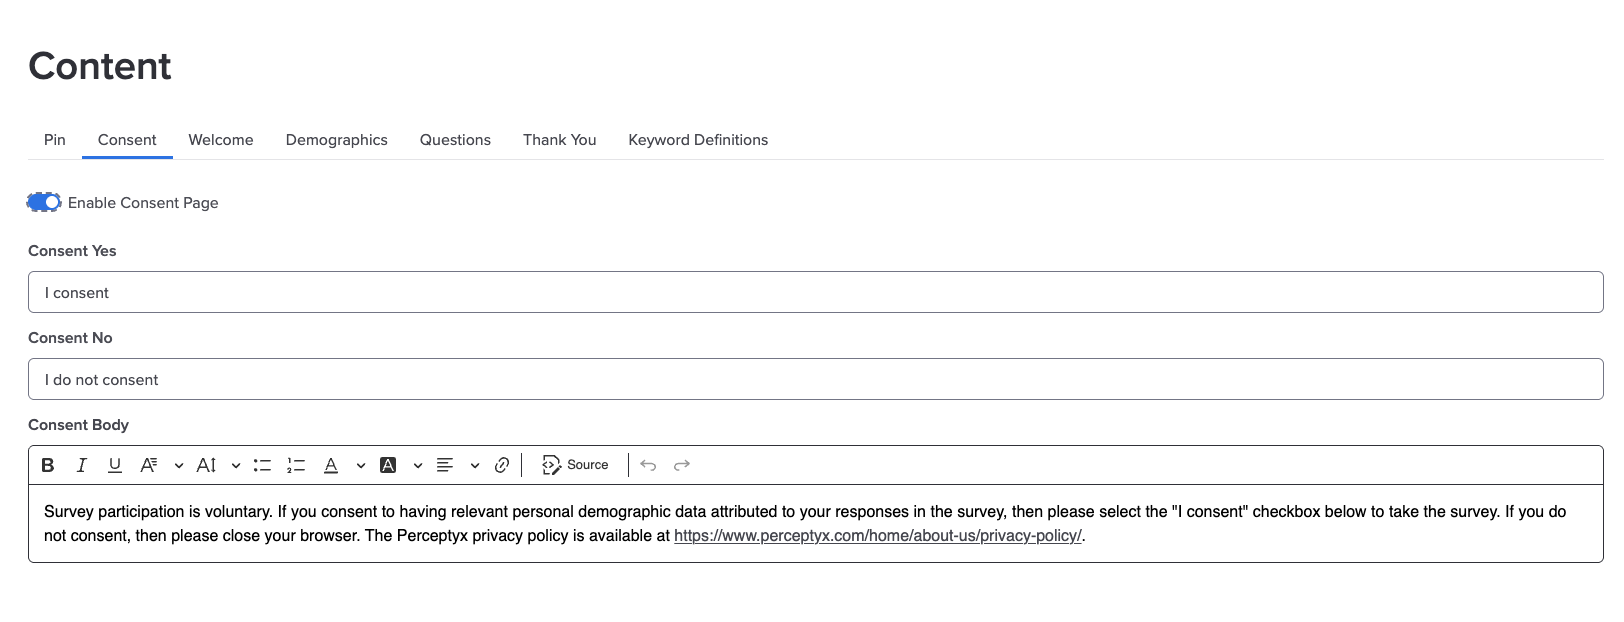
- In the Content page, click the Consent tab.
- Turn on the Enable Consent Page toggle. The consent options open up, and the Welcome page is turned on for you.
- Edit the consent text, or keep the default wording. The formatting toolbar lets you add things like bold text, lists, and links.
- Consent Yes. The label for the option that lets participants continue.
- Consent No. The label for the option participants choose if they do not consent.
- Consent Body. The text that explains what participants are agreeing to.
Read the default text before you launch
The default consent wording is a starting point. Read it through and make sure it matches your organization's own privacy policy and the way your participants will actually respond.
Welcome Page
The Welcome page is the first thing participants read. Use it to explain what the event is about, why you are running it, and anything else people should know before they start. If you are using consent, the consent text and options appear at the bottom of this page.
Add the Welcome page
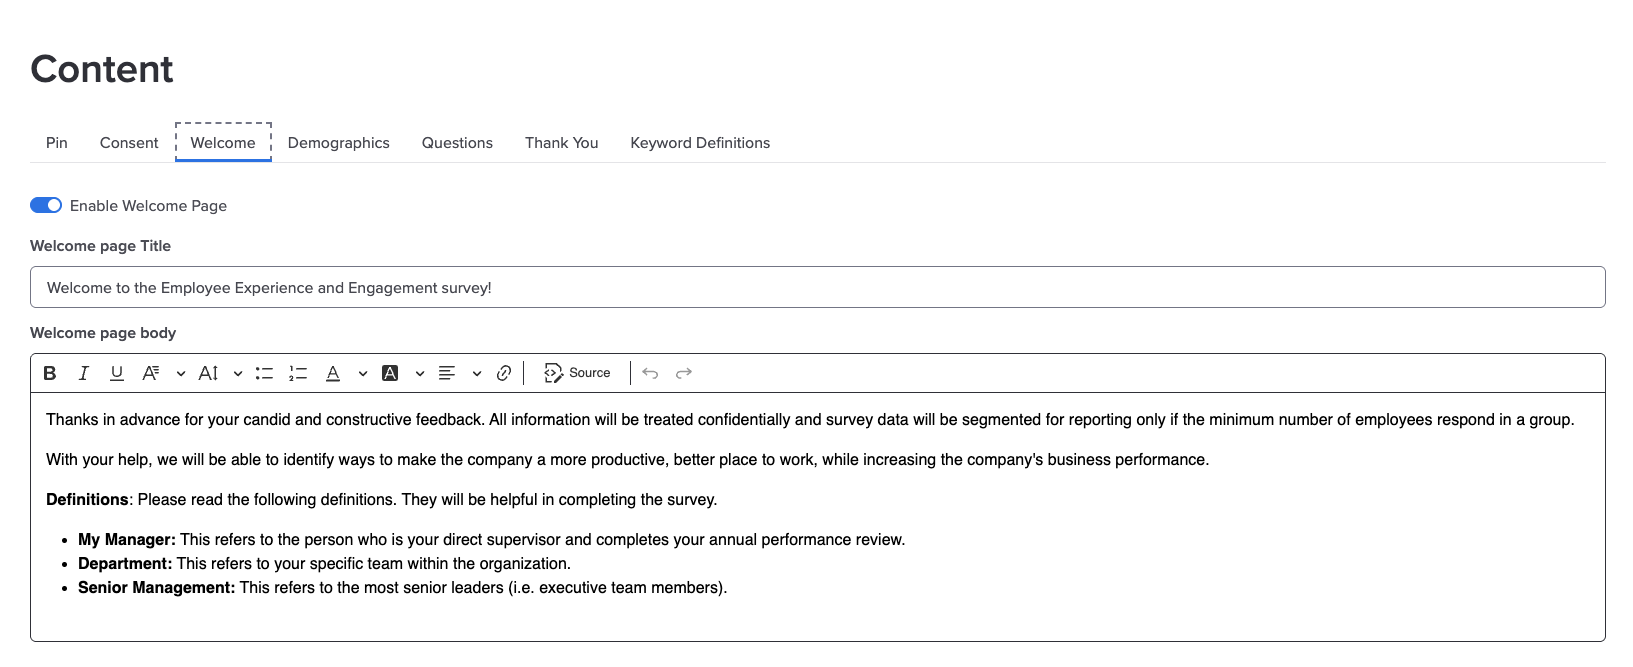
- In the Content page, click the Welcome tab.
- Turn on the Enable Welcome Page toggle. If you have already turned on consent, it is on already.
- Edit the welcome text, or keep the default wording. The formatting toolbar lets you add things like bold text, lists, and links.
- Welcome page Title. The heading at the top of the page.
- Welcome page body. Your welcome message.
Demographics Page
The Demographics page lets you ask participants about themselves, like how long they have worked at your organization. These are called self-select demographic questions, and they are useful for collecting details that are not already in your organization's participant data file. Each one becomes a filter you can use in your event reports.
You can start from a preset, which is a ready-made question with its answer options already filled in, or write your own. You also choose whether the questions come at the start or the end of your event, and whether participants have to answer them.
Turn on the Demographics page
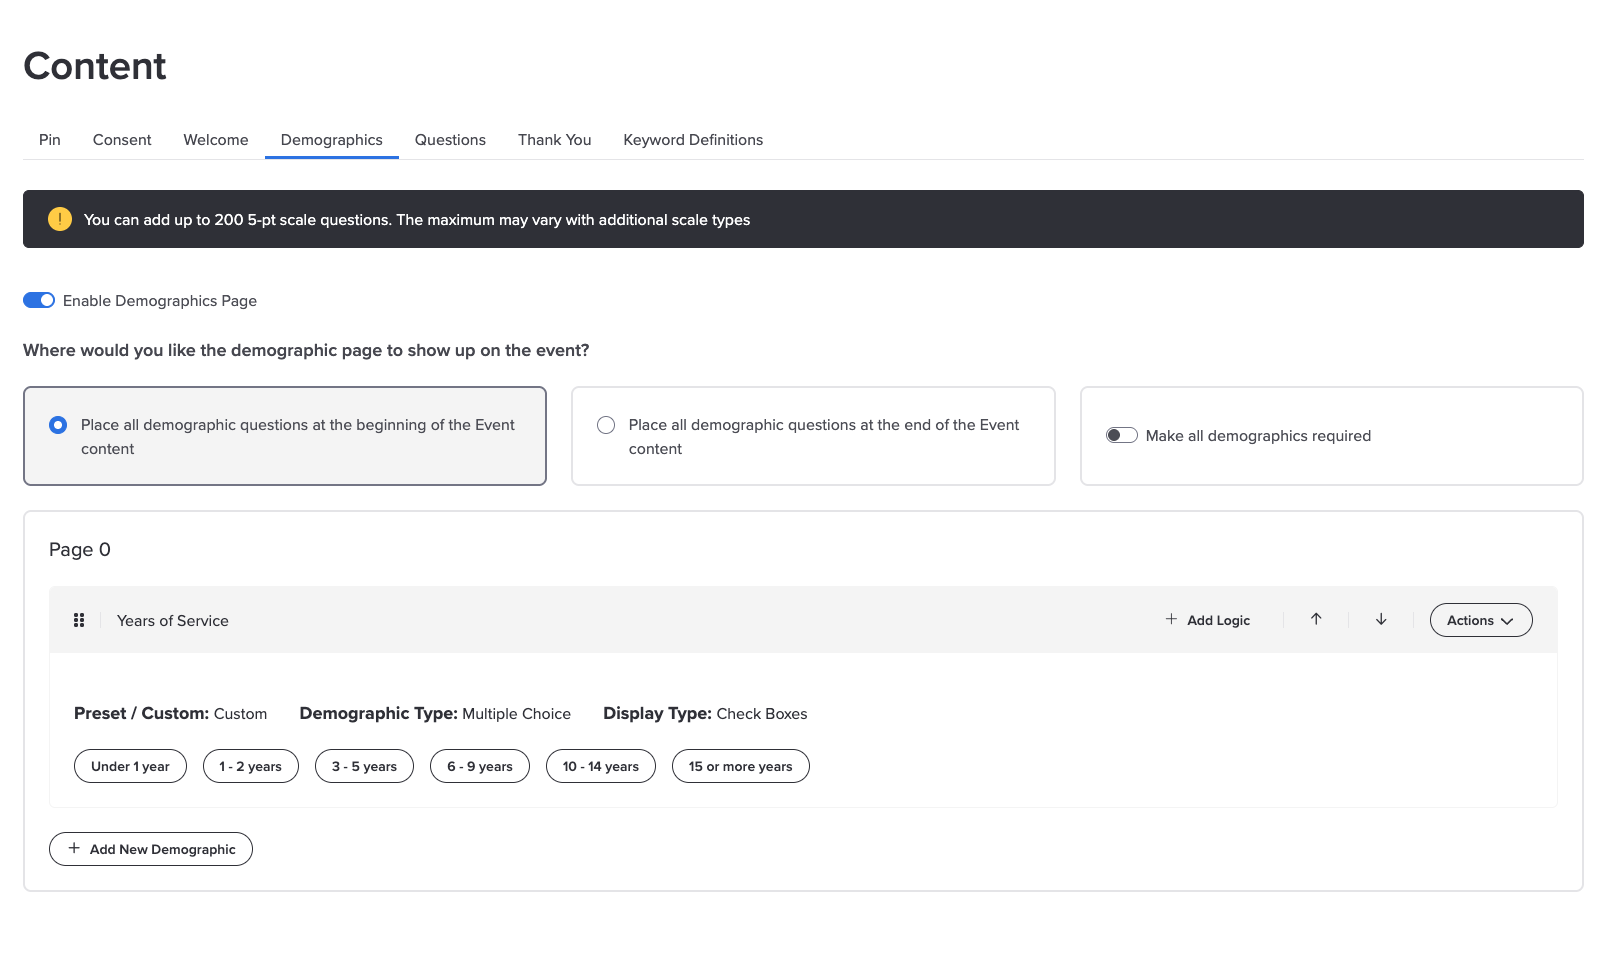
- In the Content page, click the Demographics tab.
- Turn on the Enable Demographics Page toggle.
- Choose where the questions appear: Place all demographic questions at the beginning of the Event content or Place all demographic questions at the end of the Event content.
- If you want participants to answer every demographic question before they can move on, turn on the Make all demographics required toggle.
Required is all or nothing
The Make all demographics required toggle covers every demographic question in the event at once. Either all of them are required or none of them are. There is no way to make just some of them required.
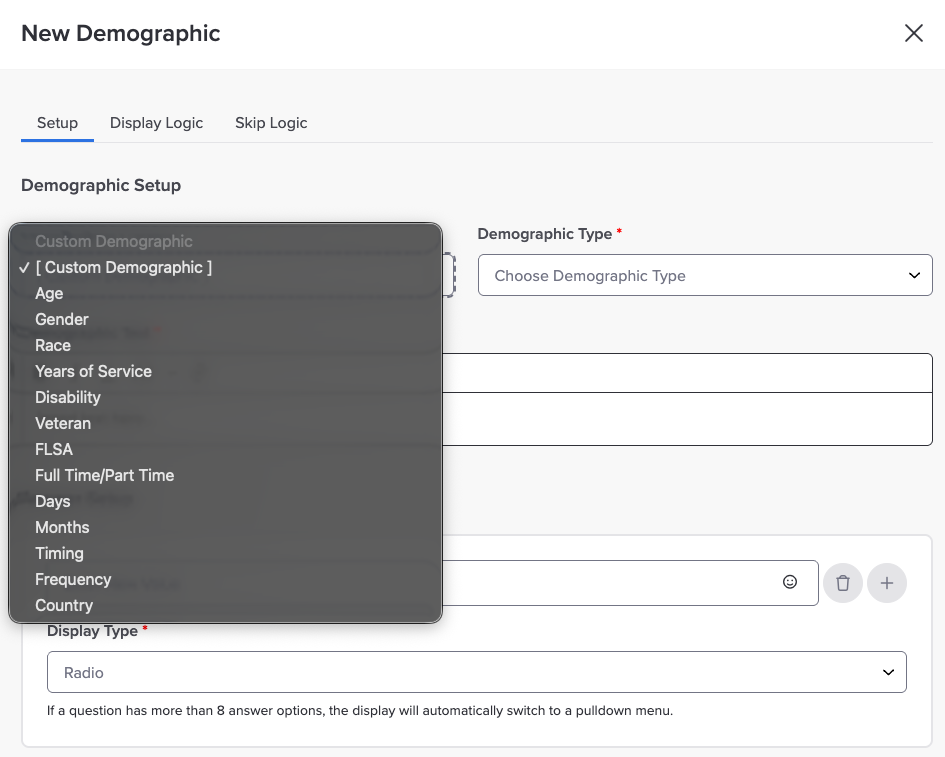
Perceptyx provides these presets:
- Age
- Gender
- Race
- Years of Service
- Disability
- Veteran
- FLSA, short for the Fair Labor Standards Act
- Full Time/Part Time
- Days
- Months
- Timing
- Frequency
- Country
Every preset comes with its question text and answer options already written, and you can change any of it. You can also format the question text or add a link to something helpful, like an org chart that helps people work out which division they are in. Links open in a new browser window for participants.
- In the Content page, click the Demographics tab, then click + Add New Demographic. The New Demographic window opens.
- Click the Demographic Presets dropdown and choose a preset. The question type, question text, answer options, and display type fill in for you.
- Change the question in the Demographic Text box if you need to. Use the formatting bar for simple formatting. To add a link, click the link icon, type or paste the web address, then press Enter or click the checkmark.
- Change the answer options under Answer Setup if you need to:
- To edit an option, click it and change the text. Click the smiley face icon to add an emoji, or the trash can icon to remove the option. Click the plus sign icon to save your change.
- To move an option, click and hold the six-dot handle next to it and drag it where you want it.
- To add an option, click the Enter New Value box at the bottom of the list, type the option, then click the plus sign icon.
- Choose how the answers look in the Display Type dropdown. Radio shows each answer as its own button, and Pulldown shows them in a dropdown list. If a question has more than eight answer options, it switches to a pulldown automatically.
- Click Save. Your question and its answer options appear on the Demographics tab.
Add your own demographic
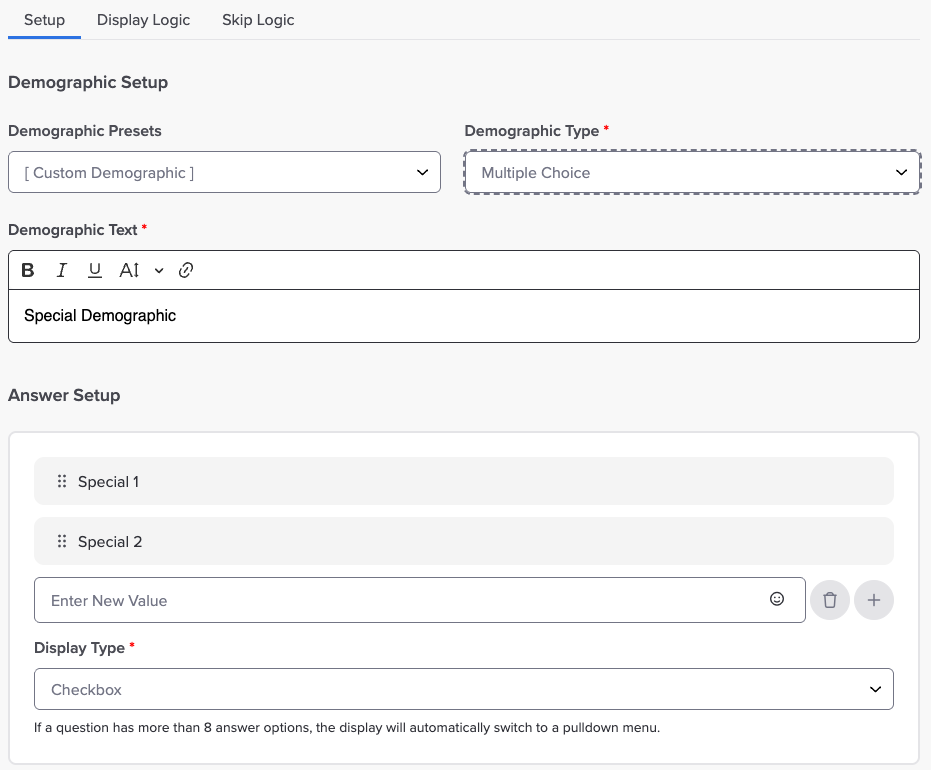
- In the Content page, click the Demographics tab, then click + Add New Demographic. The New Demographic window opens.
- Leave the Demographic Presets dropdown set to [ Custom Demographic ].
- Click the Demographic Type dropdown and choose Single Selection if participants can pick one answer, or Multiple Choice if they can pick more than one.
- Type your question in the Demographic Text box. Use the formatting bar for simple formatting or to add a link.
- Under Answer Setup, click the Enter New Value box, type your first answer option, then click the plus sign icon or press Enter. Repeat for each option.
- Choose how the answers look in the Display Type dropdown. For Single Selection questions, pick Radio or Pulldown. For Multiple Choice questions, pick Checkbox or Pulldown. If a question has more than eight answer options, it switches to a pulldown automatically.
- Click Save. Your question and its answer options appear on the Demographics tab.
Show questions to the right people
The Display Logic and Skip Logic tabs in the New Demographic window let you control who sees a question and where people go next based on their answers. Display logic needs your participants added first. See Apply Conditional Logic to Event Content | Point-In-Time & Lifecycle for the details.
Manage your demographic questions
Each question on the Demographics tab has a + Add Logic button, up and down arrows for moving it, and an Actions dropdown. Make your changes before you launch the event.
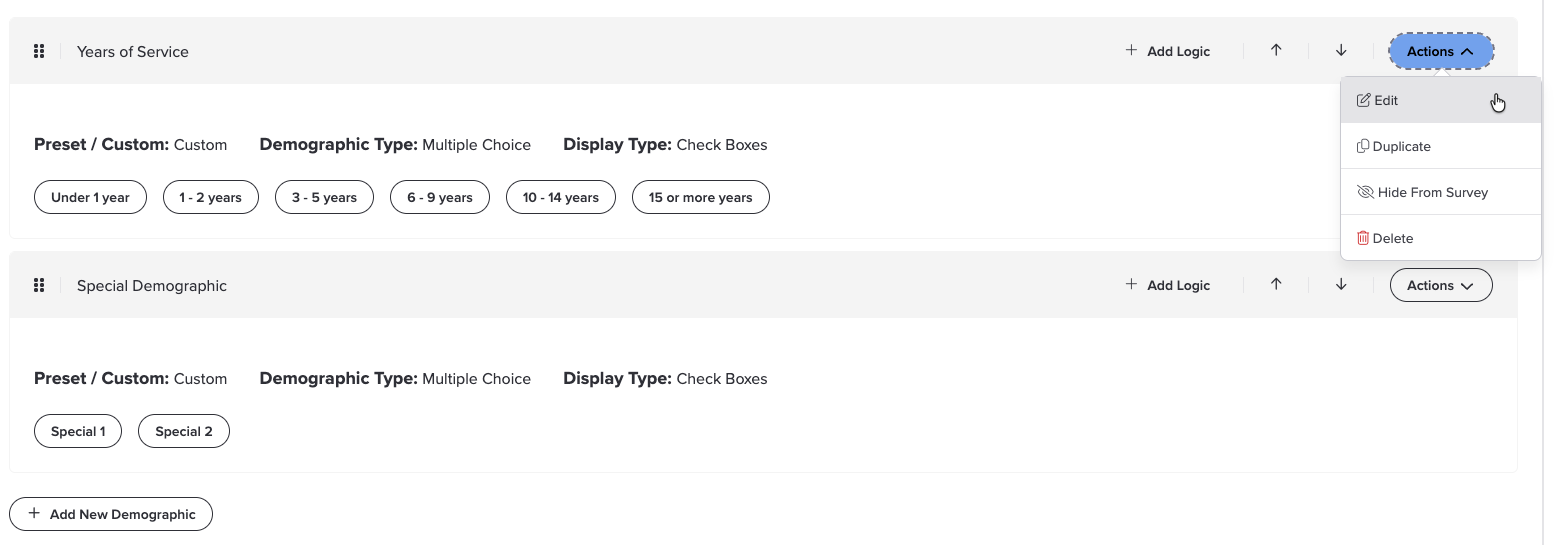
- To edit a question, click Actions, then Edit. Make your changes in the Edit Demographic window, then click Save. You can change everything except which preset the question started from.
- To duplicate a question, click Actions, then Duplicate, and click Duplicate again to confirm. A copy is added to the event, ready for you to edit.
- To delete a question, click Actions, then Delete, and click Remove to confirm.
- To hide a question without deleting it, use Hide From Survey. This is mostly used once an event is live, so it is covered in Manage Your Live Listening Event | Point-In-Time & Lifecycle.
Thank You Page
Every event ends with a Thank You page, which participants see after they click Submit. It is always included, so there is no toggle to turn it on, but you can change what it says.
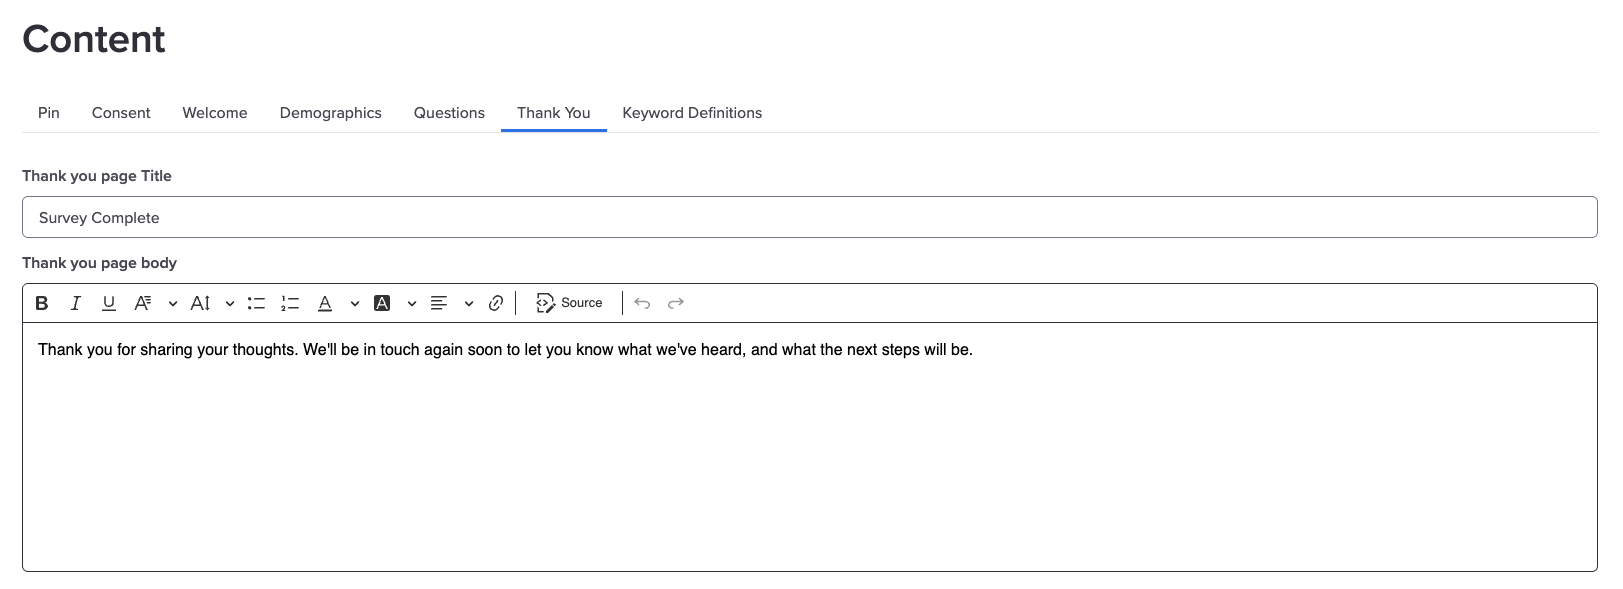
- In the Content page, click the Thank You tab.
- Edit the text, or keep the default wording:
- Thank you page Title. The heading at the top of the page.
- Thank you page body. The main message.
Make it count
The Thank You page is a nice place to tell people what happens next, like when they can expect to hear about the results. It is a small thing that helps people trust that their feedback goes somewhere.
Keyword Definitions Page
Keyword definitions help everyone read your questions the same way. You add a word or phrase along with what it means, and when it appears in a question, participants can hover over it to see your definition in a pop-up. For example, you might define "manager" as the person you report to.
You can add up to 25 keywords to an event, and you can add, edit, or remove them while the event is a draft.
How keywords are matched
Matching is not case sensitive, so "Manager" and "manager" are treated the same. If one keyword sits inside another, like "manager" and "direct manager," the longer phrase wins. Keywords also have their own styling, which may override formatting like underlines or colors that you have applied to that text.
Add a keyword
- In the Content page, click the Keyword Definitions tab.
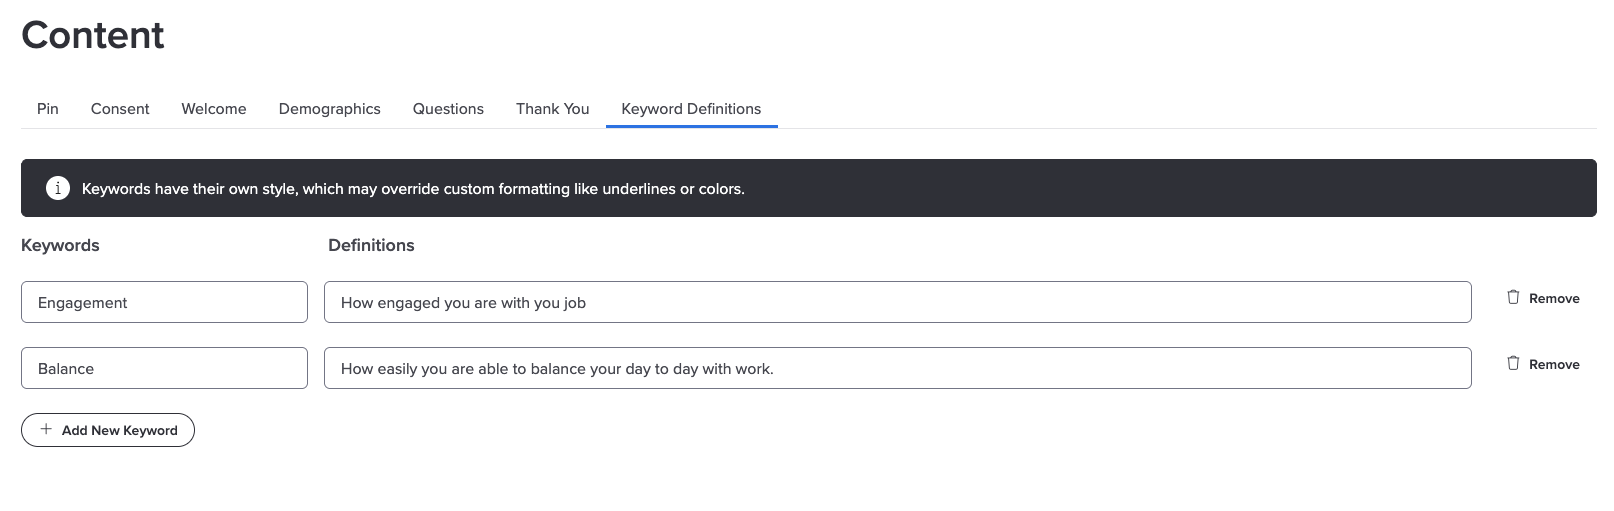
- Click + Add New Keyword. A new row appears with a box under Keywords, a box under Definitions, and a Remove option.
- Type the word or phrase in the Keywords box, then type what it means in the Definitions box.
- Repeat for any other keywords you want to add. Your keywords save automatically.
Edit a keyword or definition
Click in the Keywords or Definitions box you want to change, type your new text, then click anywhere outside the box. Your change saves automatically.
Remove a keyword
- Find the keyword you want to remove and click Remove to the right of it. A confirmation message appears.
- Click Confirm. The keyword and its definition are removed.
What's next
Your pages are set. Next up is the part participants spend the most time on. Add and Manage Questions | Point-In-Time & Lifecycle walks through adding, editing, and organizing the questions in your event.
Was this article helpful?
That’s Great!
Thank you for your feedback
Sorry! We couldn't be helpful
Thank you for your feedback
Feedback sent
We appreciate your effort and will try to fix the article