After you create and customize a survey and build out the survey content, you can edit the survey and work with configuration settings, which you access using the gear icon for the survey. These settings are available to all Admin users and to Creator users for the surveys they create. You can also duplicate or delete your survey.
This article walks through:

Edit Your Survey
You can edit your survey at any point before it closes. The survey status determines how much you can change.
Draft Status:
You can change all aspects of the survey (e.g., questions, responses, demographics, etc.).Live Status:
You can make only limited changes (edit existing question text, logos, and colors). You cannot add or delete questions or responses. For more information, see Managing Your Live Surveys.
Edit a Draft Survey
Navigate to the My Surveys page.
From the Surveys page:Click +Build New Survey.
Click the Ask icon (left menu) and select My Surveys.
From the Program Builder:
Click the Ask icon (left menu) and select My Surveys.
Click the pencil icon for the survey you want to edit.
Note: You can also click the gear icon, then select Edit Survey.
Click into the appropriate survey phase and make your changes.

Configure Your Survey Settings
You use the Survey Settings dialog box to specify general settings and activate or deactivate demographic questions for an individual survey.
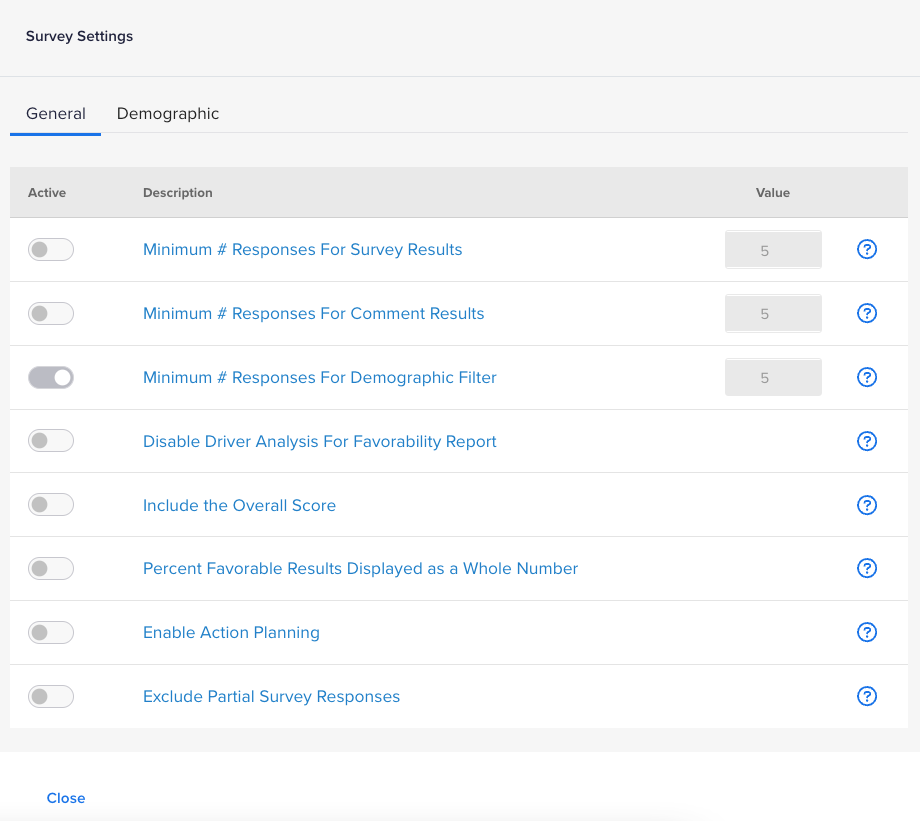
On the General tab, you can specify miscellaneous settings per survey. On the Demographic tab, you can activate or deactivate demographic questions (if applicable) per survey.
The following settings are available on the General tab. Minimum responses include all respondents (any participant who answers a minimum of one question) and completion (any participant who submits a completed survey).
Minimum # Responses for Survey Results:
When active, this setting specifies the minimum number of responses per question that is required to see results. If an Admin sets the threshold at the overall level, this setting is locked (grayed out), and you cannot change it.Minimum # Responses for Comment Results:
When active, this setting specifies the minimum number of comments required to show a given comment question in the Comments Report. (For example, if set to 10, users see comments only for questions that have at least 10 comments in their view/filter.) If an Admin sets the threshold at the overall level, this setting is locked (grayed out), and you cannot change it.Minimum # Responses for Demographic Filter:
When active, this setting specifies the minimum number of responses required to show a given demographic question in demographic reports. This setting applies to all surveys.Disable Driver Analysis for Favorability Report:
When active, a user cannot run driver analysis for each question/category in the Favorability report.Include the Overall Score:
When active, the Overall Average score displays at the bottom of all reports.Percent Favorable Results Displayed as a Whole Number:
When active, all reporting percentage values display as whole numbers without decimals.Enable Action Planning:
When active the action planning tool is available on the reporting site.Exclude Partial Survey Responses:
When active, only responses for submitted surveys are included in reporting. All partial responses (where the participant did NOT click Submit) are excluded from reporting.
Set Survey Settings
Navigate to the My Surveys page.
From the Surveys page:Click +Build New Survey.
Click the Ask icon (left menu) and select My Surveys.
From the Program Builder:
Click the Ask icon (left menu) and select My Surveys.
Click the gear icon for the survey you want to work with, then select Survey Settings.
The Survey Settings dialog box appears.
Click to toggle settings on or off. To change a minimum threshold, type a new number in the Value box for the setting.
To set demographic settings (if applicable), click the Demographic tab, then turn the Active toggle for each question on or off, as appropriate.
Click Close.

Duplicate Your Survey
Duplication is a great option if you want to run the same/similar survey, or if you want to test a survey and then duplicate once you are ready to launch.
Navigate to the My Surveys page.
From the Surveys page:Click +Build New Survey.
Click the Ask icon (left menu) and select My Surveys.
From the Program Builder:
Click the Ask icon (left menu) and select My Surveys.
Click the gear icon for the survey you want to copy, then select Duplicate Survey.
The Clone Survey from (Survey Name) dialog box appears, prompting you for an appID.
Enter an appID, then click Clone.
The entire survey is copied, except for the appID and data file.

Delete Your Survey
The Delete option is available only for surveys with a Draft or Closed status.
Navigate to the My Surveys page.
From the Surveys page:Click +Build New Survey.
Click the Ask icon (left menu) and select My Surveys.
From the Program Builder:
Click the Ask icon (left menu) and select My Surveys.
Click the gear icon for the survey you want to delete, then select Delete.
A confirmation box appears.
Note: There is no way to retrieve a survey once it has been deleted.
Click Confirm.
Was this article helpful?
That’s Great!
Thank you for your feedback
Sorry! We couldn't be helpful
Thank you for your feedback
Feedback sent
We appreciate your effort and will try to fix the article